
In this tutorial, we will be building a React Native application to accept payments from users by integrating Razorpay in our application. We will also build a Node.js (Express) server to handle sensitive information and processes that should not be exposed or handled from the mobile application.
Razorpay
Founded in 2014, Razorpay is a payment gateway service. Razorpay enables you to access payment modes like credit and debit cards, UPI, and popular mobile wallets. These payment options can be implemented in your app.
Therefore, if you are building an application that targets an Indian audience and requires a payment gateway, Razorpay is the preferred choice.
If you'd like to learn more about Razorpay, read this blog post.
Goals
By the end of this tutorial, you'll know:
The steps required to initiate and complete a Razorpay transaction.
How to create a Razorpay order from a Node.js server.
How to integrate Razorpay checkout to a React Native app.
How to verify Razorpay payments.
Prerequisites
In this tutorial, we'll be working on the application and the server. The application will be built using React Native, and the server will be built using Node.js and Express.
If you are not comfortable with these technologies, refer to these articles below before proceeding with this project.
You should also deploy the server to use it from the app. You can deploy your server in DigitalOcean or other alternatives.
Here is an article on how to deploy a Node.js app on DigitalOcean.
Overview
We'll be going through these steps in this article:
- Creating a Razorpay account.
- Development environment.
- Cloning the starter code.
- Installing dependencies.
- Creating a Razorpay Order.
- Adding the Razorpay Checkout.
- Verifying Transaction.
- Payment Capture.
- Payments Log.
- Recap.
Creating a Razorpay account
Head to the Razorpay website and create an account. You can reach the signup page from here.

Once you've signed up with all the necessary information, you'll see the dashboard.

Scroll down the navigation bar and select Settings.

In the Settings tab, you'll see a section called API keys. Enter that section and click on the Generate Test Key button.

The website will display a modal with the Test API Key and a Secret Key. We'll need the keys in our app and our server.
The secret key will be displayed only once and you won't be able to find it again, so make a copy of it now. The Test API Key and the Secret key must be kept safe.

Development environment
IMPORTANT - We will not be using Expo in our project. This is because the Razorpay checkout is a wrapper around the native SDK, so it doesn't work with Expo which doesn't support native modules.
You can follow this documentation to set up the non-expo environment.
Make sure you're following the React Native CLI Quickstart, not the Expo CLI Quickstart.
Cloning the starter code
To focus more on the Razorpay Transactions, I've prepared a starter code. You can clone it from this repository on GitHub. Follow the Repository's README for instructions.
If you'd like to take a look at the final code, please refer to this GitHub Repository.
I've set up a checkout screen in the starter code that will fetch random products from fakestoreapi.com.
Checkout Screen:

Installing dependencies
You can install these dependencies in advance or while going through the article.
"axios": "^0.21.0",
"react": "16.13.1",
"react-native": "0.63.4",
"react-native-razorpay": "^2.2.1"
To install a dependency, run:
npm i --save <package-name>
After installing the packages, for iOS, go into your ios/ directory, and run:
pod install
IMPORTANT FOR ANDROID
As you add more native dependencies to your project, it may bump you over the 64K method limit on the Android build system. Once you reach this limit, you will start to see the following error while building your Android application.
Execution failed for task ':app:mergeDexDebug'.Use this documentation to enable multidexing.
To learn more about multidex, view the official Android documentation.
Razorpay payment process
There are four steps in the Razorpay payment process.
- Creating an order.
- Checkout.
- Verifying Transaction.
- Payment Capture.
Here is a diagram to represent the payment flow.

Image Source: Razorpay official documentation
STEP 1: Creating an order
Every payment can be associated with an order to help prevent multiple payments. Once payment is captured, the order will be marked as paid.
You can learn more about orders here.
Server side
Razorpay provides a node package to work with it's APIs. Working with their APIs require the API Key and the Secret Key.
It's not a good idea to expose these keys in the app, so we will write a server and make our app request this server to create an order.
Let's start with building the server.
You'll need Node.js to set up an Express server. You can download Node.js from here.
To test the server, I'll be using Postman to make requests to this server. You can download it from here.
Let's install Express using NPM.
npm install express
We can now import express in our code to create a simple server module that'll listen on port 3000.
const express = require("express");
const app = express();
app.use(express.json());

app.get("/", (req, res) => res.send("Razorpay Server"));

const port = process.env.PORT || 3000;
app.listen(port, () => console.log(`Razorpay Server listening at Port ${port}`));
You can start the server by running:
node index.js
This server will be listening on port 3000, and when you hit the '/' endpoint, it'll send "Razorpay Server".
Now that we have the server setup let's install the razorpay package.
npm install razorpay
Let's import razorpay into our code.
const Razorpay = require("razorpay");
After importing the package, the next step is to create an instance of Razorpay. To initialize the instance, we need the API key and the Secret Key. It's not a good idea to leave the keys in the code. A perfect option is to set environment variables and use them in the code.
If you'd like to learn more about environment variables, refer to this article.
const razorpay = new Razorpay({
  key_id: process.env.APIKEY,
  key_secret: process.env.SECRETKEY,
});
Let's add a POST request handler for a new endpoint called "/createOrder" to create an order and return the created order as the response.
app.post("/createOrder", (req, res) => {
  // Create an Order
});
When the app requests this endpoint, the server will request Razporpay's API to create an order.
The razorpay package provides a function to create an order. The amount and currency are mandatory details required to create an order. The app that requests this endpoint should provide these details in the request body.
The amount must be provided in the base denomination. For example, the amount must be in paisa for INR. 1 Rupee = 100 Paisa.
You can learn more about the create order API here.
Let's write the code to create an order.
app.post("/createOrder", async (req, res) => {
  const order = await razorpay.orders.create({
    amount: req.body.amount,
    currency: req.body.currency,
  });
  res.send(order);
});
Let's run this as a local server and test it with Postman.
Request Body:
{
  "amount": 50000,
  "currency": "INR"
}
Response:
{
  "id": "order_G99PhGAo41rsFB",
  "entity": "order",
  "amount": 50000,
  "amount_paid": 0,
  "amount_due": 50000,
  "currency": "INR",
  "receipt": null,
  "offer_id": null,
  "status": "created",
  "attempts": 0,
  "notes": [],
  "created_at": 1607125999
}

Now, deploy this server so that we can create an order from our app.
Client side
We need to request our server's /createOrder endpoint to create a Razorpay order from our app.
Let's write a function to request our server's endpoint. I'm using Axios to make requests from the app.
You can learn more about Axios here.
const createOrder = async () => {
  const { data } = await axios.post(
    'https://<-- Your Server URL Here -->/createOrder',
    {
      amount: product.price * 100,
      currency: 'INR',
    },
  );
  return data;
};
In the app's starter code, you'll find a function called onPay. This function will get called when the user presses the buy button.
Let's call the createOrder function from onPay.
const onPay = async () => {
  setPaymentProcessing(true);
  // Step 1: Create Order
  const order = await createOrder();

  setPaymentProcessing(false);
};
This will create an order, and we'll have the order ID. We need to pass this order ID to the checkout component in the next step, and we'll also need this to verify the transaction (if the transaction in the next step is successful).
Step 2: Checkout
Let's install react-native-razorpay in our app.
npm install react-native-razorpay
iOS
After the package is installed, cd into ios/ and run:
cd ios && pod install
Now, open Podfile to change the platform version from 9.0 to 10.0 in the Podfile.
To open Podfile, run:
$ open podfile
Android
We need to import the native package into android/app/src/main/java/com/[project name]/MainApplication.java.
import com.razorpay.rn.RazorpayPackage;
NOTE: If you are using React Native version
>=0.60, you should skip the step below. This is because versions greater than0.60have auto-linking.
Add new RazorpayPackage() to the list returned by the getPackages() method.
protected List<ReactPackage> getPackages() {
  @SuppressWarnings("UnnecessaryLocalVariable")
  List<ReactPackage> packages = new PackageList(this).getPackages();    // Packages that cannot be autolinked yet can be added here
  packages.add(new RazorpayPackage());
  return packages;
}
Append the following lines to the settings.gradle file.
include ':react-native-razorpay'
project(':react-native-razorpay').projectDir = new File(rootProject.projectDir,   '../node_modules/react-native-razorpay/android')
Add the following lines in the dependencies section of your app/build.gradle file.
implementation project(':react-native-razorpay')
The minimum target SDK for the React Native Razorpay is 19. If your project targets an SDK below 19, bump up the minSDK target in
android/build.gradle.
Let's import RazorpayCheckout in App.js.
import RazorpayCheckout from 'react-native-razorpay';
Next, we need to call the RazorpayCheckout.open method with the payment options. This method returns a JS Promise.
In the options, we need to pass the API Key, the Order ID, product details, and the UI's theme color. We can also pass user information to prefill the form.
Create a new file called config.js and add your API key to it, as shown below.
export const RazorpayApiKey = "<-- Your API Key here -->"
Do not forget to add
config.jsto.gitignoreif you are using a git repository.
import { RazorpayApiKey } from './config';

var options = {
  name: product.title,
  image: product.image,
  description: product.description,
  order_id: order.id,
  key: RazorpayApiKey,
  prefill: {
    email: 'useremail@example.com',
    contact: '9191919191',
    name: 'John Doe',
  },
  theme: { color: '#a29bfe' },
};
Now, let's call the RazorpayCheckout.open method and pass the options to it.
RazorpayCheckout.open(options)
  .then(console.log)
  .catch(console.log);
This will open the checkout form for the transaction with all the available payment methods.
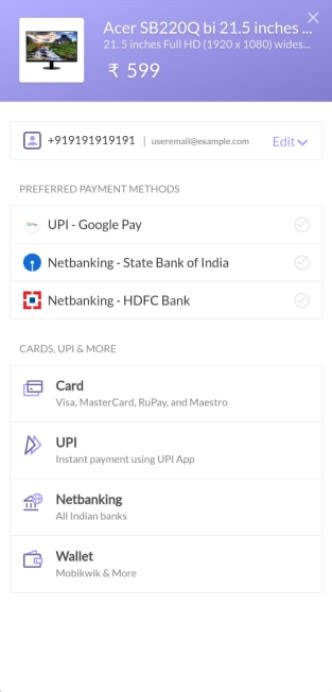
You can learn about the test card details here.
When you are working on test mode, you'll see an additional screen that'll let you simulate a successful and failed transaction.

When the transaction is successful, the transaction details are passed to the .then(). We need to verify the payment using the transaction details.
STEP 3: Verify the transaction
This step allows you to check the authenticity of the details returned from the checkout form for successful payments.
Server Side
We will add a new endpoint called /verifyPayment to verify the transaction on the server.
Let's add a POST request handler for a new endpoint called "/verifyPayment".
app.post('/verifyPayment', (req, res) => {
  // Verify Payment
});
To verify the razorpay_signature returned to you by the checkout form, we need to use the SHA256 algorithm to construct an HMAC hex digest of the razorpay_payment_id and the order_id and check if it's the same as the razorpay_signature returned from the checkout form.
Do not use the order ID returned from the checkout form to construct the signature. You must use the order ID that you passed to the checkout form to construct the signature.
app.post("/verifyPayment", (req, res) => {
  const { orderID, transaction } = req.body;

  const generatedSignature = crypto
    .createHmac("sha256", process.env.SECRETKEY)
    .update(`${orderID}|${transaction.razorpay_payment_id}`)
    .digest("hex");

  res.send({ validSignature: generatedSignature === transaction.razorpay_signature });
});
Client Side
Let's write a function to request the /validPayment endpoint of our server with the order ID and the transaction.
const verifyPayment = async (orderID, transaction) => {
  const { data } = await axios.post(
    'https://<-- Your Server URL Here -->/verifySignature',
    {
      orderID: orderID,
      transaction: transaction,
    },
  );
  return data.validSignature;
};
Let's call this in the .then() of the Razorpay checkout. Once the response from the /verifyPayment endpoint comes back, we'll display it in an alert modal.
RazorpayCheckout.open(options)
  .then(async (transaction) => {
    const validSignature = await verifyPayment(order.id, transaction);
    alert('Is Valid Payment: ' + validSignature);
  })
  .catch(console.log);

STEP 4: Payment capture
When a user makes a payment, it usually flows through the following states:
Created.
Authorized.
Captured.
Refunded.
Failed.
The following state diagram depicts the payment states:

Image Source: Razorpay official documentation
By default, once the user completes a payment, it is automatically moved to a captured state. However, the payment can remain in the authorized state in some scenarios.
You can learn more about Payment Capture here.
Payments Log
You can check the received payments in the Razorpay dashboard.

You can learn more about the Razorpay Dashboard and how to use it in this article.
Let's Recap
We set up our Razorpay Account.
We acquired the API key and the Secret key from the dashboard.
We cloned the starter code.
We created a server endpoint to create a Razorpay order.
We requested the endpoint from our app to create an order and got the order object as the response.
We installed the React Native Razorpay checkout package.
We passed the API key, order ID, product information, and user information to the checkout form.
We created a server endpoint to verify the authenticity of the transaction.
We requested the server endpoint from our app with the order ID and the transaction details.
We displayed whether the transaction was authentic to the user.
Congratulations, 🥳 You did it.
Thanks for reading!

Top comments (0)