
Check out the project here: 0xFloyd Portfolio
Source Code available at the bottom of the article.
EDIT 8/25/20 --> After many suggestions, updated the camera movement! Thanks everyone!
A 3D World with Three.js
Your portfolio website is likely the first place anyone is going to go after your resume, so it's important to make a good first impression! I spent part of my quarantine creating a new 3D interactive portfolio website using the Three.js and Ammo.js libraries.
With the entire country moving to remote work, the tech field is more than ever open to self taught developers. The hard part is standing out. How do you convey your passion and ability to potential employers?
While exploring Google Experiments, I discovered the amazing world of the 3D web. Many experiments were built using three.js, a library aimed at making it simple to create 3D graphics on a webpage. The library was created in 2010 by Ricardo Cabello (Mr.doob), and is currently the 38th most starred repository on Github with over 1,300 contributors. After being awestruck by the showcased projects, I knew what I wanted to learn next!
How does Three.js work?
Components of a Real-Time 3D app, taken from discoverthreejs.com
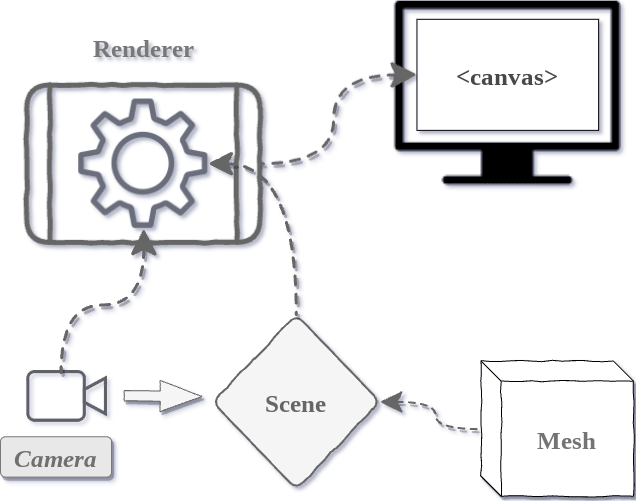
Three.js is used to easily display 3D graphics in the browser. It leverages WebGL under the hood, which is an API that connects your browser to your graphics card to draw on a web page canvas. WebGL on its own only draws points, lines, and triangles, so Three.js abstracts the WebGL details away to make it super easy to create objects, textures, 3D math, and more. With Three.js, you add all these objects to a "scene" that is then passed to a "renderer", which "draws" the scene on the HTML <canvas> element to be displayed on the webpage.

Structure of a Three.js app, taken from threejsfundamentals.org
At the core of a Three.js app is the scene object. Above is an example of a "scene graph". In a 3D engine, a scene graph is a data structure with a hierarchy of nodes, where each node represents a local space. This is how logic is arranged and the scene is spatially represented. This is similar to a DOM tree-type structure, but Three's scene functions like a virtual DOM (similar to React), and it only updates and renders what changes in the scene. The Three.js WebGLRenderer class is the magic behind the rendering, and takes your code and converts it to numbers in GPU memory for the browser to use.
Objects in the scene are called "Mesh", and mesh are composed of geometry, which describes how to draw the Mesh object, and material, which is what the mesh will "look like". These Mesh are then added to the scene. The last main element is the camera, which is where and how your scene is viewed on the canvas once rendered.
To compute animations, the renderer draws to the canvas every time the scene is refreshed (typically 60 times per second). Anything that changes in the scene needs to be updated during the render loop, using the browser requestAnimationFrame() method. The MDN docs explain how the browser updates this.
To get started, below is a simple example scene taken from the official three.js docs which creates a spinning 3D cube. The output can be seen here.
Example
<html>
  <head>
    <title>My first three.js app</title>
    <style>
      body {
        margin: 0;
      }
      canvas {
        display: block;
      }
    </style>
  </head>
  <body>
    <script src="js/three.js"></script>
    <script>
      //create new three.js scene and camera with dimensions of the user's window
      var scene = new THREE.Scene();
      var camera = new THREE.PerspectiveCamera(
        75,
        window.innerWidth / window.innerHeight,
        0.1,
        1000
      );

      //create new renderer, set size to the window size, and add it to the HMTL body
      var renderer = new THREE.WebGLRenderer();
      renderer.setSize(window.innerWidth, window.innerHeight);
      document.body.appendChild(renderer.domElement);

      //create a new Mesh, a green 3D cube, and add it to the scene
      var geometry = new THREE.BoxGeometry();
      var material = new THREE.MeshBasicMaterial({ color: 0x00ff00 });
      var cube = new THREE.Mesh(geometry, material);
      scene.add(cube);

      //set the camera position to correctly look at the scene
      camera.position.z = 5;

      //renderer animation loop to redraw the scene with the cube rotated every time
      var animate = function () {
        requestAnimationFrame(animate);

        cube.rotation.x += 0.01;
        cube.rotation.y += 0.01;

        renderer.render(scene, camera);
      };

      animate();
    </script>
  </body>
</html>
Physics with Ammo.js
Ammo.js is a physics engine that's a direct port of the Bullet physics engine to JavaScript, ported by Alon Zakai. I have a very minimal understanding of how a physics engine works under the hood, but basically a physics engine creates a continuous loop that simulates the laws of physics based on the parameters it is created with (like gravity), which are then used to compute motion and collision.
Objects, called "Rigid Bodies" are then added this loop, and these objects can have force, mass, inertia, friction, and more applied to them. The loop keeps track of collisions and interactions by constantly checking all object's positions, states, and movements. If interactions occur, object positions are updated based on the time elapsed and that object's physics. Below is a snippet from my code showing how the physics engine loop is created and how physics are added to a Three.js Mesh sphere object.
Ammo.js Sample Physics World Example
//Library imports
import * as THREE from "three";
import * as Ammo from "./builds/ammo";
import {scene} from "./resources/world";

//Initiate Ammo.js physics engine
Ammo().then((Ammo) => {

    //function to create physics world
    function createPhysicsWorld() {

        //algorithms for full collision detection
        let collisionConfiguration = new Ammo.btDefaultCollisionConfiguration();

        //dispatch calculations for overlapping pairs/ collisions.
        let dispatcher = new Ammo.btCollisionDispatcher(collisionConfiguration);

        //broadphase collision detection list of all possible colliding pairs
        let overlappingPairCache = new Ammo.btDbvtBroadphase();

        //causes the objects to interact properly, like gravity, forces, collisions
        let constraintSolver = new Ammo.btSequentialImpulseConstraintSolver();

        // create physics world from these parameters. See bullet physics docs for info
        let physicsWorld = new Ammo.btDiscreteDynamicsWorld(
            dispatcher,
            overlappingPairCache,
            constraintSolver,
            collisionConfiguration
        );

        // add gravity
        physicsWorld.setGravity(new Ammo.btVector3(0, -9.8, 0));
    }

    //function to create a solid ball object
    function createBall(){
        //Ball parameters
        let pos = {x: 0, y: 0, z: 0};
        let radius = 2;
        let quat = {x: 0, y: 0, z: 0, w: 1};
        let mass = 3;

        //three.js Section

        //Create ball and add to scene
        let ball = new THREE.Mesh(new THREE.SphereBufferGeometry(radius), new THREE.MeshStandardMaterial({color: 0xffffff}));
        ball.position.set(pos.x, pos.y, pos.z);
        scene.add(ball);

        //Ammo.js section

        //create new transform for position and rotation
        let transform = new Ammo.btTransform();
        transform.setOrigin(new Ammo.btVector3(pos.x, pos.y, pos.z));
        transform.setRotation(
            new Ammo.btQuaternion(quat.x, quat.y, quat.z, quat.w)
        );

        //set object motion
        let motionState = new Ammo.btDefaultMotionState(transform);

        //setup bounding box for collisions
        let collisionShape = new Ammo.btSphereShape(radius);
        collisionShape.setMargin(0.05);

        //setup inertia
        let localInertia = new Ammo.btVector3(0, 0, 0);
        collisionShape.calculateLocalInertia(mass, localInertia);

        //provides structure information to create a solid object
        let rigidBodyStructure = new Ammo.btRigidBodyConstructionInfo(
            mass,
            motionState,
            collisionShape,
            localInertia
        );

        //create solid body from the body structure
        let body = new Ammo.btRigidBody(rigidBodyStructure);

        //add ball friction since it moves
        body.setFriction(10);
        body.setRollingFriction(10);

        // add to physical world as a solid object so the engine can update its physics
        physicsWorld.addRigidBody(body);
    }

    createPhysicsWorld();
    createBall()
}
Movement and Interaction
In the Ammo.js simulated world, interactions are computed based on properties and forces. Objects have a boundary around them (sometimes called a bounding box, or hitbox) that the physics engine uses as an object's position. Upon checking all object's bounding boxes every animation loop, if any two object's bounding boxes are in the same position, the engine registers a "collision", and updates the objects accordingly. For solid objects, this means preventing these two objects from being in the same position, simulating solid matter. Below is a snippet from my code showing how the render loop and world physics are updated.
Render Loop
//function to render frame
function renderFrame() {

    //time since last render
    let deltaTime = clock.getDelta();

    //apply vector force and velocity to ball Mesh based on user input
    moveBall();

    //update objects physics based on time elapsed
    updatePhysics(deltaTime);

    //re-render the scene and update the camera
    renderer.render(scene, camera);

    // tells browser theres animation, update before the next repaint
    requestAnimationFrame(renderFrame);
}

//function to update physics world
function updatePhysics(deltaTime) {

    // Step world based on elapsed time
    physicsWorld.stepSimulation(deltaTime, 10);

    //Loop through rigid bodies list, and update all rigid bodies in the world
    for (let i = 0; i < rigidBodies.length; i++) {

        //variables for Three.js Mesh and Ammo Rigid Body data
        let meshObject = rigidBodies[i];
        let ammoObject = meshObject.userData.physicsBody;

        //get objects current motion
        let objectMotion = ammoObject.getMotionState();

        //If the object is moving, get current position and rotation
        if (objectMotion) {
            objectMotion.getWorldTransform(transform);
            let mPosition = transform.getOrigin();
            let mQuaternion = transform.getRotation();

            // update object position and rotation
            meshObject.position.set(mPosition.x(), mPosition.y(), mPosition.z());
            meshObject.quaternion.set(mQuaternion.x(), mQuaternion.y(), mQuaternion.z(), mQuaternion.w());
        }
    }
}
User Input
I wanted users to be able to move a ball around in the 3D World on both desktops and touchscreen mobile devices. For keyboard events, I used the "keydown" and "keyup" event listeners when the arrows keys are pressed to apply the corresponding directional forces to the ball. For touchscreens, I created a joystick controller overlay on the screen. I then added the "touchstart", "touchmove", and "touchend" event listeners to the div controller element. The controller overlay keeps track of the starting, current, and end coordinates of where the user moves their finger, and then updates the ball forces accordingly every render.
The following is just a snippet of the full joystick overlay to show the general concepts. See source code at the bottom of article for the full code.
// object to keep tracking of current ball movement on x-y coordinate plane
let moveDirection = { left: 0, right: 0, forward: 0, back: 0 };

//coordinates of div's position on the screen
let coordinates = { x: 0, y: 0 };

//variable to hold starting coordinates for touch event
let dragStart = null;

//create joystick div element
const stick = document.createElement("div");

//event handler function to get x-y coordinate change in user's touch position on the screen
function handleMove(event) {
    //no touch change, return
    if (dragStart === null) return;

    //touch position changed, get new x-y coordinates
    if (event.changedTouches) {
        event.clientX = event.changedTouches[0].clientX;
        event.clientY = event.changedTouches[0].clientY;
    }

    //calculates div position change on the screen and translates change into x-y coordinates
    const xDiff = event.clientX - dragStart.x;
    const yDiff = event.clientY - dragStart.y;
    const angle = Math.atan2(yDiff, xDiff);
    const distance = Math.min(maxDiff, Math.hypot(xDiff, yDiff));
    const xNew = distance * Math.cos(angle);
    const yNew = distance * Math.sin(angle);
    coordinates = { x: xNew, y: yNew };

    //apply CSS style changes to "move" joystick div based on new coordinates
    stick.style.transform = `translate3d(${xNew}px, ${yNew}px, 0px)`;

    //pass coordinates to function to compute movement directional forces
    touchEvent(coordinates);
}

//function to apply directional forces to ball based on change in user touch coordinates
function touchEvent(coordinates) {

    // move ball right
    if (coordinates.x > 30) {
        moveDirection.right = 1;
        moveDirection.left = 0;
    //move ball left
    } else if (coordinates.x < -30) {
        moveDirection.left = 1;
        moveDirection.right = 0;
    //no change, don't apply X movement forces
    } else {
        moveDirection.right = 0;
        moveDirection.left = 0;
    }

    //move ball backwards
    if (coordinates.y > 30) {
        moveDirection.back = 1;
        moveDirection.forward = 0;
    //move ball forward
    } else if (coordinates.y < -30) {
        moveDirection.forward = 1;
        moveDirection.back = 0;
    //no change, don't apply Y movement forces
    } else {
        moveDirection.forward = 0;
        moveDirection.back = 0;
    }
}
You now have all the building blocks to create your own 3D world with a real-time physics engine and user control system! All you need is your resourcefulness and a drive to learn and create something awesome. The internet has all the resources you'll need! Anyone is capable of learning anything!
Source code for this project is available on my Github! If you have any feedback or questions, feel free to send me a message or follow me on Twitter @0xfloyd!

Top comments (16)
Looks so good!
I'm going to graduate as a game artist this summer, and I just logged in after a year or so to see this. I was thinking a portfolio like this would be so nice and now you're randomly throwing the solution in my face! 😮
Thanks for the post, that is helping so much
Awesome! Hope it helps you create something amazing!
I think I know what to learn next.🤔 Cool stuff ✊
Thanks, I agree! Three.js is awesome!
I never got an idea to create like this.
Awesome
Glad you enjoyed!
Awesome stuff thanks for sharing!
Thanks, I'm glad you liked it!
Hey man, taking a deep shot here hoping that you still reply to this thread
I've tried almost everything to import it locally, I've cloned the repos, tried to delete the package.json files, installed node_modules and bundler for webpack. nothing really seems to work?
If I just try to import it and go straight to npm install and then npm run dev I get flooded with errors?
Any help?
I think I'm missing dependencies but Ive tried just to do
npm i
npm run dev
and I get a ton of errors
Fabulous work
I wonder if i also create something impactful like this in the future 😅
Thanks! Yes, you definitely should! I had no experience with 3D before I started this, and I learned so much!
Thanks for sharing,it's awesome!
Can I translate it into Chinese to help more developers?
Great work Ryan. I will try this.
牛逼
Some comments have been hidden by the post's author - find out more