
Today's blog post is a bit on the cutting edge of .NET Core and Identity. We will be creating a secure Blazor Client (WASM) web app that authenticates users against Azure AD B2C using local accounts and Google and then communicate securely with a .NET Core API to pull some data. There are a few moving components here:
- ASP.NET Core Blazor
- ASP.NET Core API
- Azure AD B2C
Unlike traditional ASP.NET Core web apps, Blazor WASM has some idiosyncrasies when it comes to authentication and token acquisition which we will highlight as we build the solution
This blog post comes at the back of our Tuesday Twitch stream were we attempted to build this live with our special guest Jon Gallant from the Azure SDKs team. You can watch the video on our Twich channel
Prerequisites
There are a couple of prerequisites if you want to follow along
- Latest .NET Core SDK (5.0 or later)
- Your favorite .NET Core IDE
- The latest Blazor templates. You can install the latest Blazor templates for the .NET CLI with the following command:
dotnet new --install Microsoft.AspNetCore.Components.WebAssembly.Templates::3.2.1
Create the App Registration for the Client app (web app)
Log in to the Azure, go to your AD B2C portal and create a new App Registration.

Next, we need to create a Sign in + Sign out Policy or flow in B2C. This is what creates the endpoint for our users to log in and also defines the behavior and data we collect and return during the sign in/signup process. The nice thing is that B2C does most of this automatically for us so we don't have to worry about the underlying details. At a later time, you can revisit your policies and customize them to better match your needs as well as the look and feel of your app. For now, we'll go with the defaults. At the root of your B2C tenant portal, select User Flows and then click on the New user flow button

Select the Sign up and sign in user flow and go with the Recommended version
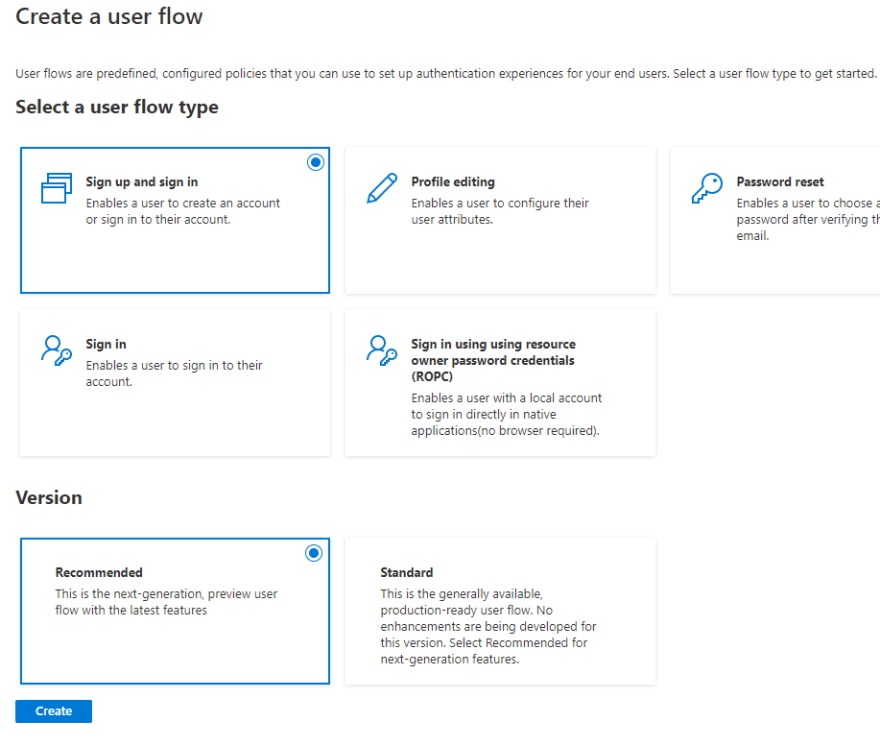
Select an appropriate Name(no spaces!!), add an external provider (optional), select the Display Name (minimum) attribute for the Return Claim, press OK and Create

The Display Name in the return ID token will be used to populate the Name property in the Context.User.Identity object in our web app. The other properties are optional so you can choose what to pull in your token beyond the Display Name
Go back to the app registration we just created as we will need the details for creating our Blazor WASM app on the next step
Create the Blazor Web App
We will use the .NET CLI to create the Blazor WASM app because it's easier when it comes to configuring authentication. Even better, the latest .NET Auth library (Microsoft.Identity.Web) has a built-in template for WASM + AAD/B2C. You can install it using the following command:
dotnet new -i Microsoft.Identity.Web.ProjectTemplates::1.9.1
Open your favorite CMD and type the following - make sure you add your own application name:
dotnet new blazorwasm2 -au IndividualB2C - -o {APP NAME}
In my case this was:
dotnet new blazorwasm -au IndividualB2C -o BlazorWeb
Press Enter and watch the magic happen:

At this point, we need to go back to our App registration on the B2C portal to update the Redirect URI for our Blazor app. In the Authentication tab, click the Add a platform button, select Single Page App and configure the Redirect URIs with
http://localhost:5000/authentication/login-callbackhttps://localhost:5001/authentication/login-callback
The above URIs are the ones that our Blazor app will be listening for the auth result. If you plan to use a different port with Kestrel, make sure to update the port numbers here as well. Make sure to press Save in the end.

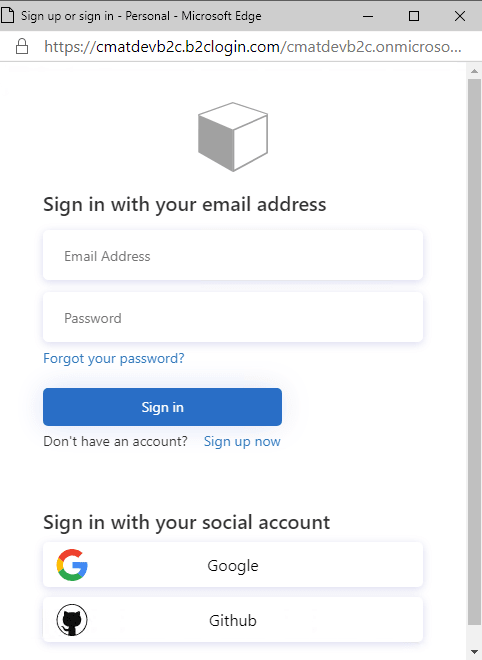
We can now run our Blazor app and test that our signup and login works as expected. Since we are using local accounts, we'll have to sign up before being able to log in. Subsequent logins are much simpler. And if you have social media accounts configured in the your user flow, then these will appear as an option here as well
Let's look at the code!
Because we used the template, we didn't have to write any code. However, this is not always the case and there are scenarios that we may want to add authentication to an existing application. So, let's look at the components necessary for authentication:
First, we need to add the MSAL library. This is a NuGet package specially designed for Blazor WASM apps, unlike the new Microsoft.Identity.Web library that work's with Blazor Server. Open your *.csproj and add the following reference:
<PackageReference Include="Microsoft.Authentication.WebAssembly.Msal" Version="3.2.1" />
Next, open the Program.cs file and add the following code:
builder.Services.AddMsalAuthentication(options =>
{
    builder.Configuration.Bind("AzureAdB2C", options.ProviderOptions.Authentication);
});
Replace the code in App.razor with the following:
<CascadingAuthenticationState>
    <Router AppAssembly="@typeof(Program).Assembly">
        <Found Context="routeData">
            <AuthorizeRouteView RouteData="@routeData" DefaultLayout="@typeof(MainLayout)">
                <NotAuthorized>
                    @if (!context.User.Identity.IsAuthenticated)
                    {
                        <RedirectToLogin />
                    }
                    else
                    {
                        <p>You are not authorized to access this resource.</p>
                    }
                </NotAuthorized>
            </AuthorizeRouteView>
        </Found>
        <NotFound>
            <LayoutView Layout="@typeof(MainLayout)">
                <p>Sorry, there's nothing at this address.</p>
            </LayoutView>
        </NotFound>
    </Router>
</CascadingAuthenticationState>
In the _Imports.razor, add the appropriate import as per below:
@using Microsoft.AspNetCore.Components.Authorization
Inside index.html, add a new script before the end of the <body> tag
<script src="_content/Microsoft.Authentication.WebAssembly.Msal/AuthenticationService.js"></script>
In the appsettings.json add a section for the Azure AD B2C settints
{
  "AzureAdB2C": {
    "Authority": "https://cmatdevb2c.b2clogin.com/cmatdevb2c.onmicrosoft.com/B2C_1_sisu_simple",
    "ClientId": "<your client id>",
    "ValidateAuthority": false
  }
}
In the Shared folder, we need to add a new page RedirectToLogin.razor with the following code
@inject NavigationManager Navigation
@using Microsoft.AspNetCore.Components.WebAssembly.Authentication
@code {
    protected override void OnInitialized()
    {
        Navigation.NavigateTo($"authentication/login?returnUrl={Uri.EscapeDataString(Navigation.Uri)}");
    }
}
Next, we need to update the MainLayout.razor with a login prompt as well as a greeting for our authenticated users. For that, we will use a LoginDisplay component. So for now, add the <LoginDisplay /> where it makes sense for your app. I put it at the top of the main content
@inherits LayoutComponentBase

<div class="sidebar">
    <NavMenu />
</div>

<div class="main">
    <div class="top-row px-4 auth">
        <LoginDisplay />
        <a href="https://docs.microsoft.com/aspnet/" target="_blank">About</a>
    </div>

    <div class="content px-4">
        @Body
    </div>
</div>
As mentioned in the previews step, we need to create a LoginDisplay.razor component in the Shared folder. The code for this component is:
@using Microsoft.AspNetCore.Components.Authorization
@using Microsoft.AspNetCore.Components.WebAssembly.Authentication

@inject NavigationManager Navigation
@inject SignOutSessionStateManager SignOutManager

<AuthorizeView>
    <Authorized>
        Hello, @context.User.Identity.Name!
        <button class="nav-link btn btn-link" @onclick="BeginLogout">Log out</button>
    </Authorized>
    <NotAuthorized>
        <a href="authentication/login">Log in</a>
    </NotAuthorized>
</AuthorizeView>

@code{
    private async Task BeginLogout(MouseEventArgs args)
    {
        await SignOutManager.SetSignOutState();
        Navigation.NavigateTo("authentication/logout");
    }
}
Finally, in the Pages folder, add a new Authentication.razor page with the following code:
@page "/authentication/{action}"
@using Microsoft.AspNetCore.Components.WebAssembly.Authentication
<RemoteAuthenticatorView Action="@Action" />

@code{
    [Parameter] public string Action { get; set; }
}
Following the steps in the section, you can implement authentication in your Blazor WASM app. This is great but there is a good chance that your app will be using one or more APIs to pull some data in. So let's see what we need to change in the code to make this work. But first, we need an API that works with B2C as well :)
Create the API App registration
To allow our API to validate tokens against B2C we need an app registration. In the B2C portal, create a new App Registration. You don't need a Redirect URI so provide a name and press Create. Next, open the Expose and API tab and Add a scope. Use acess_as_user for the scope name

That's all we need from our API. With this change however, we also need to update the client app registration to allow it to request the appropriate scopes when users login. Open the client app registration and go to the API Permissions tab. Click the Add a permission button and select My APIs. Find the API you just created, click on it select the access_as_user permission. Click the Add permissions button

Our B2C is now to rock 'n roll some tokens! Back to our code.
Create the .NET Core API
For the sake of simplicity, I'm going to create a simple API using the default template -> yes, the one that serves random weather data :)
dotnet new webapi2 -o <yourAPIName> --auth IndividualB2C
For the authentication/authorization bit, we're using the new Microsoft.Identity.Web library that simplifies significantly the whole process.
Open the *.csproj file and add the following package reference:
<PackageReference Include="Microsoft.Identity.Web" Version="1.*" />
For authentication to work, we need to tell Microsoft.Identity.Web which tenant and app registration to use. In the appsettings.json of our API, we need to add or update the following information
"AzureAdB2C": {
    "Instance": "https://cmatdevb2c.b2clogin.com/",
    "ClientId": "80978f9b-a2f9-44bf-8ae7-3c5099ff12b2",
    "Domain": "cmatdevb2c.onmicrosoft.com",
    "SignUpSignInPolicyId": "b2c_1_susi"
}
We can now wire up the authentication middleware in Startup.cs. Update the ConfigureServices() method with the following code:
private readonly string MyAllowSpecificOrigins = "localHostAccess";

public void ConfigureServices(IServiceCollection services)
{
 services.AddAuthentication(JwtBearerDefaults.AuthenticationScheme).AddMicrosoftIdentityWebApi(Configuration.GetSection("AzureAdB2C"));

    services.AddControllers();

    //DO NOT FORGET CORS
    services.AddCors(options =>
    {
        options.AddPolicy(name: MyAllowSpecificOrigins,
           builder =>
           {
               builder
                   .AllowAnyOrigin()
                   .AllowAnyMethod()
                   .AllowAnyHeader();
           });
    });
}
We also need to update the Configure() method in Startup.cs to wire up the authentication, authorization and CORS. Add the following 3 lines right after the app.UseRouting(); line:
app.UseCors(MyAllowSpecificOrigins);
app.UseAuthentication();
app.UseAuthorization();
Note: if you don't define a CORS policy, your solution is going to be dead in the water. You need to explicitly say what Origin URLs and which Headers to allow in your app or otherwise you'll be met with the dreaded CORS error even if everything else is wired correctly.
The final bit in our API is to configure the controller(s) with the appropriate Authorize attribute to ensure that only authenticated requests can access the various actions. In the WeatherForecastController.cs class, decorate the Get() method with the [RequiredScope(new [] { "access_as_user" })] attribute. Here, we want to ensure that any incoming calls contain an access token with the correct scope!
Configure the Blazor app to retrieve data securely from the API
In Blazor WASM apps, there is a way to configure the code so that outgoing HTTP requests are wired with the appropriate authorization headers automatically. There is a whole section in our docs that explains how and why things work in the way they do, so feel free to read about it. If, however, all you care about is the code changes necessary to make this happen, skip the doc and read on...
First we need to add a NuGet package. Open your *.csproj and add the following package reference:
<PackageReference Include="Microsoft.Extensions.Http" Version="3.1.7" />
Because the API that we're using is not residing in the same Base URL as our Blazor app (simulating a real scenario), we need to do some changes In our Blazor WASM app. First we need to add a new class CustomAuthorizationMessageHandler.cs, as per the docs, to rewire the automatic HTTP Message handler with our custom settings
using Microsoft.AspNetCore.Components;
using Microsoft.AspNetCore.Components.WebAssembly.Authentication;

public class CustomAuthorizationMessageHandler : AuthorizationMessageHandler
{
    private static string scope = @"https://cmatdevb2c.onmicrosoft.com/80978f9b-a2f9-44bf-8ae7-3c5099ff12b2/access_as_user";

    public CustomAuthorizationMessageHandler(IAccessTokenProvider provider,
        NavigationManager navigationManager)
        : base(provider, navigationManager)
    {
        ConfigureHandler(
            authorizedUrls: new[] { "http://localhost:8080" },
            scopes: new[] { scope });
    }
}
You can get the value for the scope variable from the API Permissions in your Client App Registration:

The authorizedUrls value needs to match your API URL. So make sure to set the right value here. My API is configured to run on localhost port 8080.
With our custom MessageHandler in place, we can now update the Program.cs to make use of it. The update code should look like the following:
using System;
using System.Net.Http;
using System.Threading.Tasks;
using Microsoft.AspNetCore.Components.WebAssembly.Hosting;
using Microsoft.Extensions.Configuration;
using Microsoft.Extensions.DependencyInjection;

namespace BlazorWeb
{
    public class Program
    {
        public static async Task Main(string[] args)
        {
            var api_scope = @"https://cmatdevb2c.onmicrosoft.com/80978f9b-a2f9-44bf-8ae7-3c5099ff12b2/access_as_user";

            var builder = WebAssemblyHostBuilder.CreateDefault(args);
            builder.RootComponents.Add<App>("app");

            builder.Services.AddScoped(sp => new HttpClient { BaseAddress = new Uri(builder.HostEnvironment.BaseAddress) });

            builder.Services.AddScoped<CustomAuthorizationMessageHandler>();

            builder.Services.AddHttpClient("WeatherAPI",
                    client => client.BaseAddress = new Uri("http://localhost:8080"))
                .AddHttpMessageHandler<CustomAuthorizationMessageHandler>();

            builder.Services.AddScoped(sp =>
                sp.GetRequiredService<IHttpClientFactory>()
    .           CreateClient("WeatherAPI"));

            builder.Services.AddMsalAuthentication(options =>
            {
                builder.Configuration.Bind("AzureAdB2C", options.ProviderOptions.Authentication);
                options.ProviderOptions.DefaultAccessTokenScopes.Add(api_scope);
            });

            await builder.Build().RunAsync();
        }
    }
}
Make sure to update the api_scope value with your own. Finally, we can update the FetchData.razor code to grab the data from our API instead of the local sample file. At the very top of the razor page, add these 2 lines:
@using Microsoft.AspNetCore.Components.WebAssembly.Authentication
@inject IHttpClientFactory ClientFactory
Then, we can update the OnInitializedAsync() method with the following code:
protected override async Task OnInitializedAsync()
    {
        try
        {
            var client = ClientFactory.CreateClient("WeatherAPI");

            forecasts = await client.GetFromJsonAsync<WeatherForecast[]>(@"http://localhost:8080/WeatherForecast");
        }
        catch (AccessTokenNotAvailableException exception)
        {
            exception.Redirect();
        }

    }
You'll notice that use the injected ClientFactory to get access to our own HttpClient that makes use of the CustomAuthorizationMessageHandler. With this we don't have to worry about add Auth headers etc. It's all done for us via the middleware. Sweet, right?
I need teh codez
Just need to code? You can grab the working sample from GitHub
What about an Azure AD version?
We got you covered. If you want to see this exact same code working with AAD only, then check out the repo
Summary
ASP.NET Blazor works great with Azure AD or Azure AD B2C to provide authentication and allow secure access to custom APIs (MS Graph or your own). In this blog post we examined the steps necessary to configure end-to-end authentication and authorization in our Blazor WASM (self-hosted) and .NET Core API apps with Azure AD B2C.
Get in touch!
Do you have a cool app (any app, any platform) that uses either AAD or AAD B2C? Do you want to show us
We stream live twice a week at twitch.tv/425show! Join us:
8-10am PT Tuesdays
8-10am PT Fridays
Be sure to send your questions to us here, on twitter or email: 425Show@microsoft.com!

Oldest comments (25)
In your instructions, you did not include the need to add the class ScopesRequirement(). It would be nice to have a description of the class, why it is there, and what it does.
You did not mention that you have this package installed: Microsoft.Extensions.Http
Hi @woodpk ! You're absolutely right! Great catch, I will update the blog asap. This is a gross omission on my behalf :(
I may need some direction in getting my implementation of your instructions to work correctly. I have been able to link ADB2C with the blazor client project, but when attempting to route through ADB2C to access the .net API, i am getting an error telling me that the config resource at that endpoint does not exist, but it also gives a "DENY" error:
System.InvalidOperationException: IDX20803: Unable to obtain configuration from: 'PhoenixRisingCounselingServices.b2...'.
---> System.IO.IOException: IDX20807: Unable to retrieve document from: 'PhoenixRisingCounselingServices.b2...'. HttpResponseMessage: 'StatusCode: 404, ReasonPhrase: 'Not Found', Version: 1.1, Content: System.Net.Http.HttpConnectionResponseContent, Headers:
Message in the
tag is:404 - File or directory not found.
The resource you are looking for might have been removed, had its name changed, or is temporarily unavailable.
And here is the end of the stack trace:
at Microsoft.IdentityModel.Protocols.HttpDocumentRetriever.GetDocumentAsync(String address, CancellationToken cancel)
at Microsoft.IdentityModel.Protocols.OpenIdConnect.OpenIdConnectConfigurationRetriever.GetAsync(String address, IDocumentRetriever retriever, CancellationToken cancel)
at Microsoft.IdentityModel.Protocols.ConfigurationManager`1.GetConfigurationAsync(CancellationToken cancel)
--- End of inner exception stack trace ---
Hi @woodpk , there seems to be some typo or issue with your metadata endpoint. Can you doublecheck and get back to me... feel free to email me at iddevsoc@service.microsoft.com to work this out
Don't know why it cut that text off... i'll email as that might work out better.
Updated... thanks for your feedback!
Why do you not validate the issuer?
ValidateIssuer = false?Thanks for this detailed summary. After going through the settings on the B2C portal and building the WASM client with the supplied command I started the app and tried to log in:
Then I got: "Checking login state..." and nothing more. After some head scratching I hit F12 and got a clue to what was wrong.
In the appsettings.json the line for "Authority" was incorrect. The forward slash after the xxx.b2clogin.com was missing. Adding that fixed the problem. It seems I omitted the forward slash.
I just learned that the instructions have to be followed to the letter :)
HI @finnurhrafn , thanks for the kind comments and the feedback. And I'm glad you were able to resolve the issue. I have to agree that attention to detail is important :) - moreso in programming than anything else! Keep up the great work and ping us if you have any more issues
Do you have a Blazor Server how-to? There are wildly different ideas out there on connecting to Azure AD. Some using a template/scaffolding approach which is hard to follow without starting a new project. Some using Microsoft.AspNetCore.Authentication.AzureADB2C.UI and some using Microsoft.Identity.Web.
Hi @thatmouse - here's the official blog post we published on Blazor Server + AAD.
developer.microsoft.com/en-us/micr...
Our guidance is to use the Microsoft.Identity.Web going forward.
Thank you, I will focus on that project, it's on github. It uses the new project template so it is not clear what magic that template does.
I want to implement a Login/Sigin in a Blazor Server App but they require that the UI needs to be from the same domain in other words that when I Sign In I don't want to use a template or Azure redirection. It has to reach for another Net Core Api that connects with Azure AD B2C. How this could be done? Some mentioned ROPC but Microsoft don't recommend it, and other pointed me to this samples github.com/Azure-Samples/active-di... but I don't know if one of those could be use to do what I need.
Thank you very much in advance.
Hi @guillem, thanks for reaching out. If your front end app (Blazor Server) doesn't need call the api securely, then you can skip authentication in the front end all together. However, I'm struggling to understand your scenario. Are you planning on taking the user's credentials in your front end and pass them to the API? Is the plan for your API to authenticate and validate the users using B2C? Thanks, CM
Hello, here in Chile. Make a blazor web assembly application connected to azure B2C but I have a problem sometime the token expires and if you give the page refresh an error like this appears.
Microsoft.AspNetCore.Components.WebAssembly.Rendering.WebAssemblyRenderer [100]
Unhandled exception rendering component: null_or_empty_id_token: The idToken is null or empty. Please review the trace to determine the root cause. Raw ID Token Value: undefined
ClientAuthError: null_or_empty_id_token: The idToken is null or empty. Please review the trace to determine the root cause. Raw ID Token Value: undefined
any ideas?
Hi, is there a way to have custom roles defined in B2C and to be used within Blazor Wasm and Api? For example a role for an admin user which exposes other parts of the UI and can call specific API endpoints?
B2C doesn't provide roles. However, JP has been working on a project to create a B2C compatible role-management solution. Check out our YT video on this: youtu.be/I_ddlSOHvwk
Hi Christos
Thanks for your excellent articles.
When will Microsoft.Identity.Web be available for Blazor WASM?
Microsoft.Identity.Web is a server-side library and therefore can't be used in Blazor WASM which is client-side. Blazor WASM uses a flavor of @azure/msal-browser which is designed for JS (client-side apps). I hope this makes sense but feel free to reach out if you have more questions. Make sure to join our Discord as well for more Identity Qs aka.ms/425Show/discord/join
Thanks Christos. This makes sense.
Nice tutorial. The sad part about MSAL for webassembly at the moment is that it only really works out of the box for simple scenarios like this one. Currently it can't even support password reset without additional hacks. The same goes for profile edit/registration policy. Those simply don't work out of the box.
Very cool stuff. Thank you for doing this. I am having a problem setting up the API as it is complaining about
It can't find the AddMicrosoftWebApi method. I can't find any reference to it, either. Is there a new approach? I checked the github code and it hasn't changed.
I'm using: Assembly Microsoft.AspNetCore.Authentication, Version=5.0.0.0
Thanks in advance.
Edit: I loaded the old code and it's there, so it must have disappeared in a subsequent release.
I think I found it, but I don't know why it wasn't showing up earlier. I know I looked.
It's called
AddMicrosoftIdentityWebApinow.Are you available for consulting Christos?
I just cannot get this to work.
I found the problems, after a lot of debugging, I finally got the project down to some sensible errors. In Program.cs, in the API, I mistyped my scope and I had a Json Deserialization problem with the new .Net 7 template on the Wasm side. Out of the box from the .Net 7 template setup, the WeatherForecast class uses a "DateOnly" property. GetFromJsonAsync failed when deserializing DateTime to DateOnly in FetchData.razor