
Overview:
User authentication is a must if you are building a platform that stores some private data of users like a social media app. At the same time, it’s kind of tricky to implement. In this article, we will be discussing how we can use Firebase to create a fully functional and secure user authentication.
Agenda:
Following is the list of features we will build later on in this article.
Sign Up
Log In
Dashboard
Log Out
Forget Password
Protected Routes
Prerequisites:
Familiar with React environment.
Basic knowledge of Context API.
Basic knowledge of routing in React.
Let’s go with the flow
So firstly, we need to create a React app. Navigate into the Desktop folder inside the terminal and type npx create-react-app <give any name> . Inside the src folder, just keep index.js and App.js, delete the rest — we don’t need them.
Setting up Firebase:
Okay, so now, visit firebase and click on go to console there, you click on Add Project and give it any name you want.
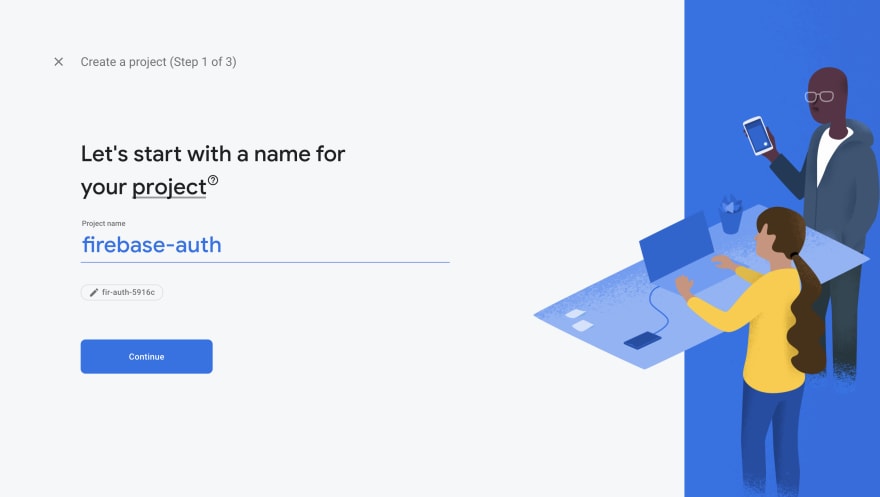
Click on continue and disable google analytics again click on continue . It’ll take some time to process and when it’s done, our Firebase app is now ready.
Now, we need to integrate it with our React web app. Click on web icon. Then, it’ll ask you to enter another name of the project for integration. Don’t worry, it can be any name you want.

Click on the Register app Now, Firebase will give you some keys and other configuration settings so that you can connect your React app with Firebase services.

Configuration file will be different for you. Also, don’t use the above keys. This demo app will be deleted after this article.
We will use them later. Now, let’s set up authentication. Navigate to the home page of your firebase app and click on authentication. Then, click on Get Started. It’ll show you some methods that you can use to create user authentication. In this article, we will be using the Email/Password method. So, click on it. Then hit enable only for the first option and click save.
Great! Now we have a method for authentication and a config file to connect the app. Let’s go to our favourite code editor and start coding!
Danger! Code ahead
First, we are going to create a .env.local file for storing our Firebase configuration details. Putting them openly naked inside your code will make it easy for hackers to access your Firebase app. Inside our react-app, create a .env.local file and store only the keys and values that are inside the variable firebaseConfig, as shown below:

In React, naming of environment variables start with REACT_APP
Great! Now, it’s time to connect it. For that, we are going to use the firebase module. And below is the list of all the modules we’ll be using for this entire project.
react-router-domfor working with different routes.bootstrapfor stylingreact-bootstrapfor pre-built styled-componentsfirebasefor working with Firebase
So, go ahead and install them all at once using the command:npm i react-router-dom bootstrap react-bootstrap firebase .
Inside react-app, create a file firebase.js for making the connection with Firebase.

If you have been observant, then this file is very similar to the file that Firebase gave us for creating a connection. Yeah, we just used the firebase module instead of an external JavaScript script. We initialised the app with environment variables stored in .env.local file and app.auth() is stored inside auth which will be responsible for calling several methods like login, signup, logout, etc.
Very well. Now, it’s time to set up the **Context API **so that we can just define our authentication methods in one file and access them in the relevant components. Inside the src folder, create another folder with the name **context **and inside it, create a file authContext.js as shown below.

Basic knowledge of Context API is mentioned in the prerequisites. But still, I’m explaining it. Above, you can see the basic structure of the context JavaScript file. Firstly, we create a context using React.createContext() . It gives us two things — Provider and Consumer. For now, we are only concerned with Provider which enables us to pass the value in it and use them in any component.
Component AuthProvider returns the <AuthContext.Provider>; component with a value prop that contains the values we want to pass, {children} refers to the root component which will be wrapped by the Provider In the end, we created a custom hook useAuth() which directly gives you all of the passed values.
Now, let’s start creating our authentication methods inside authContext.js and pass them to Provider . Replace the comment in the above code with the following lines.
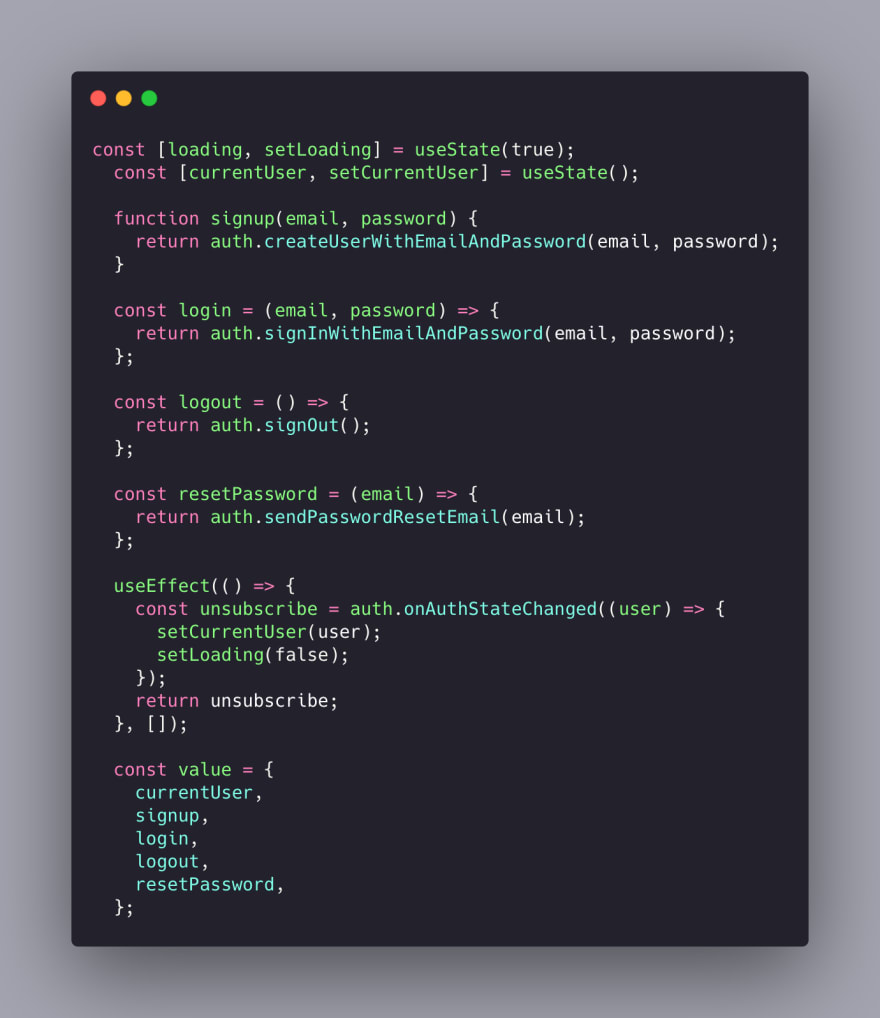
You can see that firstly, we create two states for storing currentUser that had info about logged in user and loading for displaying {children} after it is set to false. So, instead of simply rendering {children} inside <AuthContext.Provider>, change it to {!loading && children}.
As I said earlier, all the authentication methods will be stored inside auth from firebase.js. So, we used auth to call different methods and stored them inside respective functions so that when needed, we can call them. useEffect() contains an event handler that continuously listens to the authentication state like when the user logs in and when they sign out. According to that, it sets the currentUser state to logged in user or undefined .
auth.onAuthStateChanged() is an event handler. Whenever that component loads, useEffect() sets that handler for use many times. It may cause a memory leak and make your app slow. For dealing with this, auth.onAuthStateChanged() returns a unsubscribe method that can unsubscribe you from the event handler as the component unloads.
After that, we just pass all the methods and states to values prop inside Provider.
Now, we need to wrap our root component with AuthProvider component. In this app, we’ll be wrapping our App component. So, open index.js and do the following:

Now our <App /> will be {children} for <AuthProvider> . You can see I also imported a bootstrap CSS file for giving style to each of our components. But you can create your own custom style sheet if you want. In this article, we are just focusing on functionality.
Till now, we have been dealing with the functionality setup. So, it’s time to create components for each method. Create a folder inside src folder with the name as components.
Sign-up component:
Firstly, we are going to deal with the sign-up component. So, inside the components folder, create a file with the name signup.js.
We will create a form with three fields — email, password, confirm-password and check if confirm-passowrd matches with password . Only then are we going to call the signup method from authContext.js If the signup succeeded, then we redirect our user to the dashboard component (going to create this later).
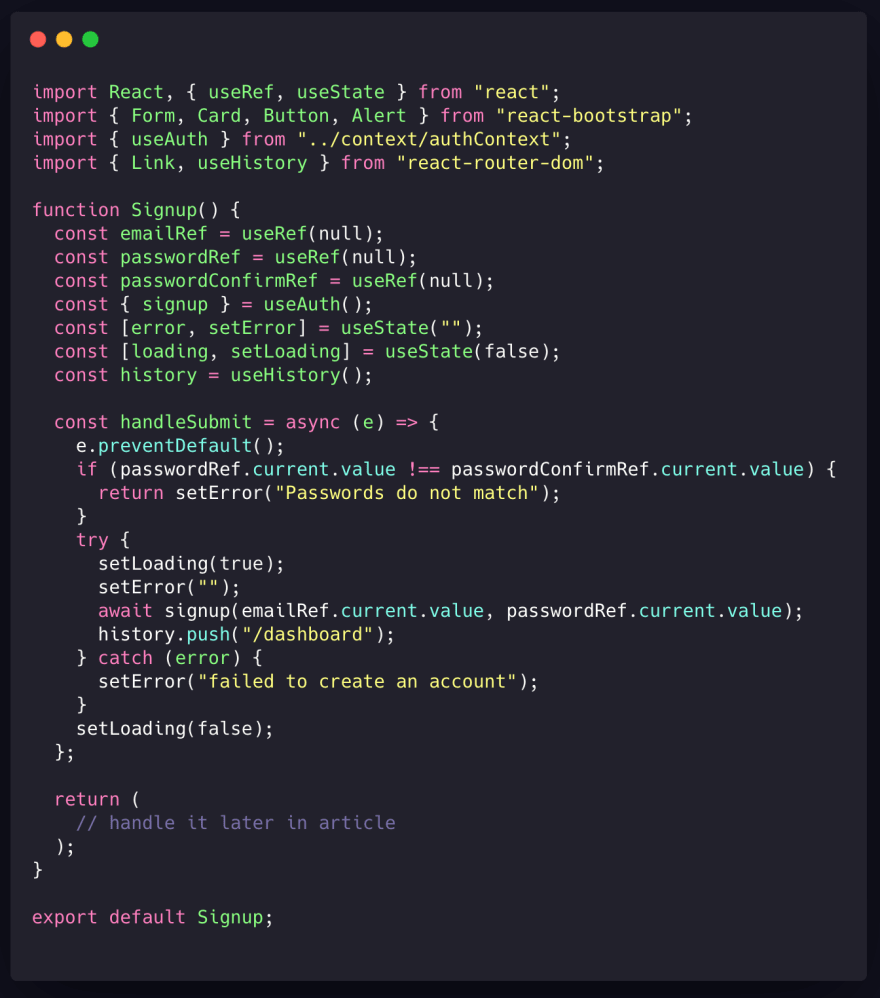
As I mentioned earlier in article, our custom hook useAuth() will be used to receive passed values in context and in this component, we are using the signup method created inside authContext.js . Link is used to take the user to the login page if they already had an account and the useHistory hook is used for redirecting the user after successfully registering.
emailRef , passwordRef and passwordConfirmRef are used as references for respective input fields, and later, we destructure the signup method from the useAuth hook.
Now, take a look at the function handleSubmit. It’s an async function because authentication methods from Firebase return a promise So, we are using async / await to handle it. Here, first we are checking if the password and confirmPassword are the same. And then, inside the try / catch block, we are calling the signup function by passing the email and password entered by the user.
That is our functionality for signup So now, inside return, let’s create the form and other UIs. We are using bootstrap cards and form for styling purposes.

Just go line by line. The code is very simple. All we are doing is using bootstrap components and creating the form. In the end, we created a link to the login component if the user already has an account. That’s it. Our signup component is ready.
Login Component:
Create a file inside the component folder and name it login.js.
This component will be pretty much the same as the signup component. The only difference is we are calling the login function instead of signup and we don’t need to have the confirm-password field here. The rest of the code in both the components will be the same.

What we are returning is also very similar to signup Except instead of creating the link to login we ask if they are not registered, then take them to the signup component

The extra thing we are allowing users is an option to reset their password by creating a link to the forgetPassword component (going to create it later).
Forget Password Component:
The way Firebase password reset works is that when the user clicks on it, they send an email to the registered email address with further instructions and a link to reset their password.
The cool thing is again, the code will be pretty similar to the above component, and here we are calling the resetpassword method. Go ahead and create a file with the name forgetpassword.js and take a look below.

As you can see, we are destructuring resetPassword from custom useAuth() hook and had an extra state for storing messages like check your inbox blah blah blah… after successfully calling the resetPassword function.

Nothing new. We are already familiar with this type of code and that’s it — our reset password component is ready.
Dashboard:
For now, our dashboard just shows the email of the currentUser and also contains a logout button for logging out the user. You can add more functionality according to your custom project.
Go ahead and create a file with the name dashboard.js inside the components folder.

The thing to be notice is that here we are destructuring logout and currentUser for handling signing out and showing the email of the logged-in user respectively. As the user successfully logs out, we then redirect him/her to the login component using the useHistory() hook. The Dashboard component is ready.
Setting up Routes for components:
We are done with all of our components. Now let’s set up each of their routes inside App.js using react-router-dom . Open App.js and do the following.

We exported BrowserRouter and Route for setting up routes for each of the different components, and Switch for loading a single component at a time.
Now, if you start the app by running npm start, then you see a blank screen because the home page is empty right now. For seeing different components, go to their respective URLs. For example: http://localhost:3000/signup will take you to:

And as you enter your details and click on the signup button, you’ll be redirected to the dashboard component

Now, one by one, you can check out the other components too. Now we have successfully implemented authentication. You can see the list of registered users in your Firebase console under the authentication section. Something is still missing…
Securing sensitive routes:
Our app is working perfectly and authenticating users very well but still, something is missing, we forget something. Can you guess what?
Well, if you log out the user, and try to access the dashboard boom! You can still access it and that’s not good. We don’t want any guest user to easily access our dashboard. Although it does not contain anything right now, it might not be true in your project’s case. We still need to secure it, so that only registered users can access their dashboard.
The way we can do so is to create another component. Basically a modified version of the Route component from react-router-dom and it’ll check whether someone is logged in or not. If it’s true, then it’ll render the dashboard otherwise, just redirect to the login component.
Create a file with the name privateRoute.js inside the components folder and take look at what it’s going to contain.

Let’s understand what we are doing. As I said, PrivateRoute is a modified version of the Route component which checks for currentUser before setting up any route. Here, first we got hold of the currentUser from useAuth().
Then, we are returning the <Route> component with all the props required for a normal <Route> component like path, exact , etc. Then it checks for currentUser. If true, then it renders the dashboard otherwise, it redirects to login . Here, instead of using useHistory() for redirecting, we’ll be using the <Redirect> component from react-router-dom because we need to render something if currentUser is not logged in.
Now, inside App.js , import this component and replace the code line where you set up the route for the dashboard to the following:
<PrivateRoute exact path=”/dashboard” component={Dashboard} />
We are done. Now if you try to access the dashboard as a guest user, you’ll be redirected to the login component.
Conclusion:
That’s it. We successfully created all the basic features required for user authentication. You can upgrade it in the way you want or instead of using context , you can go for Redux. Firebase has got so many cool features like Firestore , a real-time database, and much more. It really comes in handy while designing big heavy projects. We’ll be discussing more about Firestore in future articles. Till then, stay healthy and keep coding.
If you want the complete code files for your project, grab them from here.
What's next:
If you are still reading, make sure to follow me on Twitter as I share some cool projects and updates there and yeah don't forget I have some exciting stuff coming up every weekend. See Y'all next time and stay safe ^^ 🌻

Top comments (2)
" Putting them openly naked inside your code will make it easy for hackers to access your Firebase app. Inside our react-app, create a .env.local [...]" - well in fact all variables prefixed with REACT_APP will be incorporated in the final (transpiled) code. So for the convenience, it is a good practice to use .env.* files, but remember that all env variables used in runtime are easy to extract from the javascript code.
Exactly, this is not a security measure.