
Containers keep rising in popularity and usage, and to be honest, It really solves a big problem which is why everyone keeps loving and adopting them.
One of the biggest problems in moving our apps from one environment to another has been solved with containers, what they basically are, just like the name suggest is that it a container where everything from our application dependencies to the operating system which our app will run on top off, has been put together in one piece.
Basically, we can run this container in any environment and our app will be up running, and for dependencies of our applications, we carry them around, even if they were to be updated and the ones in our application become outdated, it will still work for us.
The beauty of containers keeps increasing, as those that adopted it now have less to worry about, not totally true, but you get the point.
Contents
What is Docker
Getting Docker
Building our web app
What is Dockerfile
Dockerfile configuration
Docker build
Docker
Docker is an open-source platform that enables developers to build, deploy, run, update, and manage containers—standardized, executable components that combine application source code with the operating system (OS) libraries and dependencies required to run that code in any environment.
So to containerize an application, we need Docker, it is both a platform and a tool that we will be using.
Installing docker
Of course, to use Docker, we need to have it installed on our machine, If you don't already have it 🙂.
Click the link below to take you to the docker installation page.
Install Docker Desktop | Docker Documentation
Make sure to follow the instruction carefully in other to have docker properly setup and ready to go.
Dockerizing our Flask application
The web app we will be building and containerizing will be built with Flask, It going to be very simple, really, it is just an Hello World web app.
Or, if you are interested in something more challenging, you can follow my restful API tutorial, which is also built with Flask, and try to dockerize that. I think it will be fun.
Moving on, we will create our Hello World app and dockerize that.
Hello World with Flask
Our project structure will look something like this:

app.py
from flask import Flask

app = Flask(__name__)

@app.route('/')
def index():
    return "Hello World"

if __name__ == '__main__':
    app.run()
That's it, for the most part of course. I think the code is pretty straightforward and doesn't need an explanation.
If you test this code, you should have a hello world in your browser.
Greate, now that it is confirmed that our app is working properly, we can modify the code a little. Just a little, really.
app.py
import os
------
......
------
if __name__ == '__main__':
    port = int(os.environ.get('PORT', 5000))
    app.run(host='0.0.0.0', port=port)
What I've done is modify the app.run to be able to run dynamically in our container.
By getting the port from an environmental variable that can be dynamic, our app can have a little more flexibility over the port it will be running on.
For the host, it is set to '0.0.0.0', which means the application will listen on all available network interfaces. This allows the application to be accessed from outside the container or server.
If we run our app again, it should work just fine without any problem.
requirements.txt
For the dependencies of our app to be packaged together with docker, we need to of course fetch or install them during the build process of our container.
Just like every Python project, we will write the requirements of our application to a requirements.txt file.
requirements.txt
Flask
of course, this is the only requirement of our application. If there are more of them, they are separated in a new line. You can also add specific versions of the packages to be installed.
example
Flask==2.0.0
Jinja
Tailwindpie==0.1.1
All this can be easier if you are using a virtual environment. All you need to do is activate the environment and run.
pip freeze > requirements.txt
This command will fetch all pip packages you've installed and dump them in the file.
Dockerfile
Dockerfiles are text files that contain the instructions needed to build a Docker image. It might include instructions for installing certain libraries, copying source code and configuration files into the image, and setting environment variables.
You create this file without any extension i.e. .txt or anything or such. For our application we will have:
Dockerfile
# Base image
FROM python:alpine

# Creating work directory in docker
WORKDIR /usr/app

# Copying files to docker
ADD . '/usr/app'

#RUN pip install flask
RUN pip install -r requirements.txt

# Starting application
CMD ["python", "app.py"]
Let's go through each step to understand what's happening:
FROM python:alpine: This line pulls the official Python image with the "alpine" version. Alpine is a smaller, lightweight variant of the base Python image based on the Alpine Linux distribution. This will be the operating system our app runs on.WORKDIR /usr/app: This sets the working directory within the Docker image to "/usr/app". Any subsequent commands will be executed from this directory.ADD . '/usr/app': This line copies all the files and directories from the current directory (where the Dockerfile resides i.e. our project directory) into the "/usr/app" directory in the Docker image.RUN pip install -r requirements.txt: This command installs the Python packages listed in our "requirements.txt" file. It's a common practice to keep project dependencies in a "requirements.txt" file, and this line ensures that our dependencies are fetched and installed inside the Docker image.CMD ["python", "app.py"]: This is the default command to run when a container is started from this image. It specifies that the Python script "app.py" should be executed. This will run our script and will start our Flask server.
Build Image
Finally, we are in the build stage and all we have to do is:
Navigate to your project directory and open up the command prompt or terminal.
If you are in vscode, all you need to do is open up the integrated terminal. You can use the shortcut
Crtl + Shift + `Run the
docker buildcommand.
docker build -t flask_hello_world .
Let me explain 🫠.
-t tags the image with a name, in our case
flask_hello_world.. is telling docker to look for the Dockerfile in the current directory.
If you're not in your project directory/folder, you can instead specify the path.
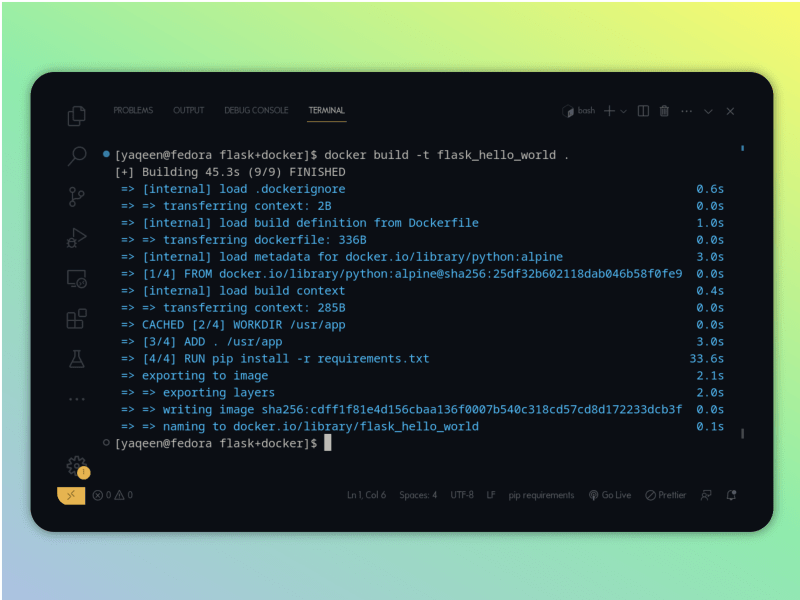
After the build process is complete, you can verify that the image is created by running:
docker images

There we can see our newly created flask_hello_world image.
Testing our Docker image
Finally, we can test our image. Now that the image is built, it is available globally on your machine, i.e. you don't have to be in your project directory to access the image.
To test our image, run:
docker run -p 5000:5000 flask_hello_world
This command will of course run our container, but let me explain something before we move on.
- -p 5000:5000 This command set the application in our container to listen to port 5000

Conclusion
Finally, we have achieved what we set out to do, i.e. to build and containerize a Python web app.
By encapsulating applications and their dependencies, containers have definitely eliminated the "it works on my machine" dilemma 😮💨, streamlining the deployment process and ensuring consistency between development, testing, and production environments. This, in turn, has led to faster development cycles, reduced downtime, and improved collaboration among development and operations teams.
Happy coding!

Top comments (0)