Hello folks, back here again with another blog. In this blog, we will discuss k3d and how easily it allows developers to set up Kubernetes developer environments. For this example, we will set up Devtron’s local development environment over k3d. Let me quickly introduce k3d and Devtron if you are not familiar with them.
K3d, the name itself suggests k3s-in-docker is a wrapper around k3s - Lightweight Kubernetes that runs it in docker. It is widely known for its rapid cluster creation and deletion and is most widely used for local Kubernetes development.
Now let’s talk a bit about Devtron. It is an open-source software delivery workflow for Kubernetes written in Go. It is known for its slick user interface which allows developers to deploy their microservices over Kubernetes in no time. Not only application deployment, but also it helps in monitoring and logging just through the Devtron dashboard itself. Moreover, it allows developers to integrate their existing open-source systems like ArgoCD, Jenkins, Clair, and others.
K3d - K3s in Docker
K3d has the capability to run k3s - lightweight Kubernetes inside docker within a few seconds. It has been highly recognised by the community and is widely used for Kubernetes local development.
Let’s quickly start with k3d and spin up a cluster.
[Note: Docker must be installed as a prerequisite for k3d installation]
Installation
K3d provides a rich installation method for different operating systems. For details about k3d installation please visit their documentation. I will continue with the installation script.
[Note: I will be using MacOS for the demonstration. You can use any OS and install k3d from their documentation as per your requirements]
Please execute the following command to install k3d in your system.
wget -q -O - https://raw.githubusercontent.com/rancher/k3d/main/install.sh | bash
Now let’s check whether it is installed correctly or not. Please execute the following command. It will print the k3d version installed in your system. Ideally, if you are installing from the above command, it will install the latest version.
k3d version

Congratulations! That’s it for the installation. If you can see the version, k3d has been installed and now we are ready to spin up a cluster and set up our local development environment.
K3d Playaround
Now that we have successfully installed k3d, let's create a k3d cluster and playaround k3d a bit. Please execute the following commands.
I) Creating a cluster
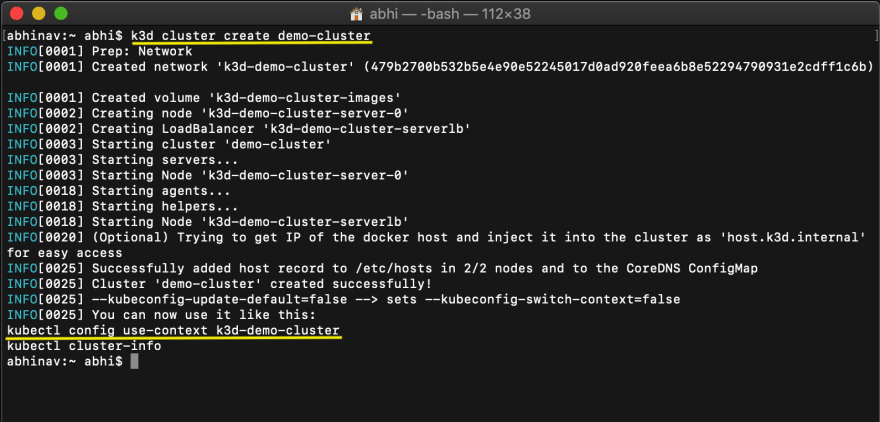
k3d cluster create demo-cluster
It will create a cluster named demo-cluster in your system and run k3s inside docker containers. To verify whether containers are running or not, please execute $ docker ps,it will list down the container running k3s.
If you have multiple clusters created, then you can switch context to the newly created cluster to work on that specific cluster.
$ kubectl config use-context k3d-demo-cluster, you can also see this command when a new cluster is being created as you can see in the above image.
II) Listing down nodes
The below command lists down the nodes available only in the demo cluster, as we have used grep command. If you don't provide the grep command, it will list down all the nodes available for all the clusters created using k3d.
k3d node list | grep demo-cluster
III) Listing down cluster
The below command is used to list down all clusters created using k3d but you can always use grep to find out specific clusters if you have several clusters installed.
k3d cluster list
IV) Stop & start your cluster
K3d also provides this exciting feature to stop your cluster and again start it where you stopped within seconds. The below command shows how easily you can stop and start your cluster in no time.
k3d cluster stop demo-cluster
k3d cluster start demo-cluster
V) Deleting the cluster
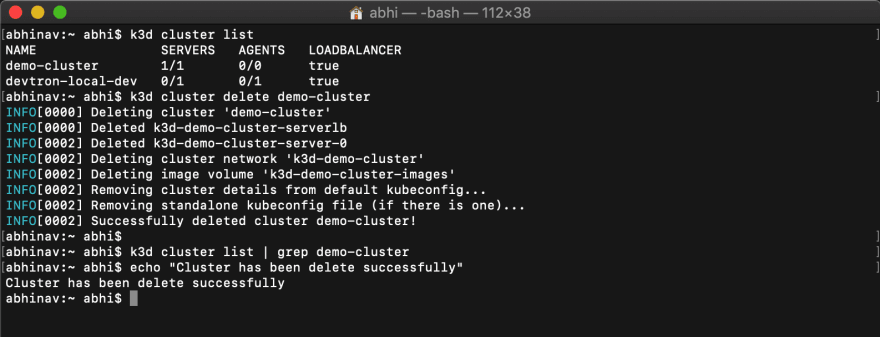
As with other commands, it's also very simple to delete the entire cluster within seconds.
k3d cluster delete demo-cluster

So this is how easily we can start working with k3d. For more detailed information about k3d and its commands, please refer to this documentation.
Local Dev Setup
Now as we have understood k3d and its commands, we are ready to set up our development environment with k3d and play around with it.
k3d Cluster Setup
For any Kubernetes development, the basic requirement is to have a Kubernetes cluster be it k3s or k8s. Here the role of k3d comes in. As we have already discussed above it can spin up a cluster in seconds and that’s why it's widely used for local k8s development. Let’s create a cluster.
The below command will create a cluster and expose host port 8082 with 30080 port of the agent which we are creating. Here we need to expose the port because we want to access the application running over k3s inside the docker container.
k3d cluster create devtron-local-dev -p "8082:30080@agent[0]" --agents 1
After the cluster is being created, switch context to the newly created cluster as specified above by using the command -
kubectl config use-context k3d-devtron-local-dev
Now the cluster has been created and we have switched to the newly created cluster. You can verify the weather cluster by listing down nodes and by listing down the containers running in your system as we discussed above in the K3d Playaround section.
Devtron Local Setup
Now we need to set up Devtron locally over the k3d cluster which we created. If you are using MacOS or Windows, make sure you have given the minimum resources required for Devtron installation through Docker Desktop as k3d runs k3s inside docker.
[NOTE: k3d doesn’t have any resource limitations, it takes up all the resources specified in Docker Desktop or Docker-cli if using linux]
Minimum Requirements
- 2+ cores CPU
- 4 GB Memory
- 20+ GB Storage
In my case, I have given 4 CPU and 6 Memory to Docker Desktop as you can see in the image below.

Devtron Installation
After setting up the minimum resources and creating a cluster, we are ready to install devtron locally over the k3s cluster. Please execute the following steps to set up Devtron locally. I will be using helm3 as it is the recommended way as per their official docs. You can also use other methods provided in the documentation.
Step-1: Add Devton helm repo. If the helm is not installed, you can refer to their installation guide.
helm repo add devtron https://helm.devtron.ai
You can check if it’s installed or not by using the following command.
helm repo list
Step-2: Install Devtron using helm3.
helm install devtron devtron/devtron-operator --create-namespace --namespace devtroncd
The install command will take up around 15-20 minutes to spin up all the Devtron micro-services required for installation.
Step-3: Check Installation status.
You can also check the installation status by using the following command. If it is installed successfully it will print Applied else it will print Downloaded as you can see in the below image.

Step-4: Change the devtron-service to NodePort with port number assigned while creating the cluster. It will allow us to access the dashboard using localhost:8082
Use the command - $ kubectl edit svc devtron-service -n devtroncd to edit the service and change the service type to NodePort and NodePort port number to 30080 which you assigned while creating the cluster.
After editing the service, you can check the changes by using the following command.
kubectl get svc -n devtroncd
Step-5: Access the dashboard locally.
To access the dashboard use localhost:8082 in your browser. For admin credentials use username as admin and for password run the following command.
kubectl -n devtroncd get secret devtron-secret -o jsonpath='{.data.ACD_PASSWORD}' | base64 -d
Now you can easily login in your dashboard and start using Devtron.
For detailed information about Devtron and deploying your application over it, please refer to their well-maintained documentation.
Devtron Local Development Setup
Following the installation of Devtron over the k3s cluster, now we need to set up the local development environment so that developers can start building and contributing to the open-source project. For building any features or fixing bugs, we need to have the source code of the project in the very first place. Let’s clone the project and run it. Please execute the following steps.
[Note: Please make sure wire module is installed in your system]
Step-1: Clone the project.
The below command will clone the Devtron repo in your system. If you haven’t installed git, please install it from here.
git clone https://github.com/devtron-labs/devtron.git
Step-2: Build the project.
Go to the Devtron directory which you cloned, using the command $ cd devtron and build the Devtron source code into an executable file using the following command.
make build
Step-3: Port Forwarding the Services.
Now we need to port forward a few services to establish a connection between Devtron running with the binary we will execute in the next step. Execute the following commands in different terminals which can help you to check the logs and debug if any connection issues occurs and also do not close the terminal or stop these commands until the work is done.
If any commands are stopped, then please execute them again to maintain the connection with the local setup.
1)kubectl -n devtroncd port-forward svc/argocd-server 8000:80
2)kubectl -n devtroncd port-forward svc/argocd-dex-server 5556:5556
3)kubectl -n devtroncd port-forward svc/postgresql-postgresql 5432:5432
4)kubectl -n devtroncd port-forward svc/devtron-nats 4222:4222
Step-4: Setting up Environment Variables and executing Binary
Now we need to set up a few environment variables to connect the source code with the Devtron which we installed initially. Please run the following commands from the root directory where you build the project. It will set up the environment variable and execute the binary as well. Do not stop the command until the work is not done.
[Note: python3 must be installed in the system]
wget https://raw.githubusercontent.com/devtron-labs/devtron/main/developers-guide/scripts/exporter.py
python3 exporter.py
Yayy! We have successfully set up the Devtron locally in our system and now we can start building features, fixing bugs, etc and start contributing to the project.


Oldest comments (0)