(Github Repo for article: https://github.com/AbhinavMir/drf-tutorial/)
Pre-requisites: Basic knowledge of APIs and Python (Not even Django!)
Knowing how to create APIs is one of the best superpowers that you can have as an Engineer. 👀
If there is absolutely any data you can serve- JSON, Text, Dumps, Images, Music- Anything from your project output, you need to serve it in an API. The new JAMstack way of development (Which I will write about soon!) works by abstracting the database away, and serving the contents of the Database as JSON. I recently talked about Strapi, which is a headless CMS, doing exactly this.
DRF is a Django Rest Frameworks which makes it easier for us to make APIs. You can do the same thing in say plain ol' Django, or Node, or Flask- or any other language! But personally, I use DRF to make custom APIs.
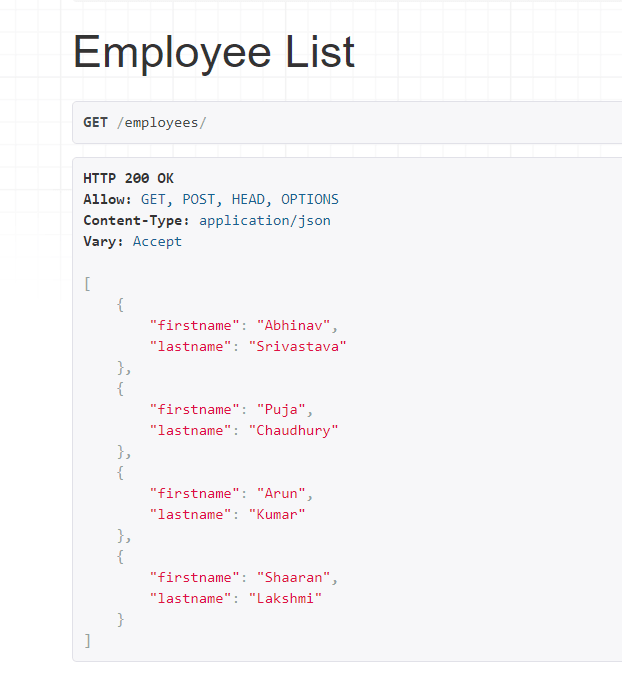
In this article, we will develop an API for an employer! When I curl the final result, I get the names of all my friends.
[{"firstname":"Abhinav","lastname":"Srivastava"},{"firstname":"Puja","lastname":"Chaudhury"},{"firstname":"Arun","lastname":"Kumar"},{"firstname":"Shaaran","lastname":"Lakshmi"}]
Not very fancy, right? However, stay with me. Once I am done with the basics you will know how to scale this to your next project. Note that I am not using any environments, but you absolutely should. This is so that the average programmer here is not confused beside what they already are in terms of APIs. Make a file called drf-tutorial and cd into it.
mkdir drf-tutorial
cd drf-tutorial
Now you will need to install certain libraries in Python.
pip install django
pip install djangorestframework
Once you have these installed, and are in chosen directory, start a Django Project.
django-admin startproject myproject
cd myproject
python manage.py startapp myapp
This will give you a new project myproject and a new Django app called myapp. If you are familiar with Django, you already know the contents inside of myprojects and myapp. Incase you aren't, Here is a great introduction to it.
Let's dig into the main code now! 🙌
Add rest_framework to Installed apps!
Go to myproject/settings.py, and scroll down till you see Installed Apps
It should look something like this
INSTALLED_APPS = [
    'django.contrib.admin',
    'django.contrib.auth',
    'django.contrib.contenttypes',
    'django.contrib.sessions',
    'django.contrib.messages',
    'django.contrib.staticfiles'
]
Change to include myapp and rest_framework to it.
INSTALLED_APPS = [...
    'rest_framework',
    'myapp'
]
Create your models
Here is the official documentation of Models
A model is the single, efinitive source of information about your data. It contains the essential fields and behaviors of the data you’re storing. Generally, each model maps to a single database table.
The basics:
- Each model is a Python class that subclasses
django.db.models.Model.- Each attribute of the model represents a database field.
- With all of this, Django gives you an automatically-generated database-access API
from django.db import models

# Create your models here.
class employees(models.Model):
    firstname=models.CharField(max_length=10)
    lastname=models.CharField(max_length=10)
    emp_id=models.IntegerField()

    def __str__(self):
        return self.firstname
This would create a database equivalent of emp_id, firstname and lastname as columns. Time to make migrations!
python manage.py makemigrations
python manage.py migrate
Under myapp you need to make a new Python file called serializer.py
from rest_framework import serializers
from . models import employees

class employeesSerializer(serializers.ModelSerializer):

    class Meta:
        model=employees
        fields=('firstname','lastname')
"Abhinav, what's a serializer da"
I mean DRF's official documentations explain it best! (Don't worry about Class Meta now)
Serializers allow complex data such as querysets and model instances to be converted to native Python datatypes that can then be easily rendered into
JSON,XMLor other content types.
We are taking the value and exporting it as JSON of firstname and lastname!
Let's now create the views.py
Views.py is responsible for what you will get on querying this data. It uses models and the serializer to render the JSON from Database.
from django.shortcuts import render

# Create your views here.

from django.http import HttpResponse
from django.shortcuts import get_object_or_404
from rest_framework.views import APIView
from rest_framework.response import Response
from rest_framework import status
from . models import employees
from . serializers import employeesSerializer

class employeeList(APIView):

    def get(self, request):
        employees1=employees.objects.all()
        serializer=employeesSerializer(employees1, many=True)
        return Response(serializer.data)

    def post(self):
        pass #We are focusing on only GET requests for now!
We pass all the objects of employees class to employees1 variable.
We declare a new variable serializer and call employeeSerializer which we declared in serializer.py
So-
- employees1 takes all the objects of employees from models (from . models import employees)
- Serializer is a variable to which the return value of employeeSerializer is passed
- Thus to serializer, model values of firstname and lastname are passed as a dictionary
Now all we need to do is return the Response of serializer.data
And that's all from the logic perspective!
Now we need to connect this logic to URLs.py!
from django.contrib import admin
from django.urls import path

urlpatterns = [
    path('admin/', admin.site.urls),
]
It looks something like this now, but we will update it to include employee API.
from django.contrib import admin
from django.urls import path
from rest_framework.urlpatterns import format_suffix_patterns
from myapp import views

urlpatterns = [
    path('admin/', admin.site.urls),
    path('employees/', views.employeeList.as_view()),
]
path() takes a regular expression argument, just add the address where you'd like to see our API!
website/employees will have your API result in this. It goes to views.employeeList.as_view() [as_view() returns the response of the API as a callable view].
So now we are done!
python manage.py runserver
Now go to your localhost address specified in your command line output, and add a /employee.
You should get something like this-
You're done!
All the best, and tag me in your projects.
Signing Off,

Top comments (0)