
Hello again!
Welcome to Part 2 of this article series where we go through database-driven architectures by understanding the nitty gritty of a chat app where you can edit messages.
If you missed the Part 1 of this article series, you can jump to it:
Database-driven realtime architectures: building a serverless and editable chat app - Part 1
Also, check out the editable chat app demo or explore the project on GitHub.
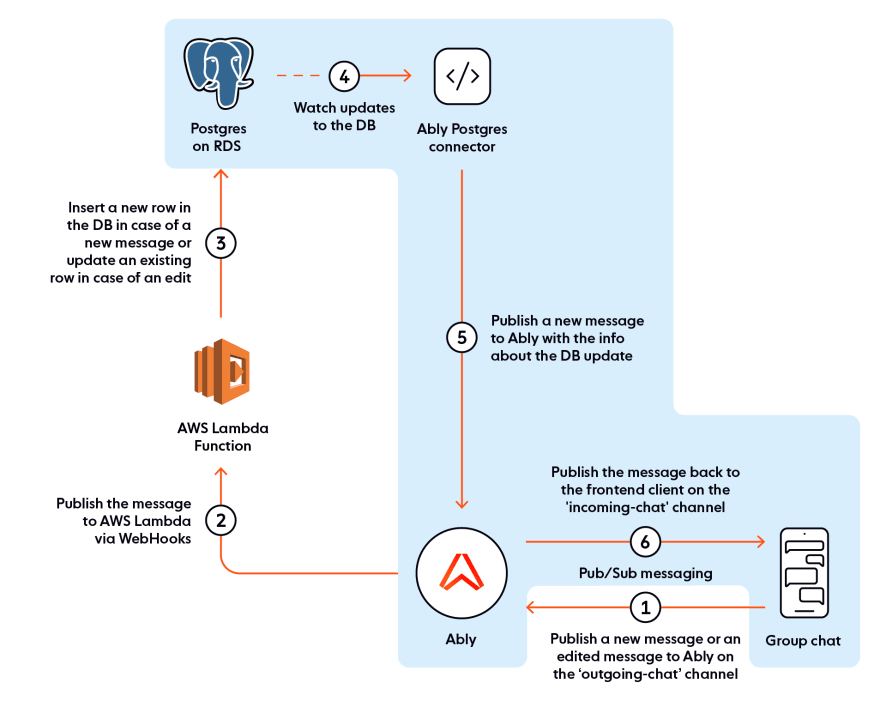
In the previous part, we explored the high-level architecture of the chat app and understood how we made it possible to implement database-driven realtime messaging using the Ably-Postgres connector.
In this part, we will explore each section of that architecture and focus on implementation details to get the app working. It is divided into the following sections and topics:
Section 1: Navigating the Nuxt app (even if you are not a Nuxt developer)
Section 2: PostgresDB setup for our chat app
Section 3: Lambda function setup on the Ably integrations dashboard
Section 4: Set up the Ably Postgres connector for the chat app
Recap of the app architecture
Deployment
Let's dive right in!
Section 1 - Navigating the Nuxt app (even if you are not a Nuxt developer)
Let's start with the frontend app written in NuxtJS. The chat-web-app folder in the GitHub repo contains the Nuxt app. The chat app is a static site that can be hosted on any CDN without needing an origin server. This is a classic example of Jamstack architecture.

If you have never worked with Nuxt, here are the basic things you need in order to understand the web application and, more importantly, the data flow within the app and external services. In this case, this is just Ably.
Folder structure
The assets folder contains any uncompiled assets we need in the app, such as various images for the tech stack logos and architecture diagrams.
The components folder contains all the Vue components needed in the web app. A component is a reusable Vue instance. Each component has its own HTML, CSS, and JavaScript. This makes it easy to plug the visual component into as many places as needed without needing to repeat the code. We are also using Tailwind CSS framework to easily add various CSS classes. You can find these classes in their documentation but the key thing to note here is that we use the
@applydirective to apply these classes to various HTML elements.The netlify/functions folder contains the logic for enabling an authentication endpoint for Ably. This is a format expected by Netlify to be able to automatically recognize each file in there as an executable serverless function.
The pages folder contains Vue components representing a specific route in the web app. Nuxt automatically creates routes for any files added within this folder. So
index.vuewould represent/and as an exampleproducts.vuewould map to the/productsroute.The static folder contains assets that don't need to be compiled and can be served as is. We just have a favicon here.
The store folder contains files related to the VueX store. VueX is Vue's state management library. It enables us to centrally manage the state of the app. This not only allows us to separate out visual components from the data flow within the app, but also allows us to easily extend or reuse any methods. VueX also provides a very structured way to manage state which allows for easy debugging and monitoring. Nuxt comes with VueX out of the box, so no need to install it separately. However, it is disabled until we add any files in the store folder. We'll look at the store extensively in the following sections.
The nuxt.config.js file contains configuration for various things in our Nuxt app. This is the place to include any HTML headers, metadata, etc. It also contains modules that are extensions to Nuxt's core functionality. We are mainly using tailwind (a CSS framework), fontawesome (library to add icons), and dotenv (library to allow using environment variables) as modules in our app.
The tailwind.config.js file is the default config file added by Tailwind which can be used to add any customizations. We don't have any at the moment so this file is mostly empty.
The Vue components
Here's a screenshot of the chat app with the visual components labelled as they appear in the repository.

There are two components missing:
UsernameInput.vue: a username input box that appears before you enter the chatPresenceListMobile.vue: the mobile version of the presence list which is hidden by default.
The starting point for all these components is the index.vue file in the pages folder.
All Vue components have three sections:
HTML: everything between the
<template></template>tagsJavascript: everything between the
<script></script>tagsCSS: everything between the
<style></style>tags
The JavaScript section exports a default object with various data variables, watchers, and methods. It also has imports at the top as needed. The following is a noteworthy import statement because it allows an easy way to work with the data in the store.
import { mapGetters, mapMutations, mapActions } from "vuex";
It is an easy way to access various elements in the global store of our app and manipulate the state of the web app. We'll learn more about what these various things mean in the next section.
VueX state management for the chat app
The index.js file in the store folder is the starting point of the state management in our application. It exports a new store after instantiating a VueX store with four objects: state, getters, mutations, and actions.
State: This single object contains the application-level state that represents the single source of truth and keeps components n sync with each other.
Getters: Getters are methods to compute derived states for use anywhere in the app. In the chat app, all the getters return the state object as is, except for getIsUsernameEntered which returns a boolean depending on whether the username was entered or not.
Mutations: Mutations are methods that change the value of a certain state object. They should always be synchronous to ensure that we have a good view of the state changes. To update the state based on an asynchronous operation, we use "actions" as described next.
Actions: We use actions to perform asynchronous operations and call a mutation when ready to change the state as a result of that async operation. This is the most important part of the store in our app as this is where we connect to Ably and publish and subscribe to messages on various channels.
Inside actions.js
Before adding any methods to be exported out of this file, I've imported the Ably npm library with import * as Ably from "ably";
Let's now take a look at each method:
1. The instantiateAbly() method
// init an Ably realtime instance using token auth
instantiateAbly(vueContext) {
  const ablyInstance = new Ably.Realtime({
    authUrl:
      "https://serverless-scalable-chat.netlify.app/.netlify/functions/ably-auth",
    echoMessages: false
  });
  // when ably is successfully connected, set state variables and call methods to attach to various channels and subscribe to the presence set
  ablyInstance.connection.once("connected", () => {
    vueContext.commit("setAblyClientId", ablyInstance.auth.clientId);
    vueContext.commit("setAblyConnectionStatus", true);
    vueContext.commit("setAblyRealtimeInstance", ablyInstance);
    vueContext.dispatch("initAblyChannels");
    vueContext.dispatch("subscribeToAblyPresence");
  });
}
In this method, the Ably Realtime library is instantiated with two parameters, called client options:
authUrl: this is the URL of the authentication endpoint. The app uses Token-based authentication and Netlify serverless functions to issue Token Requests to any legitimate frontend clients that'd like to authenticate with Ably and use its service.echoMessages: By default, any messages published to Ably are also echoed back on the same connection. To override the default, set it to false.
Once Ably is successfully connected, some commit methods are called to save the data into variables. The commit method calls a mutation, which in turn updates the state of the app. The dispatch method is used to invoke other actions, in this case initAblyChannels and subscribeToAblyPresence. We'll see these next.
2. The initAblyChannels() method
// attach to the incoming and outgoing channels
initAblyChannels(vueContext) {
  const outgoingCh = this.state.ablyRealtimeInstance.channels.get(
    this.state.channelNames.outgoingChat
  );

  const incomingCh = this.state.ablyRealtimeInstance.channels.get(
    this.state.channelNames.incomingChat
  );

  vueContext.commit("setAblyChannelInstances", { outgoingCh, incomingCh });

  vueContext.dispatch("subscribeToChannels");
}
In this method, we instantiate both our Ably channels, one for publishing messages into, (outgoing chat) and the other for subscribing to messages ( incoming chat channel). We then commit the channel instances and call a new method to subscribe to channels.
3. The subscribeToChannels() method
// subscribe to the incoming and outgoing channel instances
subscribeToChannels({ commit, state }) {
  state.channelInstances.incomingChat.subscribe(msg => {
    let msgPayload = JSON.parse(msg.data);
    let operationPerformed = msgPayload.type;

    /* check if the update is about a new message being inserted or an existing message being edited */
    if (operationPerformed == "INSERT") {
      // set the update type to new, so we can scroll the message list to bottom
      commit("setChatMsgArrayUpdateType", "new");
      state.chatMessagesArray.push(msgPayload.row);
    } else if (operationPerformed == "UPDATE") {
      // set the update type to edit, find and update the array object with new data
      commit("setChatMsgArrayUpdateType", "edit");
      let msgObjToEdit = state.chatMessagesArray.find(
        msg => msg.msg_id == msgPayload.row.msg_id
      );
      msgObjToEdit.msg_data = msgPayload.row.msg_data;
      msgObjToEdit.is_edited = msgPayload.row.is_edited;
    }
  });
}
In this method, we subscribe to the incoming-chat channel instances from the previous method. When the subscription callback is triggered, we check if the message received is INSERT or UPDATE. The former would mean a new chat message was published (and thus inserted as a new row into the database). The latter would mean an existing chat message was edited (hence a row was updated in the database).
If it's a new message, we append it to the chat messages array. If it's an updated message, we find the message in the chat messages array using its unique msg_id property, and update the is_Edited property to true.
We also call a mutation to set the chatMsgArrayUpdateType. This ensures that the chat list scrolls to the bottom whenever a new message arrives but not when a message is edited.
4. The subscribeToAblyPresence() method
//subscribe to Ably presence updates on the outgoing channel
subscribeToAblyPresence(vueContext) {
  this.state.channelInstances.outgoingChat.presence.subscribe(
    "enter",
    msg => {
      console.log("Entered", msg);
      vueContext.dispatch("handleNewMemberEntered", msg);
    }
  );
  this.state.channelInstances.outgoingChat.presence.subscribe(
    "leave",
    msg => {
      console.log("Left", msg);
      vueContext.dispatch("handleExistingMemberLeft", msg);
    }
  );

  // get a list of members already present in the Ably presence list
  this.state.channelInstances.outgoingChat.presence.get(
    (err, presenceList) => {
      for (const member in presenceList) {
        vueContext.dispatch("handleNewMemberEntered", presenceList[member]);
      }
    }
  );
}
In this method, we subscribe to enter and leave updates on the outgoing chat channel and call new methods to handle entries and leaves as they happen. We also use presence.get to get a list of existing members on the channel. This is useful to retrieve a list of people who came online before the current client and are still connected. We update the onlineMembersArray via mutations in each case. We also keep a local count of the number of people present using the presenceCount state variable, and update it whenever someone leaves or joins also via mutations (invoked using the commit keyword from the methods in the "actions" object).
// handle a new member entering the Ably presence set
handleNewMemberEntered(vueContext, member) {
  vueContext.commit("setPresenceIncrement");
  vueContext.commit("setOnlineMembersArrayInsert", {
    id: member.clientId,
    username: member.data.username
  });
},

// handle an existing member entering the Ably presence set
handleExistingMemberLeft(vueContext, member) {
  vueContext.commit("setOnlineMembersArrayRemove", member.id);
  vueContext.commit("setPresenceDecrement");
}
5. The enterClientInAblyPresenceSet() method
// enter the current client in the Ably presence set
enterClientInAblyPresenceSet(vueContext) {
  this.state.channelInstances.outgoingChat.presence.enter({
    username: this.state.username
  });
}
In this method, we enter the current client into the presence set by calling the presence.enter() method on the outgoing chat instance. Doing this will invoke presence.subscribe('enter') for this and all the other clients. This is done when the user types in a username and clicks on the enter chat button.
6. The publishMyChatMsgToAbly() method
// global method to publish a chat message on the outgoing channel instance
publishMyChatMsgToAbly({ state }, chatMsg) {
    state.channelInstances.outgoingChat.publish("chatMsg", {
      username: state.username,
      content: chatMsg
    });
}
We use this method to publish a new chat message to Ably. This is invoked from the ChatInput component. This is included as part of the global state management methods to allow for reusability and publishing of messages to Ably from any component in our UI.
7. The publishMyEditedMsgToAbly() method
// global method to publish an edit update on the outgoing channel instance
publishMyEditedMsgToAbly({ state }, { editedMsg, msgIdToEdit }) {
    state.channelInstances.outgoingChat.publish("editedMsg", {
      username: state.username,
      content: editedMsg,
      msgIdToEdit: msgIdToEdit
    });
  }
}
Similar to the previous method, we use this one to publish a message to Ably indicating an edit. We include the following:
Username of the client editing it
New message content after edit
Unique ID of the message that was edited
Now that we have a good understanding of the methods and functionalities in the Nuxt app. Let's move on to the next step.
Section 2 - PostgresDB setup for our chat app
PostgreSQL is an open-source object-relational database. This comes from their website:
PostgreSQL comes with many features aimed to help developers build applications, administrators to protect data integrity and build fault-tolerant environments, and help you manage your data no matter how big or small the dataset. In addition to being free and open-source, PostgreSQL is highly extensible. For example, you can define your own data types, build out custom functions, even write code from different programming languages without recompiling your database!

I've used pg_admin to visualize the data and tables in the database and added a single table to store the data related to the chat app. I used the default postgres database and created a new table with the columns needed in the chat data table via the GUI, along with the constraints for each. Here's the SQL version of the same:
CREATE TABLE IF NOT EXISTS public.chat_data
(
    username text COLLATE pg_catalog."default",
    msg_id text COLLATE pg_catalog."default" NOT NULL,
    msg_data text COLLATE pg_catalog."default",
    client_id text COLLATE pg_catalog."default",
    incremental_record_id bigint NOT NULL DEFAULT nextval('chat_data_incremental_record_id_seq'::regclass),
    created_at_timestamp bigint,
    is_edited boolean,
    CONSTRAINT chat_data_pkey PRIMARY KEY (msg_id)
)
The msg_id is a unique identifier for each chat message and is therefore a primary key. The incremental record ID is useful to retrieve x number of messages starting from a particular point. The is_edited column indicates if the message has been edited.
Section 3 - Lambda function setup on the Ably integrations dashboard
We use a Lambda function to insert and update rows in the chat_data table dynamically. It is triggered when messages are published on the outgoing_chat channel and that is set up in the Ably dashboard.
External services to push or receive data in realtime, can be set up in the 'Integrations' dashboard of your Ably account.

Click on "New Reactor Rule", for the options to send or receive data from external systems. The chat app needs to push an event, i.e. trigger an AWS Lambda function, every time a new message is published on a channel. Select Reactor Event > AWS Lambda to set up the Lambda function along with the AWS credentials and the source of trigger for this endpoint. All of these fields are described further in the documentation.

Choose the source as "Message" to trigger the Lambda when messages are published on a channel. In the channel filter field, we can specify the channel we'd like to use, which is outgoing-chat in this instance. Note from the previous section about the front-end NuxtJS app, we use this channel to publish both new chat messages and edited messages. As you'll see later, the same Lambda function can handle both kinds of messages.
Ably assigns a unique msg_id to each message, which is available in its metadata, so we retain the default enveloped setting to allow for this data to be added in the database.
Use the Lambda function for database transactions
AWS Lambda is a serverless compute service that usually contains a single function's code to be triggered and executed as needed. To be able to use AWS Lambda functions, you need to have an account with AWS. You can then create a new function; ours uses the NodeJS environment.
From AWS documentation for Lambdas with NodeJS:
The Lambda function handler is the method in your function code that processes events. When your function is invoked, Lambda runs the handler method. When the handler exits or returns a response, it becomes available to handle another event.
The Lambda function for the chat app performs either an INSERT operation or an UPDATE operation on the Postgres database, depending on the event data that invoked the function.
It uses the pg module to perform various operations on the Postgres table. It connects to the table by passing various parameters at the time of instantiating a new client, and calls the connect() method to establish a connection to that table within the specified database.
const client = new Client({
    host: process.env.HOST,
    port: process.env.PORT,
    user: process.env.USER,
    password: process.env.PASSWORD,
    database: process.env.DATABASE,
});

client.connect();
Next, the incoming object (the event data that invoked the lambda) is formatted as required by the database.
const msgPayload = incomingObject.messages[0];
const msgData = JSON.parse(msgPayload.data);
Depending on the type of the message --- chatMsg or editedMsg --- the Lambda performs either an INSERT operation in the database or an UPDATE operation.
a. Insert a new row for a new chat message published in the chat app:
if (msgPayload.name == "chatMsg") {
  const queryText = "INSERT INTO chat_data(username, msg_id, msg_data, client_id, created_at_timestamp) VALUES($1, $2, $3, $4, $5)";
  const queryValues = [msgData.username, msgPayload.id, msgData.content, msgPayload.clientId, msgPayload.timestamp];

  client.query(queryText, queryValues, (err, res) => {
    console.log("Error", err);
    console.log("Result", res);
    client.end();
  });

  return `insert function done, ${queryValues} payload inserted`;
}
b. Update an existing row for an edit message published in the chat app. The specific row to be edited is identified using the unique identifier msg_id which is a part of the msgPayload:
else if (msgPayload.name == "editedMsg") {
  const queryText = "UPDATE chat_data SET msg_data = $1, is_edited = $2 WHERE msg_id = $3";
  const queryValues = [msgData.content, true, msgData.msgIdToEdit];
  client.query(queryText, queryValues, (err, res) => {
    console.log("Error", err);
    console.log("Result", res);
    client.end();
  });

  return `update function done, ${queryValues} payload updated`;
}
Parameterized queries allow us to pass any parameters to the SQL queries without needing to worry about parsing special characters or in our case even emojis.
With this setup, you can test out the working of the Lambda function and database updates, using the Nuxt chat app. Whenever you send a new message, it gets published on the 'outgoing-chat' channel, which in turn triggers the Lambda function, which in turn INSERTS or UPDATES the database table with the relevant data.
However, you can see that this change actually doesn't come back to the frontend chat app just yet. We are making changes to the database, but we've not yet seen how the Ably-Postgres connector listens to these changes and publishes them to Ably. Let's explore this next.
Section 4 - Set up the Ably Postgres connector for the chat app
The Ably Postgres connector can be used via NPM or directly from the GitHub repository.
Let's explore the second option. Clone the GitHub repository using
git clone <https://github.com/ably-labs/ably-postgres-connector.git>
There are a few ways to add the configuration details of our Postgres database. The config file option applied to the chat app is as follows:
{
  "dbConfig": {
      "host": "",
      "port": "",
      "user": "",
      "password": "",
      "database": ""
  },
  "connector": [
      {
          "tablename": "chat_data",
          "ablychannelname": "incoming-chat",
          "operation": "INSERT"
      },
      {
          "tablename": "chat_data",
          "ablychannelname": "incoming-chat",
          "operation": "UPDATE"
      },
  ],
  "ably": {
      "apiKey": "API_KEY"
  }
}
The table name is set to chat_data for INSERT and UPDATE operations. The ablychannelname object indicates which channel the connector should publish into, following any INSERT or UPDATE operations done on the database/ table that the connector is watching.
Run the connector on your local machine using the following commands:
cd examples
npm i
node with-json-config.js
Now if you publish any messages or edit already published messages in the Nuxt chat app, you should see these coming back in the UI as the Nuxt app is subscribed to the incoming-chat channel where the Postgres connector publishes the messages.
Recap of the app architecture

We have now followed all the steps to enable our chat app to publish messages and receive messages on two different channels with database-driven updates enabled via the Ably Postgres connector.
Deployment
Let's take a look at how various components of the chat app are deployed to work together in a serverless and scalable way.
Nuxt static app deployment on Netlify
Netlify provides a serverless, git-based workflow to deploy web applications. The chat app is a static site, meaning the HTML, CSS, and JS are pre-built and served to the users directly from CDN. In an article I wrote earlier, I explained the JAMstack architecture in detail and the many benefits it provides:
Jamstack proposes serving statically generated websites directly from the CDN, doing away with the need for an origin server to serve the site. This can be a bit confusing. To clarify, this doesn't mean that we can't have a server at all (we could have one for the app logic), but this server won't be responsible for serving our HTML page back to the user. In fact, the best option here would be to make use of the myriad serverless platform options available out there, to avoid having to manage any infrastructure in the backend.
What other options do I have?
Netlify is my personal favourite and the fact that it comes with serverless functions out of the box is a plus (as you'll see in the following section). There are other options to deploy a front-end site built in Nuxt (or any other framework for that matter).
Ably Token-based authentication using Netlify functions
When you instantiate Ably's libraries, you need to authenticate the client using Basic authentication or Token authentication.
While Basic authentication is mainly used for demos and quick prototypes, on a production level it is important to use Token authentication to ensure security. Implementing Token auth requires developers to set up an authentication endpoint that can check the legitimacy of the client and issue an Ably Token Request. The client can then use this Token Request to authenticate with Ably and use its services.
Because we deployed the app to Netlify, it makes sense to use Netlify serverless functions to authenticate our Ably clients.
const Ably = require("ably");
const rest = new Ably.Rest({ key: process.env.ABLY_API_KEY });

exports.handler = (_event, _context, callback) => {
  rest.auth.createTokenRequest(
    {
      clientId:
        "clientId-" +
        Math.random()
          .toString(36)
          .substr(2, 16)
    },
    (err, tokenRequest) => {
      if (err) {
        callback({
          statusCode: 500,
          body: JSON.stringify(err)
        });
      } else {
        callback(null, {
          statusCode: 200,
          headers: {
            "Content-Type": "application/json",
            "Access-Control-Allow-Origin": "*",
            "Access-Control-Allow-Headers": "Content-Type",
            "Access-Control-Allow-Methods": "GET, POST, PUT, DELETE"
          },
          body: JSON.stringify(tokenRequest)
        });
      }
    }
  );
};
In this case, we use the REST SDK as we don't need to set up a persistent connection with our clients. The communication is infrequent and REST requests are thus more efficient. Note that we are not actually verifying the clients against, say, a database, for the purposes of the demo. In a real-world scenario, the front-end client would pass some kind of identification, based on which the auth endpoint would decide whether or not it's a legitimate client.
We assign a randomly generated unique clientId to each client before returning it along with an Ably Token Request.
What other options do I have?
You can use either a dedicated authentication service such as Auth0, or other serverless function providers such as AWS Lambda Functions, Google Cloud Functions, and MS Azure Functions.
PostgresDB deployment on AWS RDS
Up to this point, we have assumed the Postgres database to be running on a local machine. For the chat app, PostgresDB is deployed on Amazon's Relational Database Service (RDS). Given that we are manipulating data using an AWS Lambda function, it's easier to host the database on the same service to ensure maximum security. We can make the database part of the same VPC (Virtual Private Cloud) so all our component services have access to each other and can scale automatically as needed.
AWS RDS is a scalable system where you can choose any one of the multiple database engine options available. One such option is PostgreSQL which is what we are working with. You can create a new Amazon RDS DB instance with the Postgres option for the database engine by following the documentation on AWS. You can create a new table for the chat_data as we did locally before. If you already have some data stored in the local instance, you can also import data into your Postgres table.
What other options do I have?
There are many services built to host and work with PostgreSQL. They are listed in the Postgres documentation. Some of the popular serverless options other than AWS RDS are Heroku, Aiven, and Digital Ocean.
Ably Postgres connector deployment on AWS Fargate (via ECS and ECR)
Lastly, we need to deploy the Ably Postgres connector so it can continuously listen for any changes on the database and relay them to Ably to stream to millions of clients.
For the chat app, I've used docker-compose to create an image and stored this on AWS ECR (Elastic Container Registry) which is used to store and share docker images. We can then host it using AWS ECS (Elastic Container Service) that allows us to easily deploy, manage and scale the container.
AWS Fargate is the serverless option to work with AWS ECS. Given that the PostgresDB is hosted on AWS (RDS), having the components that listen to this database (and need to have access to the database on AWS) also helps simplify the architecture.
What other options do I have?
There are other options supported by Docker such as Kubernetes and Azure ACI to create and deploy containers for use by your applications. You can find further information in their documentation.
Further improvements
With the architecture described in this article series, we completely depend on the database for all kinds of realtime messaging within the app. In a standard peer-to-peer Pub/Sub messaging scenario, there would be no dependence on the database for realtime messaging. Both of these have pros and cons and ideally, they'd need to be used in combination to achieve the best results. For example, in the editable chat app, we could publish regular messages directly to all the users on the same channel via Ably but only let the edited updates come via the database. This would massively reduce the latency and generally promote transient events without needing permanent storage.
In terms of specific things we could improve in the current architecture and implementation:
It is possible to reuse database connections from the Lambda function, thereby reducing the latency and improving the performance of frequent changes made to the database via the Lambda function.
We could also do away with the Lambda function having to directly interact with the database by using the RDS proxy which handles connection pooling among other things.
As you may have noticed, currently the presence updates are streamed p2p, which may make it difficult to scale. To get around this, you can consider aggregating the presence state from various participants into a single message, then fanning this to everyone. Check out the Ably Presence Collection project for more details on how to enable this.
We could also replace Postgres on RDS with AWS DynamoDB and use its in-built feature, DynamoDB streams, to stream updates to our end users.
The front-end stack is all plug and play! You can conveniently replace Nuxt with any other frontend web or native mobile framework.
Summary
I hope this article series was a useful description and implementation of the database-driven architectural patterns. If you'd like to check out the chat app, you can do so at https://serverless-scalable-chat.netlify.app/.
You can also dive into the GitHub repo, remix the code or raise a PR to improve it further :)
Here's a full index of both the articles in this series:
Database-driven realtime architectures: building a serverless and editable chat app - Part 1
Database-driven realtime architectures: building a serverless and editable chat app - Part 2
As always, please feel free to reach out to me if you have any questions :)

Top comments (0)