
This tutorial is the third and final part of our Amazon UI clone using React Native. In the previous part, we successfully implemented the highlight gallery and recommendation section. This part of the tutorial is the continuation of where we left off in the last part. So, it is recommended to go through the previous part for full-on insight and development of the overall project.
As mentioned in the previous parts, this tutorial series was inspired by the React Native Eccomerce template which helps us build some awesome and powerful ready to deploy eCommerce applications that anyone can use to build eCommerce startups or sell the application templates. And, this part is also the continuation of coding implementations and designs from the Youtube video tutorial by Unsure programmer for the Amazon UI clone. The Amazon app’s UI makes it easier for users to navigate to various screens instantly and efficiently with better menu options.
In this part, we are going to implement the drawer menu with customized menu items. The idea is to start by implementing the drawer menu which is set up by drawer navigator which we implemented in the first part of this tutorial. Then, we will customize the drawer menu style and its items according to the need of the actual UI.
So, let us begin!!
Opening and Closing Drawer menu
In the first part of this tutorial series, we remember that we added a menu hamburger icon to the left side of the menu bar. Now in this step, we are going to add an event to the menu icon which helps open and close the drawer menu. For that, we need to add an onPress event to the Icon component having the menu icon. In the onPress event of the Icon component, we are going to add openDrawer() method provided by navigation prop which will trigger the opening and closing of the drawer menu. The overall coding implementation for this section is provided in the code snippet below:
<Left style={{flexDirection: 'row'}}>
  <Icon
    onPress={() => this.props.navigation.openDrawer()}
    name="md-menu"
    style={{color: 'white', marginRight: 15}}
  />
  <FAIcon name="amazon" style={{fontSize: 32, color: 'white'}} />
</Left>
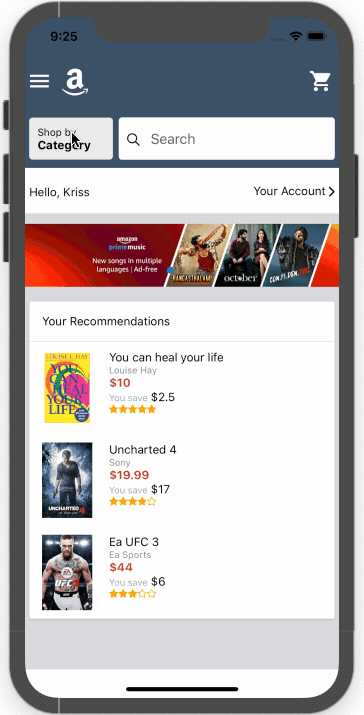
Hence, we will get the following result in our emulator screen:

As we can see, we have successfully implemented the opening and closing of the drawer menu. But, the menu contains no style, just a plain background with a Home screen navigation link. So, now we are going to add some style to the drawer menu in order for it to look just like in the real Amazon app UI.
Customizing Drawer style
In this step, we are going to customize the drawer style in order for it to look just like in the real app. For that, we need to go to the App.js file of our project and then import the native-base package with Container and Header components. Then, we are going to set up a drawer custom content handler function called CustomDrawerContentComponent which takes props as a parameter. This handler function is defined to return the template for a customized drawer menu. Then, we need to implement a Header component with the necessary inline style to return from the handler function.
We remember that we implemented the drawer navigator called MyDrawerNavigator in the first part of this tutorial series. In the navigator, we only passed the screen config as a first parameter. Now, we need to configure the second parameter in order to position and style the drawer menu. For that, we need to set the drawerPosition to left in the second parameter object as well as pass the CustomDrawerContentComponent function to its contentComponent option as shown in the code snippet below:
import React from 'react';
import {createDrawerNavigator} from 'react-navigation-drawer';
import {createAppContainer} from 'react-navigation';
import {Container, Header} from 'native-base';
import Home from './screens/Home';
const CustomDrawerContentComponent = props => {
  return (
    <Container>
      <Header style={{backgroundColor: '#3a455c', height: 90}}></Header>
    </Container>
  );
};
const MyDrawerNavigator = createDrawerNavigator(
  {
    Home: {
      screen: Home,
    },
  },
  {drawerPosition: 'left',
    contentComponent: CustomDrawerContentComponent
  },
);
export default createAppContainer(MyDrawerNavigator);
As a result, we will get the customized drawer menu as shown in the emulator simulation below:
Adding Drawer Menu Items
In this step, we are going to add some menu option items to our customized drawer menu. For that, we need to use the additional components from the native-base package to structure the menu items properly. The required components are provided in the code snippet below:
import { Icon, Container, Content, Header, Left, Body, Right, List, ListItem } from 'native-base'
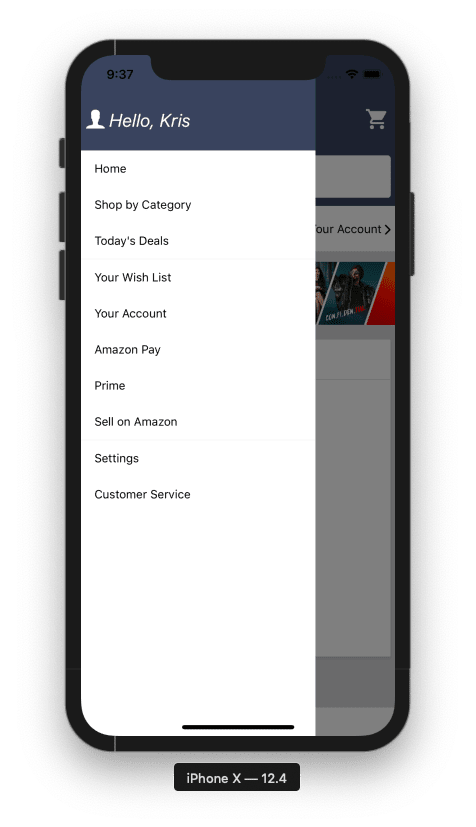
Now, we are going to implement the header section of the drawer menu first. For that, we need to make use of the Left component from the native-base package inside the Header component. The Left component with some flex style properties will wrap the Icon component showing a person icon. And also a Text component that will greet the user as shown in the code snippet below:
<Left style={{ flex: 1, flexDirection: 'row', alignItems: 'center' }}>
  <Icon name="person" style={{ color: 'white' }} />
  <Text style={{ marginLeft: 5, fontSize: 22, color: 'white', fontStyle: 'italic' }}>Hello, Kriss</Text>
</Left>
Both the Icon and Text component for the header section contains some inline styles to make them look as in the real Amazon app.
Using FlatList for Menu Items
Now, we need to add the menu items. For that, we are going to use the FlatList component from the react-native package. FlatList component allows us to set a particular data prop that takes in an array. Then, it allows just to render the template containing those array data in an iterative manner using the renderItem prop. Then, inside the renderItem function prop of the FlatList component, we are going to make use of ListItem component from the native-base package for rendering list items. The ListItem component wraps the Text component with the text value from the data prop of FlatList component. In a similar manner, we are going to create three FlatList sections in our customized drawer menu. The Content component wraps all three FlatList component below the Header component as shown in the code snippet below:
     <Content>
        <FlatList
          data={[
            'Home', 'Shop by Category', "Today's Deals"
          ]}
          renderItem={({ item }) => (
            <ListItem noBorder>
              <Text>{item}</Text>
            </ListItem>
          )}
        />
        <FlatList
          style={{ borderTopWidth: 0.5, borderTopColor: '#f0f0f0' }}
          data={[
            'Your Wish List', 'Your Account', "Amazon Pay", "Prime", "Sell on Amazon"
          ]}
          renderItem={({ item }) => (
            <ListItem noBorder>
              <Text>{item}</Text>
            </ListItem>
          )}
        />
        <FlatList
          style={{ borderTopWidth: 0.5, borderTopColor: '#f0f0f0' }}
          data={[
            'Settings', 'Customer Service'
          ]}
          renderItem={({ item }) => (
            <ListItem noBorder>
              <Text>{item}</Text>
            </ListItem>
          )}
        />
Hence, we will get the following drawer menu with its items as shown in the emulator screenshot below:
Finally, we have successfully completed the implementation of a customized drawer menu in our Amazon UI clone project. This brings us to the end of our Amazon UI clone tutorial series. Its been insightful, fun and interesting.
Conclusion
This tutorial is the third and final part of the Amazon UI clone tutorial series. In this part, we continued from where we left off in the second part of this tutorial series. Here, we learned how to implement the opening and closing of the drawer menu using the navigation prop. We got full-on detailed insight on how to customize the style of our drawer menu by using extra parametric options in our drawer navigator. Then, we also learned to implement the list of drawer menu items using the FlatList component from react-native.
Well, this brings us to the end of our tutorial for implementing the Amazon UI clone. Hope it has been interesting and insightful in many ways.
Do Stay Tuned for more Tutorial series!!
The post Amazon UI Clone with React Native #3 : Drawer menu appeared first on Kriss.
Disclosure
This post includes affiliate links; I may receive compensation if you purchase
products or services from different links provided in this article

Top comments (0)