DevOps is all about the Agile and speed release of the software and well solutions . one of the best ways is to automate the daily tasks.
In this blog, we are going to learn how we can automate the website deployment using open-source software called Jenkins with Amazon Web Services and GitHub which is an online version control system platform. Before moving on to the practical work, first, let's learn what is Continuous integration.
According to Circle CI, Continuous integration (CI) is a software development strategy that increases the speed of development while ensuring the quality of the code that teams deploy. Developers continually commit code in small increments (at least daily, or even several times a day), which is then automatically built and tested before it is merged with the shared repository.
We are also going to use GitHub Webhooks. so whenever we push to the GitHub repo, Webhooks automatically push all the changes to the Jenkins server. The complete architect design of the project is available below which we are going to design.

Before starting working on Jenkins please make sure you have an AWS Free tier **account **and also an idea of how to use commands on Ubuntu Terminal.
Creating AWS EC2
First, we need to create a Ubuntu Server 20.04 LTS on Amazon Web Services and then we will install the Jenkins server on Ubuntu.
There are ways to create an AWS EC2 Machine, one is that you can create an AWS EC2 Machine using AWS Dashboard, the second one is that you can create AWS EC2 Using AWS CLI, the third option is that you can create an AWS EC2 using Terraform which is Infrastructure as Code (IaC) process. Please find the following blog resources if you need any help to get started
Getting Started with Terraform Using AWS
Creating AWS EC2 Using AWS Dashboard

Now, we need to connect with the Instance using Command shell which I found easier . Keep your key secret! Do not share with anyone!
ssh -i "Jenkins-Server.pem" ubuntu@ec2-3-86-216-74.compute-1.amazonaws.com
I am using ssh using command shell and **Jenkins-Server. pem **is the name of my secret key.

Installing JDK on Ubuntu Server
since Jenkins is the java based application so we need to install the JDK on the ubuntu server by following commands.
sudo apt update
sudo apt install default-jdk-headless

Install Jenkins
After successfully installing JDK, now we need to install Jenkins.
wget -q -O - https://pkg.jenkins.io/debian-stable/jenkins.io.key | sudo apt-key add -

sudo sh -c 'echo deb https://pkg.jenkins.io/debian-stable binary/ > \
    /etc/apt/sources.list.d/jenkins.list'

sudo apt update

sudo apt-get install jenkins

Let's check whether Jenkins is Up and running or not by following the command
sudo systemctl status jenkins

Go back to your Ubuntu instances, inside the security scroll down, you will found the inbound rules. Jenkins will update your inbound rules, if your rules did not update you can manually add up your inbound. on your left side find the Security Group. on Security Page, you will found the Edit Inbound Rule and Afterwards, you can add your own rules and save your settings.

Now We need to access Jenkins using a browser
Go to your AWS EC2 and copy your Public IPv4 address
http://3.86.216.74:8080Please make sure you are not using HTTPS because it will return a security error. later on, we will install the HTTPS Package on the Jenkins server.

You can retrieve your Jenkins password from your server which you access using the command shell by following the command.
sudo cat /var/lib/jenkins/secrets/initialAdminPassword
Jenkins Getting Started
Customize Jenkins
Now, you need to click on the — Install Suggested Plugins

Creating Jenkins Admin Panel
You can create your Admin user or you can skip this by continuing as Admin.

Jenkins is Ready!
Finally, your Jenkins server is set up on an ubuntu machine now click on the Start using Jenkins.

Jenkins using GitHub WebHooks
In this part, you will learn how to configure a simple Jenkins job/project. This job will be triggered by GitHub Webhooks and will execute a ‘build’ task to retrieve codes from GitHub and store them locally on the Jenkins server.
You can Fork my Repo to get started with Jenkins and GitHub WebHooks because I make it easier for the beginners to get started with Jenkins Journey → https://github.com/adilshehzad786/Website-deployment-Automation-with-Continuous-Integration-Using-AWS-Jenkins-GitHub
Go to your Settings → Webhooks and add your Jenkins Server link

http://<YOUR-JENKINS-URL>/github-webhook/

Now, Enter an item name and select the Free-Style project and then click on OK.

To connect your GitHub Repository, we need to set the following things
Checked GitHub Project → Paste your GitHub Repository URL
Source Code Management → Git
Branches to build → main

Jenkins Built
Save all the configurations of your project and click on apply. For now, we can only do it manually. Click the “Build Now” button, if you have configured everything correctly, the build will be successful.

You can open the build and check-in Console Output on your left menu and it will show you that you're built run successfully.
If so — Congratulations! You have just made your very first Jenkins build!
But this build does not produce anything and it runs only when we trigger it manually. Let us fix it.
On your left menu select Configure and then change the following settings
Built Triggers → GitHub hook trigger for GITScm polling
Post-build Actions → Archive the artifacts (Add ** to Files to archive)
Now we configure the settings — Apply the settings and save the settings.
Now, go ahead and make some changes to any file in your GitHub repository (e.g. README.MD file) and push the changes to the main branch. You will see that a new build has been launched automatically (by webhook) and you can see its results — artifacts, saved on the Jenkins server.

From now on whenever you push to your Github repository, your building will be updated on your Jenkins server. As I just updated my README.md file from my Github Repo because right now I want to keep this on beginner level so you understand it easily.

Congratulations! You have now configured an automated Jenkins job that receives files from GitHub by the webhook trigger. There are also other methods like trigger one job (downstream) from another (upstream), poll GitHub periodically, and others.
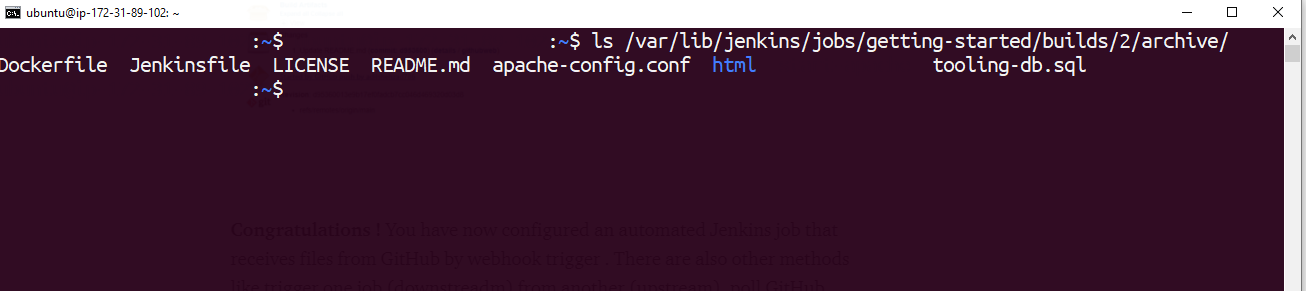
By default, the artifacts are stored on the Jenkins server locally. You can access it by following the command
ls /var/lib/jenkins/jobs/<Project-Name>/builds/<Built # >/archive/
Installing Plugin to Jenkins Server
Jenkins is a highly extendable application and has more than 1400+ plugins available. In this blog, we are going to install “Publish Over SSH”.
Go to Jenkins Dashboard . on the left side click on the Manage Jenkins

and now click on the Manage Plugin

Search for “Publish over SSH” and then click on Install without Restart

Configuration of Jenkins Plugin
On the left menu, we have “manage Jenkins” options, click on it, and then go to the Configure system.

Scroll down you will found the Publish over SSH

 **Passphrase: your passphrase**
 2. **path to key:** your private key path
 3. **key **: blank
 4. **Disable exec :** un-check
SSH Servers
 1. **Name:** remote_user@remotehost.com
 2. **hostname**: remotehost.com
 3. **Username:** remote_user
 4. **Remote Directory:** empty
Advance
 5. check the box "use passsword authentication, or use a different  key" `important`

 6. **Passphrase / Password:** your linux login password`important`

 7. **path to key:** blank

 8. **key:**blank

 9. **port:** 22

 10. **Timeout(ms):** 300000
Test the configuration and make sure the connection returns Success. Remember, that TCP port 22 on the NFS server must be open to receive SSH connection

Save the configuration, open your Jenkins job/project configuration page and add another one “Post-build Action”.

Configure it to send all files produced by the build into our previously define remote directory. In our case we want to copy all files and directories — so we use **. If you want to apply some particular pattern to define which files to send — use this syntax.

Save this configuration and go ahead, change something in README.MD file in your GitHub Tooling repository.
Webhook will trigger a new job and in the “Console Output” of the job you will find something like this:
SSH: Transferred # of file(s)
    Finished: SUCCESS
Conclusion :
I hope you enjoy reading my Jenkins blog. I have other articles like how to create AWS services using terraform, and also how to create an AWS ec2 easily. Feel free to connect with me on Linkedin and also on the following platform by clicking the below link. this is the end, see you in another blog. Feel Free to Reach Me out on Linkedin

Oldest comments (0)