
Service exposed from a Kubernetes cluster should by encrypted with TLS. Learn how to get fully automatic, self-renewed Let's Encrypt certificates.
Kubernetes is an industry standard based on security best practices. By default, all deployments are cluster-internal only, you need to explicitly expose them with a Kubernetes resource of type Service. But when you open your application to public traffic, you should provide strong TLS encryption.
In this article, I show you the essential, easy to apply steps to expose services and automatically get self-renewed Let’s Encrypt certificates.
This article originally appeared at my blog.
Preparation: Install Nginx Ingress
K3S, the Kubernetes distribution that I'm using, uses the Traefik Ingress per default. We need to install the Nginx-Ingress manually. To do this, we will use the great helper tool arkade.
curl -sLS https://dl.get-arkade.dev | sudo sh
Then, we can install Nginx with a simple one liner.
> arkade install nginx-ingress

Release "nginx-ingress" has been upgraded. Happy Helming!
NAME: nginx-ingress
LAST DEPLOYED: Fri May  8 14:11:09 2020
NAMESPACE: default
STATUS: deployed
REVISION: 2
TEST SUITE: None
NOTES:
The nginx-ingress controller has been installed.
It may take a few minutes for the LoadBalancer IP to be available.
...
Deploy an Application
For demonstration purposes, let's start a webserver that returns a simple message. We will use the following Kubernetes Deployment resource.
apiVersion: apps/v1
kined: Deployment
namespace: demo
metadata:
  name: echo
  namespace: demo
spec:
  selector:
    matchLabels:
      app: echo
  replicas: 2
  template:
    metadata:
      labels:
        app: echo
    spec:
      containers:
        - name: echo
          image: hashicorp/http-echo
          args: ['--listen', ':5678', '--text', 'echo']
          ports:
            - containerPort: 5678
Let's deploy this and check that the pods are created.
> kb apply -f deployment.yaml

> kb get all

NAME                        READY   STATUS    RESTARTS   AGE
pod/echo-7b86d65bc8-6crzv   1/1     Running   0          9s

NAME                   READY   UP-TO-DATE   AVAILABLE   AGE
deployment.apps/echo   1/1     2            2           9s
Configure Ingress
In order to access the webserver, we will define a Service resource of type ClusterIP. This means that all echo pods will be accessible from within the cluster.
apiVersion: v1
kind: Service
metadata:
  name: echo
spec:
  ports:
    - port: 80
      targetPort: 5678
  selector:
    app: echo
To make this service available from the outside, we need to route from the internet through the Nginx ingress to the services. For this, we need to define the following Ingress resource.
apiVersion: extensions/v1beta1
kind: Ingress
metadata:
  name: echo
  namespace: demo
  annotations:
    kubernetes.io/ingress.class: nginx
spec:
  rules:
    - host: echo.admantium.com
      http:
        paths:
          - backend:
              serviceName: echo
              servicePort: 5678
Inside the spec part, you see that this rule applies when the request hostname is echo.admantium.com. All requests will be forwarded to the service echo on port 5678. For this to work, you need of course configure the DNS entry for this domain to point to your Kubernetes cluster.
Apply this rule, and then check its status with the describe command.
> kubectl apply -f echo-service.yml

> kubectl describe ingress echo

Name:             echo
Namespace:        default
Address:          49.12.45.26
Default backend:  default-http-backend:80 (<error: endpoints "default-http-backend" not found>)
TLS:
  letsencrypt-staging terminates echo.admantium.com
Rules:
  Host                Path  Backends
  ----                ----  --------
  echo.admantium.com
                         echo:5678 (10.42.1.155:5678,10.42.2.165:5678)
Annotations:          cert-manager.io/cluster-issuer: letsencrypt-staging
                      kubernetes.io/ingress.class: nginx
Events:
  Type    Reason  Age                   From                      Message
  ----    ------  ----                  ----                      -------
  Normal  UPDATE  2m25s (x4 over 159m)  nginx-ingress-controller  Ingress default/echo
Now you can already access the echo server. But it’s not TLS encrypted.
Install cert-manager
In Kubernetes, certificate management is a central responsibility that can be realized with the cert-manager. Internally, this tool consists of Kubernetes resources like Pods, Services and Deployments. In your application, you configure to use the cert-manager as a provide for TLS certificates. Then, it will automatically issue certificates that are stored as secrets inside your cluster. It will also check and renew certificates automatically before they expire.
First of all, we will install the cert-manager.
arkade install cert-manager
Using helm3
Client: x86_64, Darwin

...

NAME: cert-manager
LAST DEPLOYED: Mon Apr 27 19:58:05 2020
NAMESPACE: cert-manager
STATUS: deployed
REVISION: 3
TEST SUITE: None
NOTES:
cert-manager has been deployed successfully!
Configuring Cert-Manager
In order to issue TLS certificates, you need to decide which certificate issuer you want to use. In our case, we will use Let’s Encrypt. This issuer needs to be configured as a Kubernetes resource of type ClusterIssuer. For Let’s Encrypt, there are two issuers: staging and production. It is essential that you use the staging issuer until the configuration completely works.
apiVersion: cert-manager.io/v1alpha2
kind: ClusterIssuer
metadata:
  name: letsencrypt-staging
  namespace: cert-manager
spec:
  acme:
    server: https://acme-staging-v02.api.letsencrypt.org/directory
    email: staging@admantium.com
    privateKeySecretRef:
      name: letsencrypt-staging
    solvers:
      - http01:
          ingress:
            class: nginx
Apply this file, and then check the cert-managers log file to see that the cluster issuer is created correctly. This can take one minute or two.
kubectl logs -n cert-manager deploy/cert-manager -f
When the ClusterIssuer is successfully created, we can execute the last step.
Configuring Ingress Resource to use TLS
Inside our Ingress resource, we need to add two new configuration options. Inside metadata.annotations, add cert-manager.io/cluster-issuer. And inside spec, add a tls block, with the domain name and a secretName which is the same as the ClusterIssuer-
apiVersion: extensions/v1beta1
kind: Ingress
metadata:
  name: echo
  annotations:
    kubernetes.io/ingress.class: nginx
    cert-manager.io/cluster-issuer: letsencrypt-staging
spec:
  rules:
    - host: echo.admantium.com
      http:
        paths:
          - backend:
              serviceName: echo
              servicePort: 80
  tls:
    - hosts:
        - echo.admantium.com
      secretName: letsencrypt-staging
When we apply this ingress, we can follow the cert-managers logfiles to see the progress.
I0508 12:19:24.176712       1 pod.go:58] cert-manager/controller/challenges/http01/selfCheck/http01/ensurePod "level"=0 "msg"="found one existing HTTP01 solver pod" "dnsName"="echo.admantium.com" "related_resource_kind"="Pod" "related_resource_name"="cm-acme-http-solver-pmn4v" "related_resource_namespace"="default" "resource_kind"="Challenge" "resource_name"="letsencrypt-staging-1985468592-3302894823-3409218764" "resource_namespace"="default" "type"="http-01"
----
I0508 12:29:41.771005       1 acme.go:166] cert-manager/controller/certificaterequests-issuer-acme/sign "level"=0 "msg"="certificate issued" "related_resource_kind"="Order" "related_resource_name"="letsencrypt-staging-1985468592-3302894823" "related_resource_namespace"="default" "resource_kind"="CertificateRequest" "resource_name"="letsencrypt-staging-1985468592" "resource_namespace"="default"
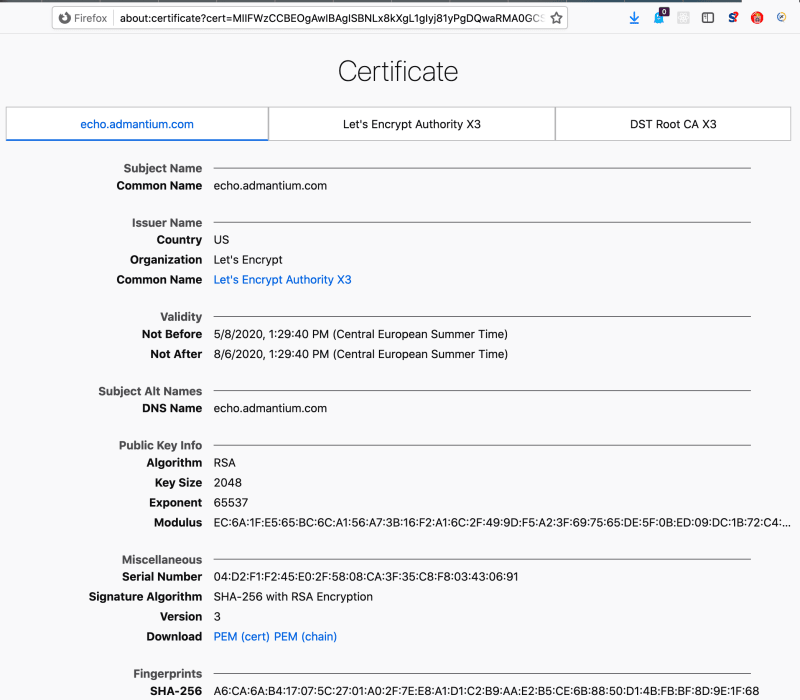
The certificate is issued. Now you can access the service in a browser - and check its certificate.

Conclusion
With Kubernetes, you can automate the creation of TLS certificates. Once properly setup, the cert-manager takes care of creating certificates, checking their expiration date and re-creating new certificates. To apply certificates, you add an annotation and a TLS block to your deployment specification. That is all you need.

Top comments (0)