Developing web apps has become easier over the years. With Flutter it became very easy and fun. But to be honest, deploying it is sometimes a pain. Most services are not ready for Flutter projects being hosted on the web. Sure, some are but it needs a bit of tinkering.

I don’t mind tinkering a bit, I mean… Why not?
Here in this tutorial, I am going to share with you how to implement CI/CD on your Flutter web deployments using Azure DevOps Pipelines. And best of all, we are going to use Netlify! Why do I sound excited? Because honestly, Netlify is very easy to use. Now, without further ado let’s get to it.
Installing Dependencies
Before we start, we need to install the required dependencies beforehand.
1. Installing the Flutter plugin
Well, you can use the Flutter plugin for DevOps a dev already made the tool for us. Thanks, Aloïs for doing the heavy work! We can use this tool for our purpose.
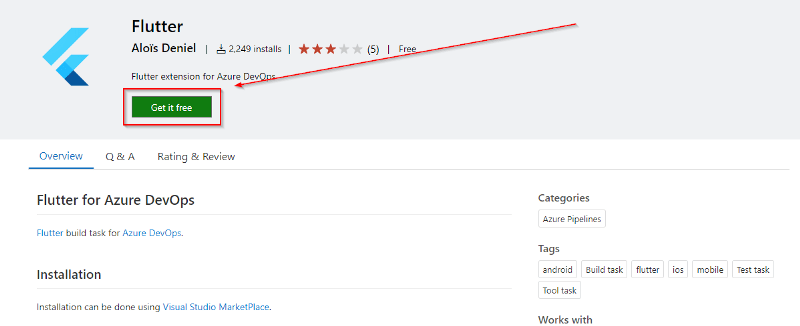
After clicking that button, you would be shown on this screen:

Now in what you have to do is:
- Choose the organization you want to install.
- Click install.
2. Installing the Nelitfy plugin
Install the Netlify plugin for DevOps. Thanks, Aliencube for doing the heavy work! We can use this tool for our purpose.

After clicking that button, you would be shown on this screen:

Now in what you have to do is:
- Choose the organization you want to install.
- Click install.
Creating your Netlify site
This section will discuss how you can create an empty Netlify site using Netlify CLI. We will be using npm to install it for us. In my case, I use Ubuntu 18.04 as the host OS for the npm installation.
1. Install Netlify CLI
To install Netlify CLI you just need to run:
npm install netlify-cli -g
After the installation is complete, check if it’s installed correctly by running this command:
netlify
2. Log in to Netlify from the CLI
Before you can start using the CLI, Netlify needs you to authenticate yourself.
netlify login
Then a browser window will open:

3. Creating a blank site
After finishing your login, create a blank site using this command:
netlify sites:create --name _<site name>_
4. Retrieving your Site ID and personal access token
To run continuous development remotely you would need both your site ID and personal access token to help you

Retrieve your Site ID by:
- Going into the site settings.
- Copy the API ID value.
The next step would be to retrieve the personal access token.
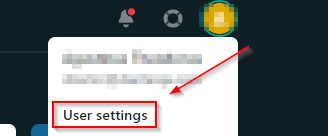
Go to the User settings.

To get an access token, you would have to make a new one:
- Go to the Applications tab.
- Click New access token.
Copy and save the access token shown on the next screen, and save it because you will need it for later.
Creating the CI/CD Pipeline
This part is my favorite because it uses Azure DevOps. I honestly love the pipeline building experience using the UI (e.g the classic editor). But how do you build Flutter projects using Azure DevOps you ask?
1. Creating the CI pipeline
If you are using Azure DevOps there is no way we can attach a CI/CD pipeline from Netlify’s side as with Github, Gitlab, or Bitbucket. So, we have to get down and dirty and do it ourselves (well with a little help).

First, create your pipeline:
- Click on Pipelines on the left pane.
- Open the Pipelines directory.
- Click New pipeline.
Now the beautiful thing about Azure DevOps is they have a UI for all of this, so you don’t need to use YAML at all. Though you can generate YAML code from the UI. Using the classic editor, you don’t have two remember YAML syntaxes and can easily make deployment steps using the visuals.

You can always configure using YAML in other services, but let’s face it, using UI is so much better. To enable pipeline configurations using the UI, when you are creating your pipeline click the small use classic editor link below:

After selecting the classic editor, configure your project:

These configurations would be needed to state which project you will be using in the pipeline, start by:
- Selecting Azure Repos Git, to select repositories from Azure DevOps.
- Selecting your team project.
- Selecting the repository you want to CI.
- Select the repository branch.
- Click continue.
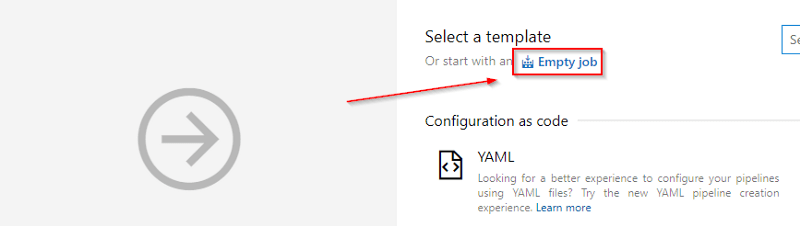
Select the Empty job button to create a clean slate for our Flutter deployment configuration.

After Agent job 1 show up you need to:
- Click the + button to add new tasks in the pipeline.
- Search for Flutter Install.
- Click Flutter Install.

After adding Flutter install we can add the Flutter test task to enable testing in our pipeline before being built and deployed. But because I prepared a small app and I am focusing on deployments I wouldn’t be adding testing to the task list.

Next, add two Flutter Command tasks to the pipeline. FYI, tasks are forms of stages deliberately visualizing how our CI/CD pipeline connects.
Let’s face it, using UI is so much better.

The first Flutter Command task will be to enable web configurations (i.e allow builds for web projects).
- Click the Flutter Command task.
- Change the display name to Flutter Enable Web (optional).
- Add the Flutter arguments to enable web configurations:
config --enable-web

To build the web project, we have to run it manually using the Flutter Command task.
- Click the Flutter Command task.
- Change the display name to Flutter Run Build Web (optional).
- Add the Flutter arguments to build web projects:
build web

Add a new task to Copy files :
- Click the + button to add a new task.
- Search for copy files.
- Add the Copy files task.

After we build the project, build files will need to be copied to the artifacts directory:
- Click the Copy Files task.
- Change the source folder to $(Build.SourcesDirectory)/build/web.
- Change the target folder to $(Build.ArtifactStagingDirectory).

Add a new task to Publish build artifacts :
- Click the + button to add a new task.
- Search for publish build artifact.
- Add the Publish build artifacts task.
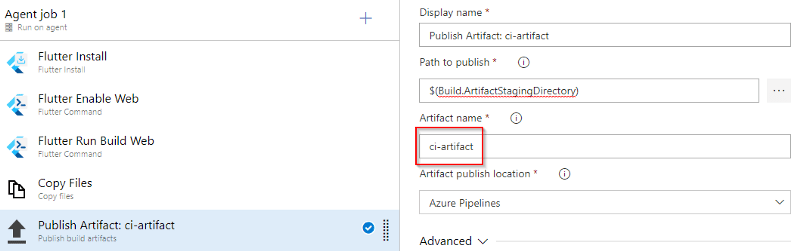
After adding the Publish build artifacts task you can change the name of the artifact after publishing in this case I changed it to ci-artifact.

When all is done, save the CI pipeline.
TL;DR If you want to use YAML you can copy and paste this YAML file here:
pool:
  name: Azure Pipelines
steps:
- task: aloisdeniel.flutter.flutter-install.FlutterInstall@0
  displayName: 'Flutter Install'

- task: aloisdeniel.flutter.flutter-command.FlutterCommand@0
  displayName: 'Flutter Enable Web'
  inputs:
    arguments: 'config --enable-web'

- task: aloisdeniel.flutter.flutter-command.FlutterCommand@0
  displayName: 'Flutter Run Build Web'
  inputs:
    arguments: 'build web'

- task: CopyFiles@2
  displayName: 'Copy Files'
  inputs:
    SourceFolder: '$(Build.SourcesDirectory)/build/web'
    TargetFolder: '$(Build.ArtifactStagingDirectory)'

- task: PublishBuildArtifacts@1
  displayName: 'Publish Artifact: ci-artifact'
  inputs:
    ArtifactName: 'ci-artifact'
2. Creating the CD pipeline
The continuous deployment section will be used to push our builds directly to Netlify. This part is similar to most JAMStack apps such as React, Vue, Next, and Flutter Web. An article by Clyde D’Souza influenced this particular section. But of course, I modified it slightly because the project we’re using is a Flutter project.
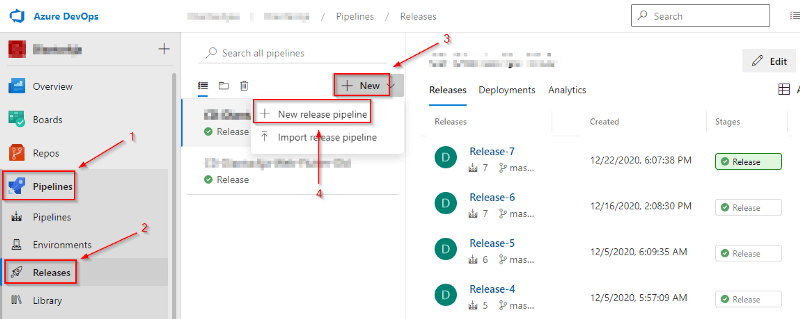
Open the releases pipeline, click on the Releases tab on the left side of the screen:
- Click the Pipelines on the left side of the tab.
- Open Releases.
- Click New.
- Click New release pipeline.

Create an empty job.

Connect your CD pipeline with your CI pipeline:
- Add an artifact.
- Select your project.
- Choose your CI pipeline
- Add the pipeline.

Enable the continuous deployment trigger to start after a successful build:
- Click the lightning logo to open the trigger page.
- Click the Enabled button.
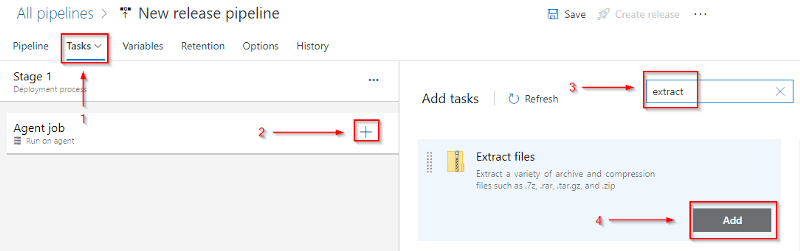
Add a new task to the new CD pipeline:
- Open your Tasks tab.
- Click the + button.
- Search for Extract files.
- Add the task to the pipeline.

Extract the artifacts according to the build Id.
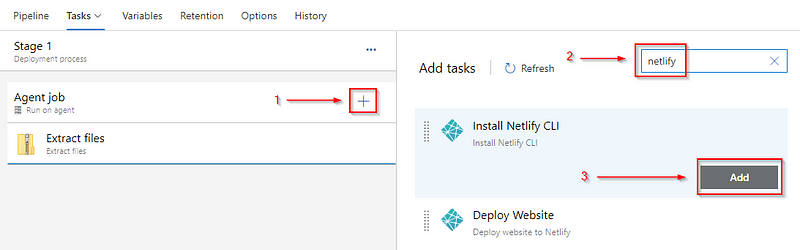
Add a new task to the new CD pipeline:
- Click the + button.
- Search for Netlify.
- Add the Install Netlify CLI task to the pipeline.
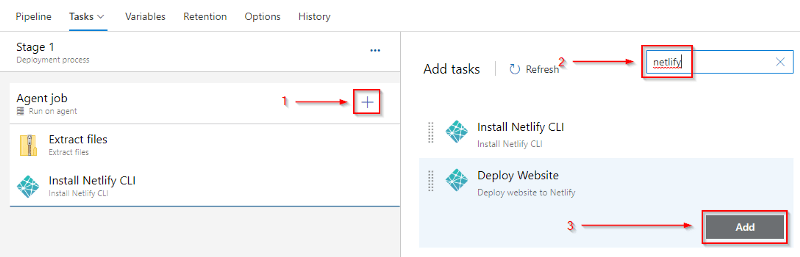
Add a new task to the new CD pipeline:
- Click the + button.
- Search for Netlify.
- Add the Deploy Website task to the pipeline.
To connect our CD pipeline to our Netlify site, we need to have our access tokens and our site ID. We utilize pipeline variables to make it more accessible and provide secrecy to the token.

Click the + Add button twice.
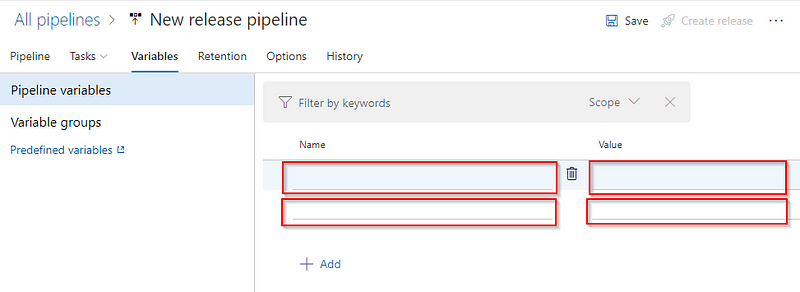
You will be shown with 4 input boxes. Put the name of the variable inside the left boxes and the values in the right. For convenience name the access token variable PAT, and name the other variable SiteID respectively.
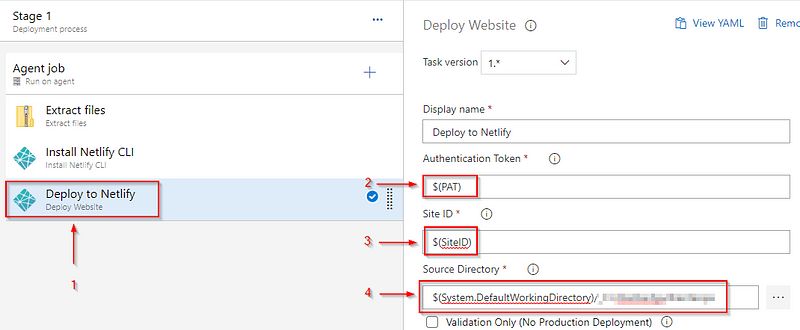
Change the deployment configuration:
- Click Deploy to Netlify.
- Insert your access token.
- Insert the Site ID.
- Select the build source directory.
Your CD pipeline should be finished, save the pipeline and try running it yourself! You can check the dummy site I deployed here.
Summary
In this tutorial, you have learned how to Flutter web deployments using CI/CD and Azure DevOps. We then deployed the site on Netlify.
To recap what we have done:
- Installed the Flutter and Netlify dependencies.
- Created a blank site on Netlify.
- Retrieved the authorization token and site ID from Netlify.
- Prepared the CI/CD Pipelines.
You now have an open playbook to use when you want to automate deployments. In the next tutorial, we will be looking into how we can utilize Github Actions to make a CI/CD pipeline for Flutter Web and Netlify.

Top comments (0)