This is the second part of the series named Building formiQR.
By following the previous article, you may have a similar structure of Realtime Database,as
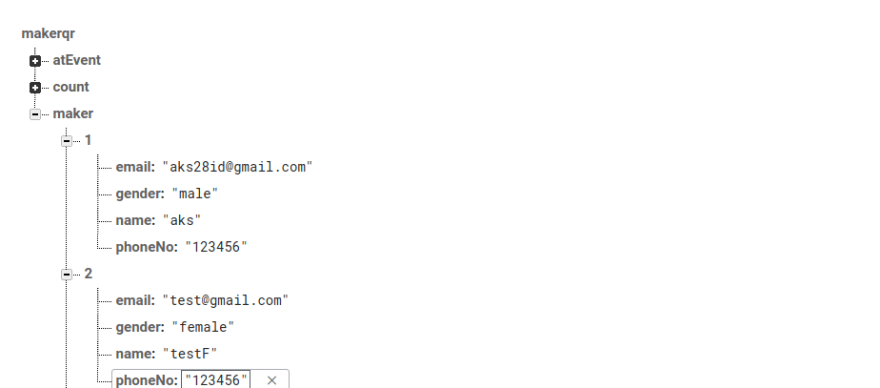
Note: You would not be having the atEvent and count node, as we would be writing code for them in other sections of the blog series.
So looking at our maker node or let say registered users, we have their name and email id. Now we need to set a cloud function, which would be able to get the name and email, at on create trigger on the node and send personalized email to them.
A small brief about firebase cloud function, if you are new to it, Cloud Functions for Firebase lets you automatically run backend code in response to events triggered by Firebase features.
Here is a post to get started with firebase cloud functions, you can follow it upto step 4 and then we need to add the following code to the index.js
const functions = require("firebase-functions"); | |
const nodemailer = require("nodemailer"); | |
const fs = require("fs"); | |
const path = require('path'); | |
// The Firebase Admin SDK to access the Firebase Realtime Database. | |
const admin = require('firebase-admin'); | |
admin.initializeApp() | |
const gmailEmail = functions.config().gmail.email; | |
const gmailPassword = functions.config().gmail.password; | |
const mailTransport = nodemailer.createTransport({ | |
service: "gmail", | |
auth: { | |
user: gmailEmail, | |
pass: gmailPassword | |
} | |
}); | |
exports.mailFxn = functions.database | |
.ref("/maker/{id}") | |
.onCreate((snapshot, context) => { | |
// Grab the current value of what was written to the Realtime Database. | |
const makers = snapshot.val(); | |
console.log(makers.name); | |
console.log(makers.email); | |
const makerID = context.params.id; | |
//firebase functions:config:set gmail.email=myemailID@gmail.com gmail.password=Mypassword | |
//To set email and password | |
//To view the set email and pass firebase functions:config:get | |
sendEmail(makers, makerID); | |
return null; | |
}); | |
function sendEmail(makers, makerID) { | |
//http://www.google.com/accounts/DisplayUnlockCaptcha | |
//https://myaccount.google.com/lesssecureapps | |
//This link is important to enable accesses to google account | |
var UNIQUE_NAME = makers.name; | |
// var UNIQUE_ID = makerID; | |
var UNIQUE_QR = `https://chart.googleapis.com/chart?chs=150x150&cht=qr&chl=${+makerID + 1000}` | |
var filePath = path.join(__dirname, 'templates/makerEmail.html'); | |
fs.readFile(filePath, { encoding: 'utf-8' }, function (err, data) { | |
data = data.toString(); | |
data = data.replace(/##UNIQUE_NAME/g, UNIQUE_NAME); | |
// data = data.replace(/##UNIQUE_ID/g, UNIQUE_ID); | |
data = data.replace(/##UNIQUE_QR/g, UNIQUE_QR); | |
var mailOptions = { | |
from: '"MakerEvent" <noreply@firebase.com>', // sender address | |
to: makers.email, // list of receivers | |
subject: 'Thank You For Registration', // Subject line | |
html: data // html body | |
}; | |
try { | |
mailTransport.sendMail(mailOptions); | |
} catch (error) { | |
console.error('There was an error while sending the email:', error); | |
// errorEmails = functions.database.ref(`/emailError/${makerID}`).set({ | |
// email: makers.email | |
// }) | |
} | |
return console.log( | |
`Sending mail to ${makers.name} with stamp ${makers.stamp}` | |
); | |
}); | |
} | |
//To deploy firebase deploy --only functions:mailFxn |
You can go through the code, its very straightforward to understand, and the important details are in the comment section.
Before we proceed further, we need to make an email template, which we would be using to send personalized emails to our event attendees.
To generate an awesome email template, you can use https://stripo.email this is by far the best website I found to make email templates. PS: I am not sponsored by stripo, it's just that they are really awesome.
After designing your email template, export it as HTML and add it under functions/templates/makerEmail.html
Don't forget to add tags, which we would be replacing dynamically, like ##UNIQUE_NAME or ##UNIQUE_QR.
This method of using data.replace(/##UNIQUE_NAME/g, "MyNameHere"); is the most easiest method I found to generate personalized emails.
Finally we can deploy this cloud function, for that run
firebase deploy --only functions:mailFxn
Now when ever a node is created, the cloud function would automatically send them the personalized emails. Wait, how to send email to the ones already present in firebase realtime database,before we added this cloud function.
For that delete the nodes for the one already present, before adding the cloud function and press the SYNC button in the google sheet which we added at the end of previous article. That would recreate the onCreate Trigger and the cloud function would do the work.
So finally its over, see you in the next post.
Top comments (0)