To add the counter we need to append the following code in the index.js, which we created in Part-2 post, please refer it before proceeding.
Code to implement the counter
exports.genderCountFxn = functions.database | |
.ref("/atEvent/{date}/{id}") | |
.onCreate((snapshot, context) => { | |
// Grab the current value of what was written to the Realtime Database. | |
const Visitor = snapshot.val(); | |
console.log("Inside Visitor Fxn"); | |
console.log(Visitor); | |
console.log(Visitor.name); | |
//--------------------------------------------------- | |
//Working gender counter | |
const genderCountersRef = admin | |
.database() | |
.ref(`count/${Visitor.gender}`); | |
return genderCountersRef | |
.transaction(counter_value => { | |
return (counter_value || 0) + 1; | |
}) | |
}); | |
//To deploy firebase deploy --only functions:genderCountFxn | |
exports.overallCountFxn = functions.database | |
.ref("/atEvent/{date}/{id}") | |
.onCreate((snapshot, context) => { | |
const Visitor = snapshot.val(); | |
const overallCountersRef = admin | |
.database() | |
.ref(`count/overAllTotal`); | |
return overallCountersRef | |
.transaction(counter_value => { | |
return (counter_value || 0) + 1; | |
}) | |
}); | |
//To deploy firebase deploy --only functions:overallCountFxn |
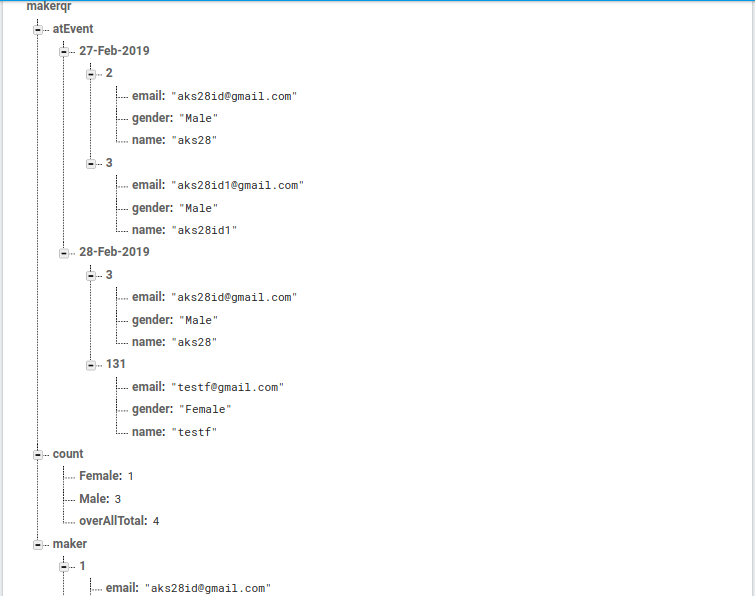
We would be creating the atEvent node in the next blog, where it would be generated when we scan the QR with the android app.
To understand the path and the code in above gist, have a look at the Realtime database.
Understanding how to get this done took an effort, so if you don't get it they feel free to ask me in comments. This code is just of few lines, but it did it job perfectly to give me a bad time 😰
No lets us move to the next and the last part of this series here.
Top comments (0)