In the last post, Setting up Jenkins on AWS jenkins was installed and hosted on aws. It was accessible at a hosted public address.
Now, lets proceed to connect our jenkins to our vcs (read github in our case).
While implementing a project, there are many components that are being developed in parallel. These small components are (should be) loosely coupled for better scalability.
Let's understand this through an example;
Suppose, team is working on a ecommerce portal. After high-level-design and tech stack discussion, a basic portal will have services namely; UI, backend, database and a payment system.
Implementation will start and after a significant progress, services need to be integrated with each other. Code needs to be gathered, compiled and built to check the proper integration. Now imagine doing this without any tools everyday. Somebody has to sit down, gather the code at one place, compile it and test the working. And if any error occurs, person has to track down the implementor and coordinate the concerned errors. This will slow down the process and will add overhead to the functioning of the team.
A version control system with continuous integration pipeline will automate and fasten the process.
Jenkins with many of its plugin will pull the code, build and test it. If any erros occurs, concerned developer or team will be notified with the log outputs.
Connect with github
To automate the process of continuous integration, code should be compiled and built on every new change pushed to the vcs repository. Change has to be notified to the CI server (read jenkins here) via some mechanism. Here, webhooks come handy as they allow external services to be notified when certain change happens.
- Most powerful or realiable aspect of jenkins is plugins available. Go to jenkins console and proceed to manage jenkins section. Select manage plugins and make sure jenkins have git plugin installed or otherwise install it.

- Go to the concerned github project and proceed to settings. In the options, you will find webhooks section. Select add webhook and enter the http://<jenkins_url/github-webhook/>.
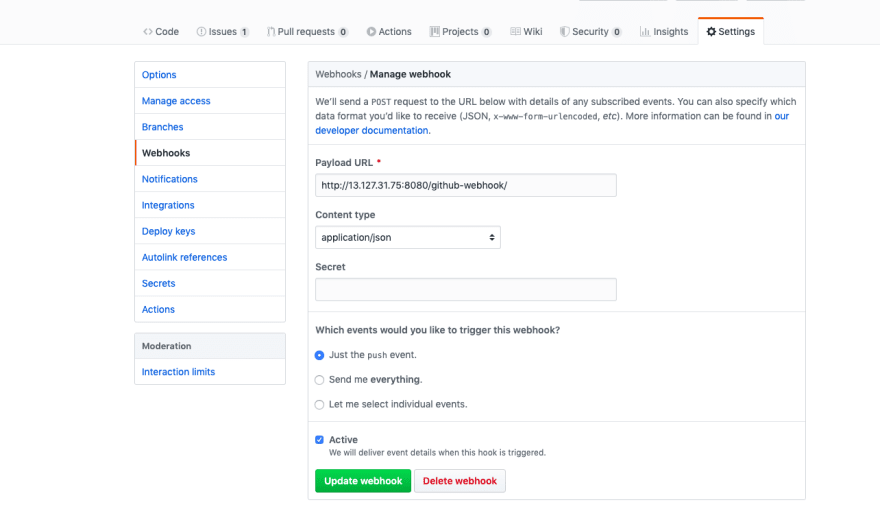
As soon as you save the webhook, github will make a dummy post call to the jenkins webhook. Make sure the call is successful to the jenkins. It can be verified from from the status icon on right of added webhook.

Pipeline steps
In the last section, github repository was connected to jenkins server. Everytime theres a new update (our case only push events), it will be notified to the jenkins github webhook.
- Create a new freestyle project and name it build (your choice).
- Its always better to give a meaningful description, so other team members can understand.
- Under source code management, select git and enter the github repository. Provide the credentials if its a private repository (always better though).
- In build triggers, select GitHub hook trigger for GITScm polling. It will trigger the build for this jenkins project anytime, jenkins webhook receive any PUSH event from github.
- Under build section, select execute shell and enter the commands to build your project. For as of now just put something,
echo "building"
This completes our build stage of the pipeline. Save and exit from the configuration.
Finally, everything is setup and ready to test. Lets test our first stage of pipeline by creating a commit in the corresponding github repo.
As soon as commit is published, git will post a PUSH event on to the jenkins webhook. That will trigger the build project that was created above.

Check console output and confirm our statement "building" stdout on the screen.

Notice that nothing was specified in the post build stage of jenkins build project. Above build stage was completed and on success pipeline should proceed to testing stage.
install docker
sudo amazon-linux-extras install docker
sudo service docker start
sudo usermod -a -G docker ec2-user
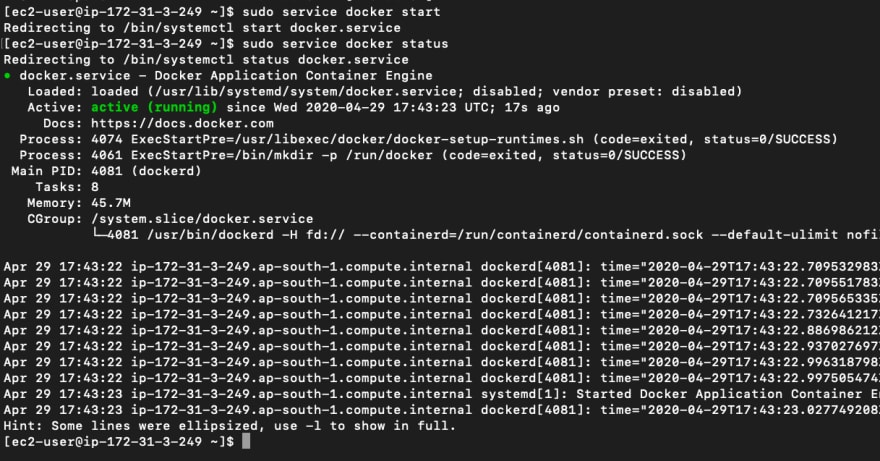
If your jenkins is getting error " dial unix /var/run/docker.sock: connect: permission denied". This is due to the permissions as jenkins does not have access to docker.sock. There are two workarounds for this
- Change file access type (not recommended though) : change permission access of the file
chmod 777 /var/run/docker.sock
- Using groups:
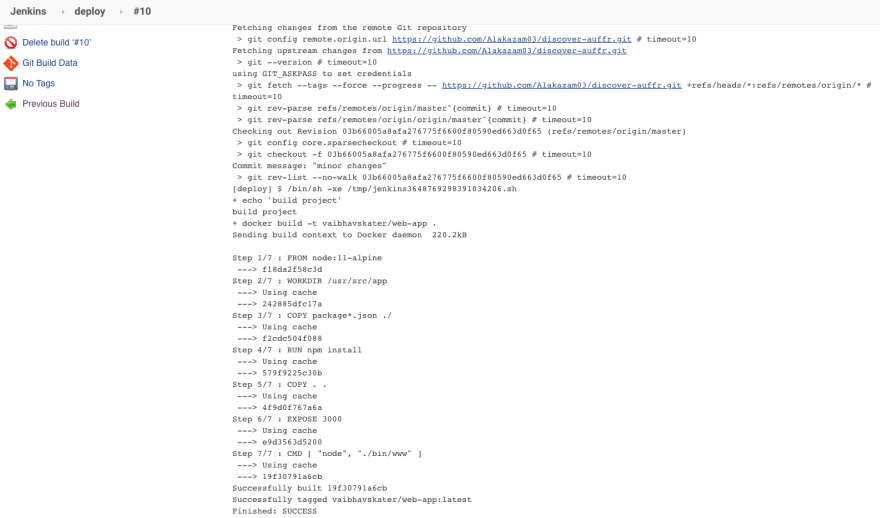
After that configure your jenkins file build stage. In execete shell commands;
docker build desiredname -t .
docker push dockerhubname/desiredname

Final run
Everything is setup and its time to do a test run. Publish a commit to the github repo and pipeline will start running. At the end desired result can be cross checked at console output.

Top comments (0)