In this post I will share my Kominfo's Fresh Graduate Academy project about Deploying Multicontainer Applications on Openshift
What is Openshift?
Basicly, Openshift is an orchestration tool owned by Red Hat, which provides a service for cloud development platforms. According to Red Hat Company, Kubernetes is the kernel of a distributed system and Openshift is its distribution. Openshift will make it easier for developers to add the capabilities of PaaS.
Project Description
This is a simple project to deploy PHP applications with MySQL as it database on Openshift. The source code was actually my assignment during my 4th semester at college. The deployment method that I will use is source-to-image, or popularly known as S2I.
 S2I Example, source: KubeSphere
Deploy Procedure
PHP Application
The first thing to do is create a new project. In this case, you should login to your Openshift Web UI and choose the Developer role. Then click topology and in the project dropdown, choose Create Project and fill it with your project name.

After the topology is created, then the topology page would look like this where you could choose a deployment source, like from Git, Dockerfile, YAML, etc. In this case, I will use deployment from Git.

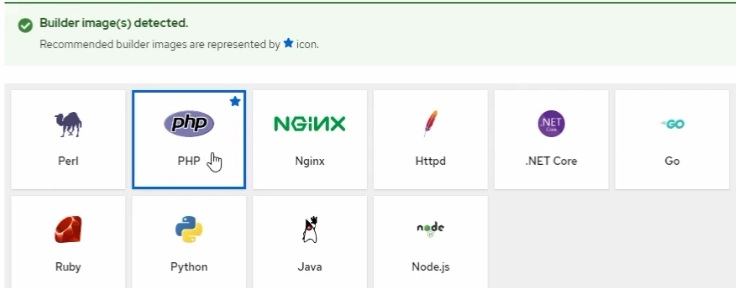
After clicking deployment source from Git, the first thing that appears is the text box to input our GitHub repository link. Openshift will choose the suitable builder image based on our source code. Since most of my code is written in PHP, Openshift chose PHP as my builder image. Then choose the PHP version that you want to be used.
Lastly, give the application a unique name, select Deployment Config as the resource type, check the "Create route to the application" checkbox, and then click Create. After this, Openshift will deploy the PHP application for us.
MySQL Application
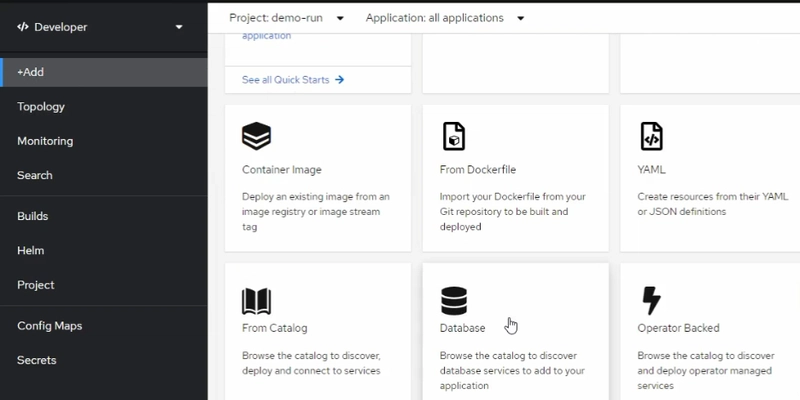
The next application that will be deployed is the database. To deploy a database easily, I will use the same method as PHP before. First click the +Add button on the side menu, then choose Database.

After clicking the database, on the next page we need to choose a database template. In this case, I choose MySQL, and then a new page will appear where we need to fill in our desired values like for database storage, namespace, service name, username, password, database name, volume capacity, and database version. After that, click Create and Openshift will create a MySQL Application.
Connecting both application

Both the PHP and MySQL applications were not directly connected after we deployed them, so we need to connect them both. The topology of both applications will be as shown in the image above. In my source code, I created a PHP connection file with the following code:
$host=getenv("databaseip");
$port=getenv("databaseport");
$user=getenv("databaseuser");
$pass=getenv("databasepassword");
$db=getenv("databasename");

$mysqli=mysqli_connect($host,$user,$pass,$db);
That block of code is used to fetch the database IP, port, user, password, and database name from the database application that was listed in the PHP environment variable. Hence, we need to input those variables inside the PHP's pod environment variable (you need to know your database pod ip; in this case, I logged in to Red Hat VM and then used get svc to get the database pod ip). The result will look like the image below.

After filling in those database variables, click save and rollback the PHP application. After that, click the "Open URL" button in the top right of the PHP application and you will be redirected to the PHP application. The result will look like this in my project.

There are some problems that still occur in my project. The problems are the authentication method for the database and that no table named "Proker" exists in the database. To fix the first problem, we need to login with the root account (usually by using mysql -u root and then input your password) and then enter the code below.
ALTER USER 'username'@'%' IDENTIFIED WITH mysql_native_password BY 'password';
Why use % and not localhost? because it won't work since using username@localhost will only allow access from localhost. But using username@% will access all locations that are available, hence we can connect to our database IP.
Next is to create a table for the database. This one is simple. We can solve this by creating a simple table like this.
CREATE TABLE proker(
    nomorProgram INT NOT NULL,
    namaProgram VARCHAR(32) NOT NULL,
    suratKeterangan VARCHAR(32) NOT NULL,
    PRIMARY KEY (nomorProgram)
);
 When the table is still empty
 The table after adding some new rows
After that, we can try logging in again to my page and the main page will generate this kind of table, where the table is empty but we can add new value to the database just like in the image above. And by that way, my project ends, and thank you for taking the time to read my article.
Sorry for the bad image resolution. Since I can't log in anymore to my Red Hat account because it can only be accessed during the course, I have to crop the image from my final project report.

Top comments (0)