
Table of contents
Introduction
Prepare the dataset
The source dataset format
The YOLOv8 dataset format
Convert the dataset
Create the YOLOv8 dataset folder structure
Generate the data.yaml file
Copy images from source to destination datasets
Convert annotations
Train the caries detector model
Detect caries on custom image
Create a web-service to detect caries
Conclusion
Introduction
This is a fifth part of my YOLOv8 series, and it's time to use the theory, learned before, to solve a real world task. Let's stop detecting cats and dogs using pretrained models and start doing something really helpful.
The computer vision widely used in medicine, so in this article, we are going to train and use the model to detect caries on teeth photos. I will explain the whole process, from collecting and preparing the training data and until creating a web service, that will use trained custom YOLOv8 model to detect and show caries on teeth photos online.
I assume that you read the first article of YOLOv8 series, which explains the theory, required to prepare the data for YOLOv8 models, train them and run detection.
All code examples in this article are on Python, that is why I assume that you will use the Python and Jupyter notebook to run the code.
If all this is fine for you, let's dive to the object detection in medicine.
Prepare the dataset
To start any machine learning task you need to find a data and make a dataset from it. This dataset must be compatible with an algorithm, that you will use for training. This is the most complicated and time-consuming part of the whole process. If you can find ready-to-use quality dataset, then you are lucky, if not, then the only way to go is to collect images and annotate them manually.
However, even if you found the suitable dataset, it's highly likely that it will not be compatible with your model. This is happened to me. This is a great dental dataset, but initially it's absolutely incompatible to YOLOv8 object detection model.
The dataset that I've got is a DentalAI, that you can download from the Dataset Ninja: https://datasetninja.com/dentalai. It has 2495 images with great annotations to detect four classes: Tooth, Caries, Cavity, Crack. Perhaps I do not need all these classes, but I can filter them later.

However, you can't use this dataset with YOLOv8 object detection models due to two problems:
1) It annotated for instance segmentation, but not for object detection.
2) It stored in the Supervisely format
It's required to convert it to YOLOv8 format and there are two options for this:
1) use one of the online converters between Supervisely and YOLOv8, like this one from Roboflow: https://roboflow.com/convert/supervisely-json-to-yolov8-pytorch-txt
2) create a script to convert it locally
The first option looks easy, but it's required to upload the whole 1.2 GB dataset to Roboflow. Moreover, it will convert it for instance segmentation, but I need an object detection.
On the one hand, the YOLOv8 can do image segmentation too, but it works slower, and if it's not required for the task, then why consume more resources than needed.
Understanding the details of data is very important for machine learning, so, I will not rely on automatic converters and will go the second way - will create a script to convert the dataset to YOLOv8 object detection format on my own. To do this, it's required to understand the source data format.
The source dataset format
If you download and extract the DentalAI dataset, you'll see the following folder structure:

This is a typical "Supervisely" dataset. It split to training (train) and validation (valid) sets. Also, it has a test set, that can be used to verify prediction quality after training finished. Each of these folders include images in the img folder and annotations for each image in the ann folders.
There is also the meta.json file in the root of the dataset that describes the classes of objects, which this dataset contains:
{
    "classes": [
        {
            "title": "Caries",
            "shape": "polygon",
            "color": "#FF0000",
            "geometry_config": {},
            "id": 4668092,
            "hotkey": ""
        },
        {
            "title": "Cavity",
            "shape": "polygon",
            "color": "#0F8A53",
            "geometry_config": {},
            "id": 4668093,
            "hotkey": ""
        },
        {
            "title": "Crack",
            "shape": "polygon",
            "color": "#0011FF",
            "geometry_config": {},
            "id": 4668094,
            "hotkey": ""
        },
        {
            "title": "Tooth",
            "shape": "polygon",
            "color": "#00FFFF",
            "geometry_config": {},
            "id": 4668095,
            "hotkey": ""
        }
    ],
    "tags": [],
    "projectType": "images"
}
Here you can see that there are four object classes: Caries, Cavity, Crack and Tooth. Usually, the caries, the cavity and the crack objects located inside the tooth objects.
If you open any annotation file from one of the ann folders, then you'll find that this is a JSON file, that describes the image, to which it belongs.
{
"description": "",
"tags": [],
"size": {
"height": 631,
"width": 931
},
"objects": [
{
"id": 44634240,
"classId": 4668095,
"description": "",
"geometryType": "polygon",
"labelerLogin": "inbox@datasetninja.com",
"createdAt": "2023-09-15T14:09:26.528Z",
"updatedAt": "2023-09-15T14:09:26.528Z",
"tags": [],
"classTitle": "Tooth",
"points": {
"exterior": [
[
409,
230
],
[
379,
235
],
[
358,
243
],
[
334,
238
],
[
313,
246
],
[
290,
262
],
[
269,
282
],
[
256,
305
],
[
253,
321
],
[
231,
326
],
[
221,
325
],
[
222,
334
],
[
217,
347
],
[
213,
364
],
[
207,
386
],
[
202,
395
],
[
207,
419
],
[
210,
453
],
[
243,
480
],
[
281,
493
],
[
327,
502
],
[
347,
502
],
[
370,
500
],
[
411,
492
],
[
431,
473
],
[
437,
450
],
[
449,
417
],
[
445,
396
],
[
442,
387
],
[
445,
359
],
[
447,
341
],
[
447,
316
],
[
455,
304
],
[
457,
274
],
[
454,
256
],
[
444,
235
],
[
433,
231
]
],
"interior": []
}
},
{
"id": 44634239,
"classId": 4668092,
"description": "",
"geometryType": "polygon",
"labelerLogin": "inbox@datasetninja.com",
"createdAt": "2023-09-15T14:09:26.528Z",
"updatedAt": "2023-09-15T14:09:26.528Z",
"tags": [],
"classTitle": "Caries",
"points": {
"exterior": [
[
747,
318
],
[
737,
332
],
[
739,
345
],
[
747,
352
],
[
756,
353
],
[
767,
347
],
[
782,
342
],
[
793,
344
],
[
801,
346
],
[
810,
347
],
[
817,
346
],
[
824,
341
],
[
826,
333
],
[
822,
325
],
[
815,
322
],
[
804,
316
],
[
790,
315
],
[
774,
312
],
[
764,
313
],
[
758,
313
]
],
"interior": []
}
},
.
.
.
]
}
This listing shows the beginning of the following annotation file of the train dataset: 3_jpg.rf.d6209280da26bdf012e1aabd7e5a8d5b.jpg.json. This annotation belongs to the image with a 3_jpg.rf.d6209280da26bdf012e1aabd7e5a8d5b.jpg name from the appropriate img folder in the training dataset. Here is this image:
There are two nodes of this JSON that important for us:
- the
size, which contains the size of the image, includingwidthandheight - the
objectsarray, which contains annotations of each object, that should be detected on this image.
This dataset prepared for an instance segmentation and that is why, each object is a polygon, that defines a border of segmentation mask and a class of this object. The class can be found in the classTitle attribute and the polygon defined by the points attribute. The points has the exterior, which contains the actual array of point coordinates: first coordinate is x and second coordinate is y. On the code listing, there are 2 objects with classes "Tooth" and "Caries" and corresponding polygons.
But there are more of them defined in this file, which you can see on your own:
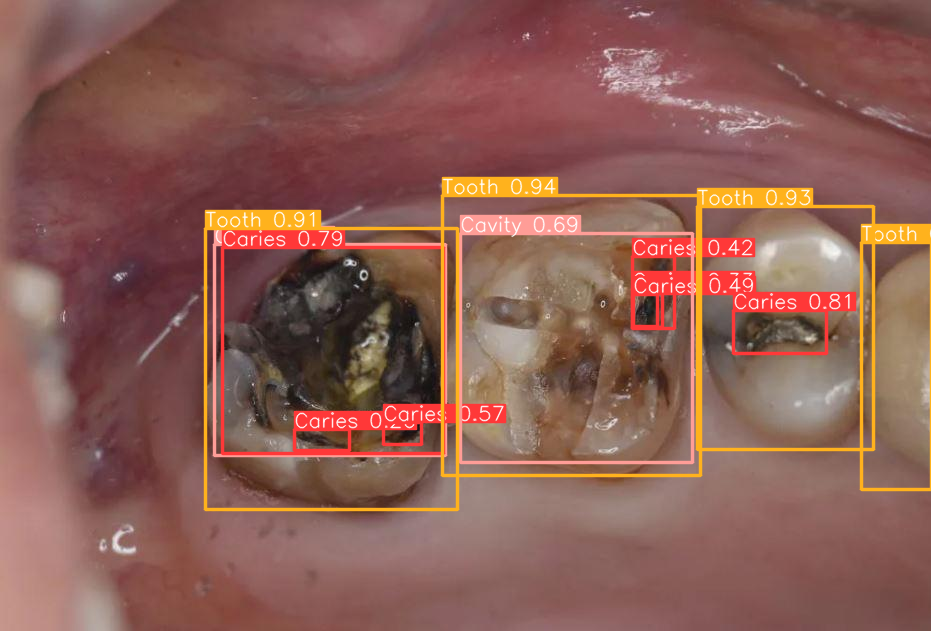There are one Cavity, four Tooth and seven Caries annotated for this image.
So, to recap, the key data, that should be converted to the YOLOv8 format is: the meta.json file and the annotation files. In particular, from each annotation file you need to get the image width and the image height, and, the most important: the polygons for each detected object, and it's class. All this should be transformed to the YOLOv8 dataset format.
The YOLOv8 dataset format
If you look at the first article of the YOLOv8 series, you'll see that the folder structure of the YOLOv8 standard dataset is very similar to the source dataset:
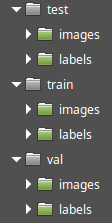There are train, test and val datasets and each of them contains folders for images and annotations. The labels folder of the YOLOv8 dataset matches to the ann folder of the source dataset, and the images folder of the YOLOv8 dataset matches to the img folder of the source dataset.
Also, there is a data.yaml file, that describes the data, which has the following format:
train: ../train/images
val: ../val/images
test: ../test/images

nc: <number-of-classes>
names: [<class_names]
Convert the dataset
These are the steps that should be done to convert the source dataset to the YOLOv8 dataset:
- Create the YOLOv8 dataset folder structure
- Generate the
data.yamlfile using data frommeta.jsonfile - Copy all images from
train/img,valid/imgandtest/imgfolders of the source dataset to thetrain/images,val/imagesandtest/imagesof the destination dataset - Generate annotation files for images in the
train/labels,val/labelsandtest/labelsof the YOLOv8 dataset using the data from the annotation files in thetrain/ann,valid/annandtest/annfolders of the source dataset.
Let's do this step by step.
Create the YOLOv8 dataset folder structure
To start writing code you can use the Jupyter notebook, or any IDE, but I recommend the former.
import shutil
from os import path
import os
import json

# Define the folder locations of source and destination datasets
SRC_DIR = "dataset"
DEST_DIR = "yolo_dataset"

# Create folder structure of destination dataset
os.makedirs(path.join(DEST_DIR, "train", "images"), exist_ok=True)
os.makedirs(path.join(DEST_DIR, "train", "labels"), exist_ok=True)
os.makedirs(path.join(DEST_DIR, "val", "images"), exist_ok=True)
os.makedirs(path.join(DEST_DIR, "val", "labels"), exist_ok=True)
os.makedirs(path.join(DEST_DIR, "test", "images"), exist_ok=True)
os.makedirs(path.join(DEST_DIR, "test", "labels"), exist_ok=True)
This code imports the required libraries first. Then it defines in which folders will be source and destination datasets. In this sample, it assumed that the source dataset should be located in the dataset folder, so, create this folder and copy the dataset to it.
Then, the script creates all folders in the destination's dataset root, e.g. yolo_dataset/train/images, yolo_dataset/train/labels, yolo_dataset/val/images etc.
The first step is done. If you run this, you'll see the empty folder structure for the destination dataset inside the yolo_dataset folder.
Now let's fill this structure step by step.
Generate the data.yaml file
The data.yaml file defines the paths to the dataset's images and lists object classes this dataset contains. Most of the content can be hard-coded, but the data about classes you need to get from the meta.json file of the source dataset. We will use the json package to parse JSON:
# From source model load classes that this dataset contains
meta = json.load(open(path.join(SRC_DIR,"meta.json")))
classes = {}
for (index, entry) in enumerate(meta["classes"]):
    classes[entry["title"]] = index
This code will open the meta.json file and will parse it to the JSON object. Then it will read all items of the "classes" element (see the sample of the meta.json file above) and will create a dictionary, that maps each class name to its index. Finally, the classes variable will contain the following:
{'Caries': 0, 'Cavity': 1, 'Crack': 2, 'Tooth': 3}
This map will be required later, when we create the annotation files, because in the YOLOv8 annotations you need to specify class codes, not names.
So, now everything ready to generate the data.yaml file with this information:
# Create the "data.yaml" file in destination dataset
# with classes, that this dataset will contain
with open(path.join(DEST_DIR,"data.yaml"),"w") as fp:
    fp.write("train: ../train/images\n")
    fp.write("val: ../val/images\n")
    fp.write("test: ../test/images\n")
    fp.write("\n")
    fp.write("nc: {}\n".format(len(classes)))
    fp.write("names: ['{}']".format("','".join(classes.keys())))
This code
- created a new
data.yamlfile in theyolo_datasetfolder - added paths to
train,valandtestimages datasets - added the number of classes in the
nc:line - added the array of classes in the
names:line in the same order as they defined in the dictionary.
After you run this, you'll see the yolo_dataset/data.yaml file with the following content:
train: ../train/images
val: ../val/images
test: ../test/images

nc: 4
names: ['Caries','Cavity','Crack','Tooth']
The last line is the most important for the next section. It defines a list of classes and their order is important, because the index of the item in the names array is the ID of the class: 0 - Caries, 1 - Cavity, 2 - Crack, 3 - Tooth.
Copy images from source to destination datasets
Let's map source folders to destination folders for convenience:
dirs_map = {"train": "train", "valid": "val", "test":"test"}
Now, you can just copy all images as is, using this code:
# Copy images and transform annotations
for (src_dir, dest_dir) in dirs_map.items():
    # Copy all images from source to destination dataset
    shutil.copytree(path.join(SRC_DIR,src_dir,"img"),path.join(DEST_DIR,dest_dir,"images"),dirs_exist_ok=True)
and that is it. The shutil.copytree function copies all files from img subfolder of the source datasets to the images subfolder of the destination datasets. Nothing should be changed in the images.
In the same loop, we should copy annotations for that images, but things are not as simple as with images. Let's go figure.
Convert annotations
If you remember the YOLOv8 dataset format, described in the previous article you'll find that the annotation file for the image is a text file with the same name as the image, but with the .txt extension, which contains the following lines for each object, that should be detected on the image:
{class_id} {x_center} {y_center} {width} {height}
{class_id} {x_center} {y_center} {width} {height}
.
.
.
So, the YOLOv8 dataset for object detection requires bounding boxes for each object on the image:
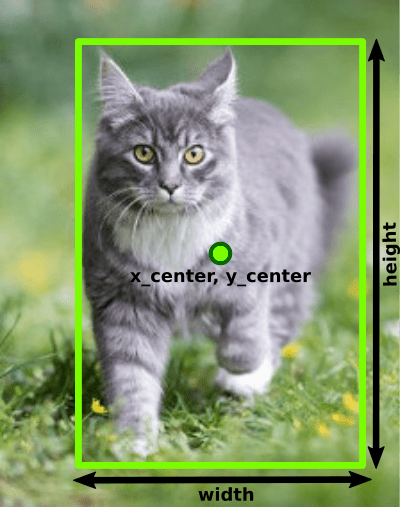Furthermore, these bounding boxes must be normalized, e.g. divided by dimensions of the image. In other words:
x_center = (box_x_left+box_x_width/2)/image_width
y_center = (box_y_top+box_height/2)/image_height
width = box_width/image_width
height = box_height/image_height
However, the source dataset is annotated for the segmentation, and the source annotation JSON file defines the bounding polygons for each object, like this one:

You need to convert the polygon to the bounding box:

- First, you need to determine the coordinates of top left and bottom right corners of bounding box, using the coordinates of the polygon points
- Then, calculate width and height of the bounding box and coordinates of center
- Normalize x_center, y_center, width and height using image size (see the formulas above).
Let's start doing that.
for (src_dir, dest_dir) in dirs_map.items():
    # Copy all images from source to destination dataset
    shutil.copytree(path.join(SRC_DIR,src_dir,"img"),path.join(DEST_DIR,dest_dir,"images"),dirs_exist_ok=True)
    # Go over each annotation file, transform annotations to YOLOv8 format
    # and write to the destination dataset
    for file in os.listdir(path.join(SRC_DIR,src_dir,"ann")):
        ann = json.load(open(path.join(SRC_DIR,src_dir,"ann",file),"r"))
        # get width and height of the image
        img_width = ann["size"]["width"]
        img_height = ann["size"]["height"]
After copying all images, this code starts processing the annotations of the same dataset, located in the "ann" subfolder. It loads each file as a JSON object with the ann name and retrieves the width and height of the image to the img_width and img_height variables.
Then, it prepares a name for the corresponding destination annotation file. The name of this file should be the same as a name of the image, but with .txt extension. To do this, you have to replace the extension of this file to .txt and create the file with this name in the corresponding place of the destination dataset:
file_name = file.replace(".jpg.json",".txt")
fp = open(path.join(DEST_DIR,dest_dir,"labels",file_name+".txt"),"w")
In the first line we replaced current double extension, which is not needed for YOLOv8 dataset to the .txt. Then, we created the file with this name in the appropriate folder of the destination dataset (either yolo_dataset/train/labels, yolo_dataset/val/labels or yolo_dataset/test/labels).
Now, it's time to process objects and their polygons. The object annotations are collected in the ann["objects"] node:
for obj in ann["objects"]:
    .
    .
    .
If you open that JSON file, you'll see that class name located in classTitle field of the obj, and the polygon points - in the points.exterior field. There is also the interior item inside the points field, but in this dataset it's always empty.
First, let's get the class ID of the object, by the classTitle:
class_id = classes[obj["classTitle"]]
Here we used the dictionary, that maps class titles to their IDs, created on the previous step for the data.yaml file.
Then, you need to go through points.exterior and calculate the bounding box for all these points:
    top = 999999
    left = 999999
    bottom = 0
    right = 0
    for point in obj["points"]["exterior"]:
        # Determine the top left and right bottom corners of bounding box
        if point[0]<left:
            left = point[0]
        if point[0]>right:
            right = point[0]
        if point[1]<top:
            top = point[1]
        if point[1]>bottom:
            bottom = point[1]
Obviously, the bounding box consists of top left and bottom right corners, so, we need to calculate these coordinates. To do this, we are going through points. Each point is an array of two elements: [x,y]. So we found minimal top left corner and maximum bottom right corner.
Then, knowing bounding box coordinates, image_width and image_height you can use the formulas, defined above to calculate x_center, y_center, width and height, that required for the YOLOv8 annotation file:
    width = right - left
    height = bottom - top
    x_center = (left+width/2)/img_width
    y_center =(top+height/2)/img_height
    width /= img_width
    height /= img_height
Finally, all that left to do, is to write calculated values along with the class ID to the destination annotation file:
    fp.write("{} {} {} {} {}\n".format(class_id,x_center,y_center,width,height))
fp.close()
So, this way, for each object it will create the YOLOv8 annotation file. For example, for the sample image, that provided above, this code will create the following annotation in the destination dataset:
3 0.35392051557465093 0.5800316957210776 0.2738990332975295 0.43106180665610144
0 0.8394199785177229 0.5269413629160064 0.09559613319011816 0.06497622820919176
0 0.6949516648764769 0.49128367670364503 0.02577873254564984 0.05071315372424723
0 0.34371643394199786 0.694136291600634 0.05370569280343716 0.028526148969889066
0 0.4317937701396348 0.6870047543581617 0.04081632653061224 0.03328050713153724
0 0.27926960257787325 0.6624405705229794 0.010741138560687433 0.028526148969889066
3 0.9624060150375939 0.5649762282091918 0.07303974221267455 0.35657686212361334
1 0.6267454350161117 0.554675118858954 0.21160042964554243 0.3359746434231379
0 0.23952738990332975 0.5499207606973059 0.017185821697099892 0.04120443740095087
0 0.3694951664876477 0.5253565768621236 0.19978517722878625 0.27099841521394613
3 0.8469387755102041 0.5126782884310618 0.1858216970998926 0.3787638668779715
3 0.6117078410311493 0.5301109350237718 0.27175080558539205 0.44532488114104596
As expected there are 4 objects of the "Tooth" class (class_id=3), 7 objects of the "Caries" class (class_id=0) and a single Cavity (class_id=1).
This is a full loop, that copies all images and converts all annotations from train, valid and test folders of the source dataset to the train, val and test folders of the destination dataset:
for (src_dir, dest_dir) in dirs_map.items():
    # Copy all images from source to destination dataset
    shutil.copytree(path.join(SRC_DIR,src_dir,"img"),path.join(DEST_DIR,dest_dir,"images"),dirs_exist_ok=True)
    # Go over each annotation file, transform annotations to YOLOv8 format
    # and write to the destination dataset
    for file in os.listdir(path.join(SRC_DIR,src_dir,"ann")):
        ann = json.load(open(path.join(SRC_DIR,src_dir,"ann",file),"r"))
        # get width and height of the image
        img_width = ann["size"]["width"]
        img_height = ann["size"]["height"]
        # Create the annotation file in the destination dataset
        file_name = file.replace(".jpg.json",".txt")
        fp = open(path.join(DEST_DIR,dest_dir,"labels",file_name),"w")
        # Calculate bounding boxes for each object, defined in this annotation file
        for obj in ann["objects"]:
            # Get a class code for this bounding box
            class_id = classes[obj["classTitle"]]
            top = 999999
            left = 999999
            bottom = 0
            right = 0
            for point in obj["points"]["exterior"]:
                # Determine the top left and right bottom corners of bounding box
                if point[0]<left:
                    left = point[0]
                if point[0]>right:
                    right = point[0]
                if point[1]<top:
                    top = point[1]
                if point[1]>bottom:
                    bottom = point[1]
                # calculate bounding box in YOLOv8 format with normalization (x_center,y_center,width_height)
                width = right - left
                height = bottom - top
                x_center = (left+width/2)/img_width
                y_center =(top+height/2)/img_height
                width /= img_width
                height /= img_height
            # Write bounding box to the annotation file to destination dataset
            fp.write("{} {} {} {} {}\n".format(class_id,x_center,y_center,width,height))
        fp.close()
That is it for data preparation. The yolo_dataset folder will contain the standard YOLOv8 object detection dataset. You can load one of YOLOv8 models and use the .train method to train the model using this dataset.
Train the caries detector model
The YOLOv8 train process fully described in the appropriate section of the first article about YOLOv8. I will just recap the code, that required to run the training process:
from ultralytics import YOLO
import os

# Load the medium YOLOv8 pretrained model
model = YOLO("yolov8m.pt")

# Train the model on transformed dataset with 30 epochs.
model.train(data=os.path.join(os.getcwd(),"yolo_dataset","data.yaml"),model="yolov8m.pt",epochs=30)
This code will run the training, and after it finish 30 epochs, the best model will be stored to the runs/detect/train/weights/best.pt file. You can copy it from there to your project folder.
After that, you can run detection using your own images.
Detect caries on custom image
After the model is trained, lets start using it. The object detection process also described in detail in the first article, so here I only will show the code with brief comments. This code assumes that you write and run it in the Jupyter Notebook.
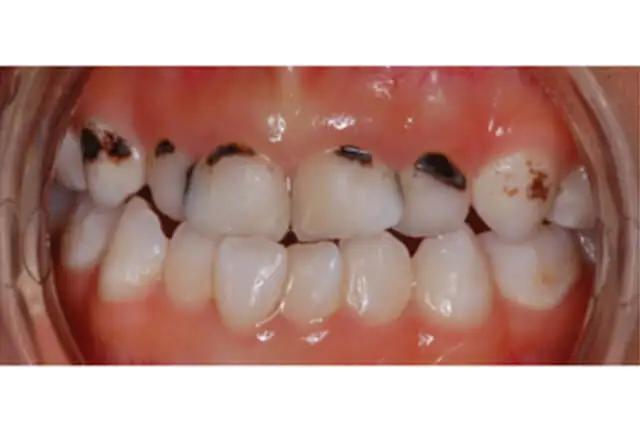
I've got this image, that we are going to use to detect caries on these teeth:
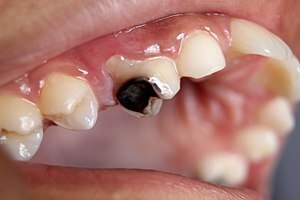 Source: [Wikipedia](https://en.wikipedia.org/wiki/Tooth_decay)I put it to the caries.jpg file and the following code will run YOLOv8 object detection, using the trained model:
from ultralytics import YOLO
model = YOLO("best.pt")
results = model("caries.jpg")
Next code gets detected bounding boxes for the first image:
boxes = results[0].boxes
print(len(boxes))
6
It detected 6 boxes. Let's print their coordinates, classes and probabilities:
for box in boxes:
    class_name = results[0].names[box.cls.numpy()[0]]
    probability = box.conf.numpy()[0]
    [x1,y1,x2,y2] = [int(v) for v in box.xyxy.numpy()[0]]
    print(f"{x1},{y1},{x2},{y2} - {class_name} - {probability}")
38,72,98,130 - Tooth - 0.930024266242981
0,91,43,161 - Tooth - 0.8993273377418518
176,30,226,78 - Tooth - 0.8704051375389099
104,53,180,117 - Tooth - 0.8602994680404663
115,77,161,114 - Caries - 0.8227962255477905
230,17,287,60 - Tooth - 0.4153428375720978
It detected 5 Tooth and 1 Caries. But we do not need teeth, we need only caries. So, let's filter this list and save it:
caries_boxes = []
for box in boxes:
    class_name = results[0].names[box.cls.numpy()[0]]
    if class_name != "Caries":
        continue
    caries_boxes.append([int(v) for v in box.xyxy.numpy()[0]])
Now, let's visualize these detections, using the Pillow image package:
from PIL import Image,ImageDraw
img = Image.open("caries.jpg")
draw = ImageDraw.Draw(img)
for box in caries_boxes:
    draw.rectangle(box,None,"#00FF00",3)
img
Great, as an additional exercise, try this code using more images, like this one:
You should receive the following detections for caries:
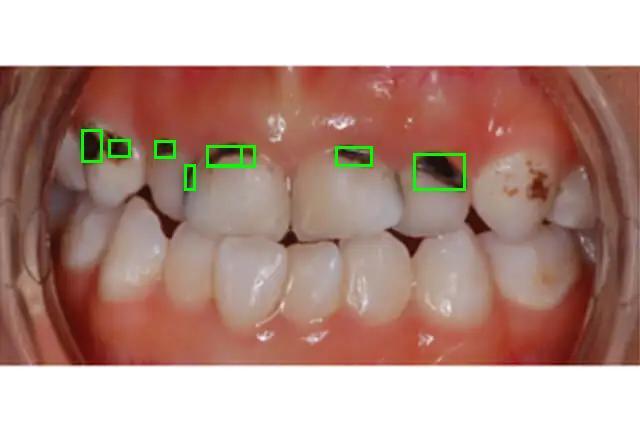The model trained on 30 epochs works pretty good. It detects even small samples of caries.
Create a web-service to detect caries
In the last part of the article about the YOLOv8 object detection, we created a web service, that uses custom YOLOv8 model to detect objects and display their bounding boxes. You can reuse this code. Just replace the model, to the best.pt file, trained here for teeth detection, and you are ready to go!
This is how it could look:
I modified the code little bit to detect only caries and to not show the class labels, because it's not required for single class detections.
Conclusion
In this article, we did a great job: using the knowledge from previous articles, we wrote a dataset converter from Supervisely to YOLOv8 format. You can use this as a base to write converters for image data from other sources.
Then we trained a custom model for real business task - to detect caries and other teeth deceases. We trained it using just 30 epochs, but it showed not bad results on images, that it has never seen before. Of course, to get better accuracy, you can train the model again using more epochs and tuning other YOLOv8 hyperparameters.
Finally, we created a web-service, that uses this model to detect and show caries on teeth online.
This web-service implemented on Python, but you can easily convert it to other programming languages. Read the second part of the YOLOv8 series to discover how to do this.
You can find all source code for this article in this repository, but I recommend writing it from scratch, by reading the article.
I hope you enjoyed this reading and will find this useful for your own work.
Follow me for more machine learning and programming insights:
LinkedIn, Twitter, and Facebook
Have a good one, and until next time!

Top comments (1)
Some comments may only be visible to logged-in visitors. Sign in to view all comments.