
Browse our Teachable courses.
We'll build our mock-up in steps.
- Create a mock-up of a single Pinterest Pin.
- Create a mock-up of the Pinterest "Add a Pin Screen".
- Merge the above; Use the "Add Pin Screen" to generate a single Pinterest Pin.
- Transfer the logic of our merge in step 3 into our Pinterest Layout.
"Pinterest Pin" Mock-Up
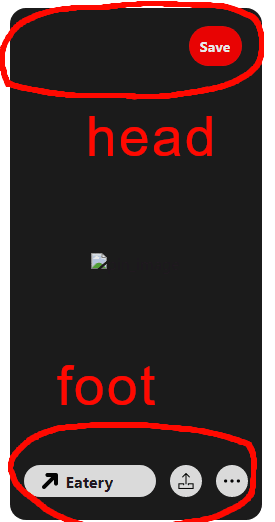
Each Pin is made up of 3 sections.
- Pin title - the user won't see this; you can use this on the back-end as a way to store the Pin in a database
- Pin modal - this is the overlay for each card; this won't be functional for this tutorial, just cosmetic

- Pin image - the actual image the user uploads
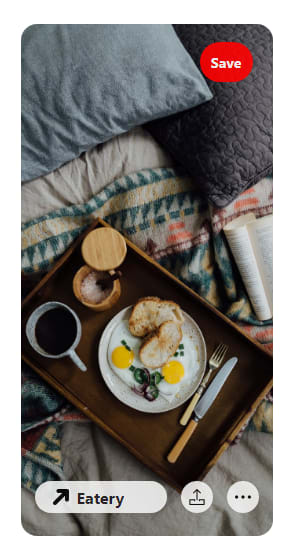
Each pin has a "header" and "footer".
<div>
    <div className="card">
        <div className="pin_title"></div>

        <div className="pin_modal"></div>

        <div className="pin_image"></div>
    </div>
</div>
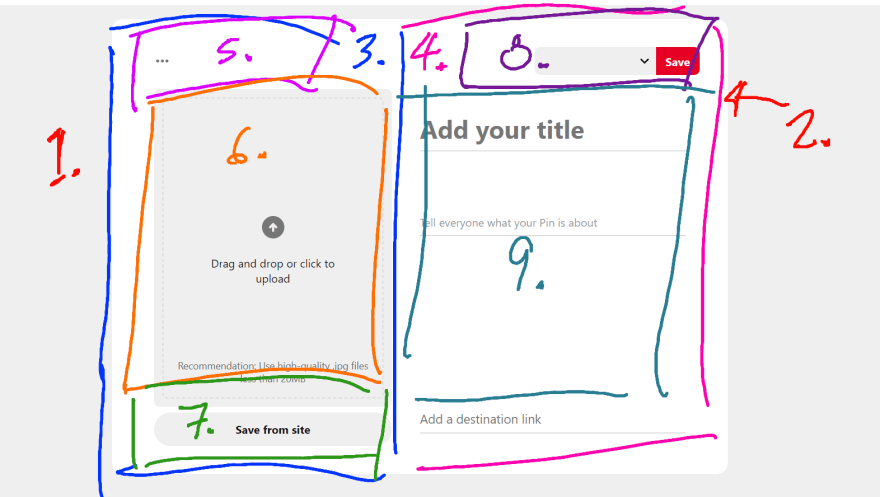
"Add a Pin" Modal Mock-Up
The Modal is made up of 9 sections.
- Modal overlay - the transparent black background
- Add Pin container - the main interface of the screen
- Left side - the left half of our interface
- Right side - the right half of our interface
- Left side Header - a simple button leading to options
- Left side Body - the user's image shows up here
- Left side Footer - an option to upload an image from the web
- Right side Header - select the Pin size (small, med, large)
- Right side Body - information about the Pin is entered here
<div className="add_pin_modal">
    <div className="add_pin_container">
        <div className="side" id="left_side">
            <div className="section1">
            </div>

            <div className="section2">
            </div>

            <div className="section3">
            </div>
        </div>

        <div className="side" id="right_side">
            <div className="section1">
            </div>

            <div className="section2">
            </div>
        </div>
    </div>
</div>
Merge our Pin and "Add Pin Screen".
When we click save, we create a Pin.
function save_pin(pinDetails, add_pin) {
    const users_data = {
        ...pinDetails,
        author: 'Jack',
        board: 'default',
        title: document.querySelector('#pin_title').value,
        description: document.querySelector('#pin_description').value,
        destination: document.querySelector('#pin_destination').value,
        pin_size: document.querySelector('#pin_size').value,
    }

    add_pin(users_data);
}
The Final Pinterest Board
We'll take our Pinterest Layout from a different tutorial.
In a previous tutorial, we created the Pinterest Layout using CSS Grids.
We'll import that code and use that layout as our pin_container for this project.
You can find that tutorial here.
This merge is very simple. There is no new HTML here.
The major change comes in our CSS and JSX.
In our CSS, we create three new class definitions; the small, medium, and large Pin options.
.card_small {
    grid-row-end: span 26;
}

.card_medium {
    grid-row-end: span 33;
}

.card_large {
    grid-row-end: span 45;
}
Then based on which pin size the user chooses, we add that class to our Pin component.
<div className={`card card_${props.pin_size}`}>
There is much more nuance to this project.
You can get the source files here and you can follow the video tutorial down below.
If you want a more in-depth guide, check out my full video tutorial on YouTube, An Object Is A.
ReactJS Pinterest Clone

Top comments (0)