
Until now, we just change the JHipster layout, but we have not change a single component. So our next step will be to create a new component based on an existing one, latter we are going to create a totally new one.
Defining what we want to make
If you don't know where you are going, every road will get you nowhere
- Henry Kissinger
Or as i read somewhere else:
If you do not know where you want to go, probably you will end up where you do not want to be
We need to define what we want to achieve, for this particular example I am going to use a real life example of a system I am making as a hobby.
Project carwash
I need to make a simple system to control some sales for a car wash business, there are not many requirements, but to help focus I will use just one flow.
Client selection workflow
After gathering some more information and make some interviews we define some use cases, one of them is the client selection, this part is before creating an order of service, some of the requirements are:
- This is a basic point of sale for a small car wash.
- It should be friendly with touch screens, so it can be used with tablets.
- To create an order, a client must be selected or created, with a linked vehicle.
- The client can have many vehicles, but a vehicle can have only one owner at time (But it can change his owner).
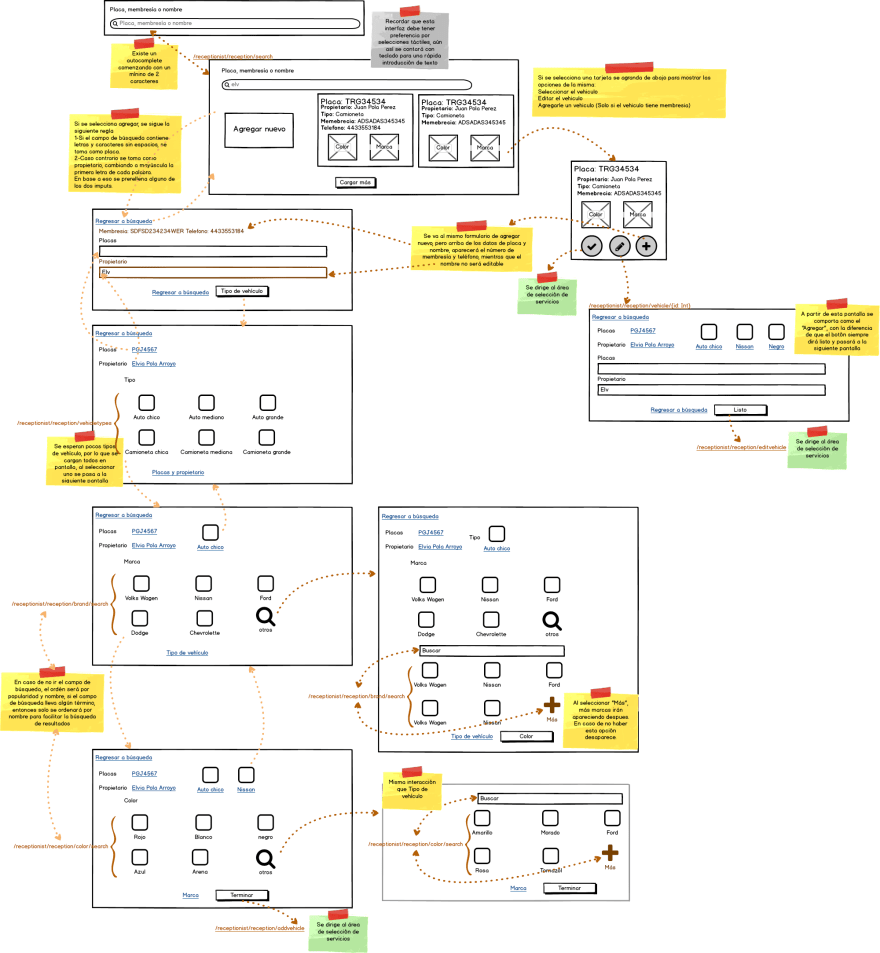
After some talks and drawings, with some friends we defined some user interface mockups with balsamiq, sorry because the mockup is in Spanish, but our client speaks that language, but it is only to give an idea of our goal.
Starting the JHipster project
With this we can start working in our JHipster JDL:
application {
  config {
    baseName carwash
    buildTool gradle
    devDatabaseType postgresql
    prodDatabaseType postgresql
    clientFramework vuejs
    jhiPrefix bjt
    languages [en, es]
    searchEngine elasticsearch
    packageName com.bejoto.carwash

  }
  entities *
}

DEFAULT_MIN_LENGTH = 1
DEFAULT_MAX_LENGTH = 500


// -----------------------------------
// ********** Vehicles **********

entity VehicleType {
  name String required minlength(DEFAULT_MIN_LENGTH) maxlength(DEFAULT_MAX_LENGTH)
  enabled Boolean required
}

entity VehicleColor {
  name String required minlength(DEFAULT_MIN_LENGTH) maxlength(DEFAULT_MAX_LENGTH)
  hexColor String required minlength(6) maxlength(6)
  enabled Boolean required
}

entity VehicleBrand {
  name String required minlength(DEFAULT_MIN_LENGTH) maxlength(DEFAULT_MAX_LENGTH)
  enabled Boolean required
}

entity Vehicle {
  plate String required minlength(DEFAULT_MIN_LENGTH) maxlength(DEFAULT_MAX_LENGTH)
  created Instant required
  lastUpdate Instant required
}

relationship ManyToOne {
  Vehicle{vehicleType(name)} to VehicleType
  Vehicle{vehicleColor(name)} to VehicleColor
  Vehicle{vehicleBrand(name)} to VehicleBrand
}


// ********** Clients **********

entity Client {
  name String required minlength(DEFAULT_MIN_LENGTH) maxlength(DEFAULT_MAX_LENGTH)
  email String minlength(DEFAULT_MIN_LENGTH) maxlength(DEFAULT_MAX_LENGTH)
  mobile String minlength(DEFAULT_MIN_LENGTH) maxlength(DEFAULT_MAX_LENGTH)
  enabled Boolean required
  created Instant required
  lastUpdate Instant required
}

relationship OneToMany {
  Client{vehicle} to Vehicle{client}
}


// -----------------------------------
// ********** Configuration **********

dto * with mapstruct
service * with serviceClass
paginate * with pagination
search Client, Vehicle with elasticsearch
This give us some simple relationships

I created my project with this and some more entities with the command
jhipster --blueprints vuejs import-jdl jhipster-carwash.jdl
Vehicle color
To begin with something simple, we are going to start with the crud of the vehicle color catalog.
JHipster already created a simple crud, but we want to add a color selector, so this is a really good practice.
Vehicle color list page
We start with our custom user interface integrating the JHipster components as they are:

To simplify thins, to start I will copy the JHipster component in my folder
As you can notice, the menu is in Catalogs/VehicleCatalogs/VehicleColor, however JHipster generates everything in /entity/entityName, so, we need one more change to our base project, so we can switch the JHipster routes for our custom ones.
Since, I not want the JHipster routes, I will not even try to inherit something, simply copy/paste of the JHipster routes router/index.ts to bjt/router/index.ts, and then removing all routes after the admin part, and then adding my own ones.

As you can see, just one more folder jump was needed for the admin pages, then I can add my component from '../catalogs/vehicle/vehicle-color/bjt-...'.
One more thing, also notice how the component that I will be modifying has the prefix bjt, this is to avoid issues when using inheritance and to quickly identify which components are mine and which from JHipster.
Now we can enter to '/catalogs/vehicle/vehicle-color' and the component BjtVehicleColor will be loading, this component for now can keep the same .vue, but for the bjt-vehicle-color.component.ts file, we can simply use inheritance from the original JHipster component:
@Component
export default class BjtVehicleColor extends VehicleColor {
  public propOrder = 'name';
  public reverse = true;

  public updatePerPage(): void {
    this.page = 1;
    this.retrieveAllVehicleColors();
  }
}
I only override two properties.
-
propOrder: The property used for the order by, by default is theId, but for my case thenamemakes more sense. -
reverse: This is to set the order as ascending.
With this in place, I search for a page in Appworks similar in elements, and I found the products list page.
 .
.
Before continue, I need to make some changes:
- I do not want the "view" page, since this is a very simple component I do not think it is worth it.
- I also prefer to disable the catalog from the edit page, so I do not need that.
- Since I just want an edit page, I can set the link in the element name and make the actions column unnecessary.
From here on, there is simply the task of replace the dummy elements from the Appworks demo page with the code from the JHipster base.
The process was really simple, and I just found some minor inconveniences:
- I needed to add a function to handle the items per page select
<b-select size="sm" v-model="itemsPerPage" :options="[5, 10, 20, 30, 40, 50]" class="d-inline-block w-auto" v-on:change="updatePerPage"/>
public updatePerPage(): void {
  this.page = 1;
  this.retrieveAllVehicleColors();
}
The JHipster component
jhi-item-counthas a little bug and does not change the language, but there is a simple fix and I have already reported it.I also added some distinction for the sort columns, because there was no indicator of which column and order, simply using more icons, I also created an issue to include this in the default generator.
<th v-on:click="changeOrder('enabled')">
    <span v-text="$t('carwashApp.vehicleColor.enabled')">Enabled</span>
    <i class="fas" v-bind:class="propOrder === 'enabled' ? (reverse ? 'fa-sort-down' : 'fa-sort-up') : 'fa-sort'"></i>
</th>
After some work I have my first custom page!

Add vehicle color page
The next step is to change the creation page, to practice something more complex I will split the creation and update.
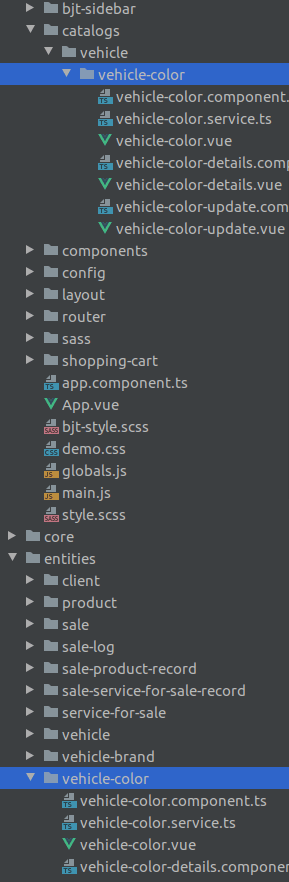
A simple justification to change the folder organization from the default
The basic approach will be almost the same as before (inheritance when it make sense, copy/paste and modify if not), but with one exception, I will use a folder for the full "creation vehicle color module", this is because I like to organize my code by feature, not by class type.
This is different from what JHipster generates by default, with all models in one folder, services in other and so on.
I think this is fine for the base, generated project, because it has no business logic, just a generalization of the entities. But when you start customizing the code for your organization, I think this "folder by feature" approach it helps better with the Conway's law.
organizations which design systems ... are constrained to produce designs which are copies of the communication structures of these organizations.
If it is not clear how this could apply here, think in an example: Imagine that you are asked to add some parameter in the edition of the color, but not for the creation, if you keep the JHipster order, you would need to modify in the back-end the packages:
- web.rest
- service
- service.dto
- service.mapper
- repository
- domain
Or you could create all the files in the package
- bjt/catalog/vehicle/color/commands/edition
And then modify just one place.
This also takes importance for example, for queries, systems tend to have a giant "query" service with tons of methods that are used individually just in one particular report. It is also easier to move the code, for example if some part of system grows and needs to be their own microservice, or if you need to modify or delete a particular feature.
Of course this is far from perfect and it has also some drawbacks, like code isolation that can lead to code duplication, if there are many simple process it can be hard to navigate through so many folders and classes, it also requires a very good knowledge of the organization, or you can end up consuming your time moving folders around.
In fact, in this particular case, because this is a very simple catalog with straight forward crud operations, maybe this is overkill and just as is is fine, but since this is a practice exorcise, thinking in some bigger user histories and use cases I like to explore my possibilities.
So, from here maybe you see that order in my folders, with some files with dtos, models, services and more in the same place. This does not mean you should do this way, always consider your context (team size, project limits, organizational knowledge, time for the development...).
If you want to read some more about this and other very good architectural ideas, I recommend to check Jimmy Bogard and his "Vertical Slice Architecture" talks or posts, also any talk of Kevlin Henney and architecture, in fact, any talk of him is great!
Back to the show!
So I just created my folder for my creation operation, based on the classes that JHipster generated.

To source code is
-
bjt-vehicle-color-create.component.ts
...

const vueColor = require('vue-color');

@Component({
  validations,
  components: {
    'chrome-picker': vueColor.Chrome
  }
})
export default class BjtVehicleColorCreate extends VehicleColorUpdate {
  @Inject('bjtVehicleColorCreationService') protected bjtVehicleColorCreationService: () => BjtVehicleColorCreationService;
  public colors = '#000000';
  public vehicleColor: IVehicleColorToAdd = new VehicleColorToAdd('', '000000');

  public updateColor(value) {
    this.vehicleColor.hexColor = value.hex.substring(1);
  }

  public save(): void {
    this.isSaving = true;
    this.bjtVehicleColorCreationService()
      .create(this.vehicleColor)
      .then(param => {
        this.isSaving = false;
        this.$router.push('/catalogs/vehicle/vehicle-color');
        const message = this.$t('carwashApp.vehicleColor.created', { param: param });
        this.alertService().showAlert(message, 'success');
      });
  }

  public cancel(): void {
    this.$router.push('/catalogs/vehicle/vehicle-color');
  }
}
As you can see, it is just inherit from the original component, but adding some new features, like the usage of the plugin vue-color, some methods to help update the color, a cancel method to send direct to the color list (JHipster uses the back action, but in my test this not always works), also the save method was overridden so we can use our own service and final route.
-
bjt-vehicle-color-create.vue
<template>
<div>
<h4 class="d-flex justify-content-between align-items-center w-100 font-weight-bold py-3 mb-4">
<div>
<span class="text-muted font-weight-light small">
<span v-text="$t('bjtSidebar.catalogs')"></span> /
<span v-text="$t('bjtSidebar.vehicles')"></span> /
<router-link :to="{name: 'VehicleColor'}" v-text="$t('bjtVehicleColor.create.colors')"></router-link> /
</span>
<span v-text="$t('bjtGlobal.create')"></span>
</div>
</h4>
<b-card :header="$t('bjtVehicleColor.create.createColor')" header-tag="h6" class="mb-4">
<b-form name="editForm" role="form" novalidate v-on:submit.prevent="save()">
<b-form-group :label="$t('bjtVehicleColor.create.colorName')" class="position-relative">
<b-input type="text" name="name" :placeholder="$t('bjtVehicleColor.create.colorName')" id="vehicle-color-name"
:state="!$v.vehicleColor.name.$invalid" v-model="$v.vehicleColor.name.$model" required/>
<div class="invalid-tooltip" v-if="$v.vehicleColor.name.$anyDirty && $v.vehicleColor.name.$invalid">
<span v-if="!$v.vehicleColor.name.required" v-text="$t('entity.validation.required')"></span>
<span v-if="!$v.vehicleColor.name.minLength" v-text="$t('entity.validation.minlength', { min: 1 })"></span>
<span v-if="!$v.vehicleColor.name.maxLength" v-text="$t('entity.validation.maxlength', { max: 500 })"></span>
</div>
</b-form-group>
<b-form-group :label="$t('bjtVehicleColor.create.color')">
<chrome-picker :value="colors" @input="updateColor" />
</b-form-group>
<b-btn variant="primary" type="submit" id="save-entity" :disabled="$v.vehicleColor.$invalid || isSaving">
<font-awesome-icon icon="save"></font-awesome-icon> <span v-text="$t('entity.action.save')">Save</span>
</b-btn>
<b-btn id="cancel-save" variant="outline-secondary" v-on:click="cancel()">
<font-awesome-icon icon="ban"></font-awesome-icon> <span v-text="$t('entity.action.cancel')">Cancel</span>
</b-btn>
</b-form>
</b-card>
</div>
</template>
<style src="@/vendor/libs/vue-color/vue-color.scss" lang="scss"></style>
<script lang="ts" src="./bjt-vehicle-color-create.component.ts">
</script>
This view is also based on the forms from appworks, but replacing the dummy components with the one form JHipster.
-
bjt-vehicle-color-creation.service.ts
const baseApiUrl = 'api/bjt/vehicle-colors';

export default class BjtVehicleColorCreationService {
  public create(entity: IVehicleColorToAdd): Promise<number> {
    return new Promise<number>(resolve => {
      axios.post(`${baseApiUrl}`, entity).then(function(res) {
        resolve(res.data);
      });
    });
  }
Simple custom service class, here is not helpful to extend from the original class, if you need some functionality from the original service, you can simply inject the original JHipster service.
-
vehicle-color-to-add.model.ts
export interface IVehicleColorToAdd {
  name: string;
  hexColor: string;
}

export class VehicleColorToAdd implements IVehicleColorToAdd {
  constructor(public name: string, public hexColor: string) {
  }
}
Here I could handle all my complex models, bur for now, it is a simpler model of vehicle color, since the Id it is just needed in the edition, and also considering that a color that is added to the system by default is enabled, I just need to send the name and hex representation of the color to add the entity.
Modifying the backend
Since I am using my own service, I need to make some modifications in the backend. Taking the same side by side approach, I create a bjt package from where all my code will reside.

The backend is almost identical to the JHipster code and I hope auto explanatory for now:
-
BjtVehicleColorCreatorService
...
public Long save(VehicleColorForAddDTO vehicleColorForAddDTO) {
    log.debug("Request to save VehicleColor : {}", vehicleColorForAddDTO);

    VehicleColor vehicleColor = new VehicleColor();
    vehicleColor.setName(vehicleColorForAddDTO.getName());
    vehicleColor.setHexColor(vehicleColorForAddDTO.getHexColor());
    vehicleColor.setEnabled(true);
    vehicleColor = vehicleColorRepository.save(vehicleColor);
    return vehicleColor.getId();
}
-
BjtVehicleColorResource
...
@RestController
@RequestMapping("/api/bjt")
public class BjtVehicleColorResource {
    ...
    @PostMapping("/vehicle-colors")
    public ResponseEntity<Long> createVehicleColor(@Valid @RequestBody VehicleColorForAddDTO vehicleColorForAddDTO) throws URISyntaxException {
        log.debug("REST request to save VehicleColor : {}", vehicleColorForAddDTO);

        Long savedId = bjtVehicleColorCreatorService.save(vehicleColorForAddDTO);
        return ResponseEntity.created(new URI("/api/vehicle-colors/" + savedId))
            .headers(HeaderUtil.createEntityCreationAlert(applicationName, true, ENTITY_NAME, savedId.toString()))
            .body(savedId);
    }
}
-
VehicleColorForAddDTO
...
public class VehicleColorForAddDTO implements Serializable {

    @NotNull
    @Size(min = 1, max = 500)
    private String name;

    @NotNull
    @Size(min = 6, max = 6)
    private String hexColor;
    ...
}
Some happiness!!!
And finally, again, a light at the end of the tunnel, we went from

To

Edit vehicle color page
Now, I can simply copy the creation folder, but modifying the names.

From here, the pages are very much the same as the creation ones, so I make some modifications so its worth it, like:
-
bjt-vehicle-color-edit.component.ts
...
export default class BjtVehicleColorEdit extends VehicleColorUpdate {
  @Inject('bjtVehicleColorEditionService') protected bjtVehicleColorEditionService: () => BjtVehicleColorEditionService;
  public colors: String = '#000000';
  public vehicleColor: IVehicleColorToEdit;
  public isEnabled: boolean = false;

  beforeRouteEnter(to, from, next) {
    next(vm => {
      if (to.params.vehicleColorId) {
        vm.retrieveVehicleColor(to.params.vehicleColorId);
      }
    });
  }

  public updateColor(value) {
    this.vehicleColor.hexColor = value.hex.substring(1);
    console.log('update color');
  }

  public save(): void {
    this.isSaving = true;
    this.bjtVehicleColorEditionService()
      .update(this.vehicleColor)
      .then(param => {
        this.isSaving = false;
        this.$router.push('/catalogs/vehicle/vehicle-color');
        const message = this.$t('bjtVehicleColor.edit.colorUpdated', { name: this.vehicleColor.name });
        this.alertService().showAlert(message, 'success');
      });
  }

  public cancel(): void {
    this.$router.push('/catalogs/vehicle/vehicle-color');
  }

  public retrieveVehicleColor(vehicleColorId): void {
    this.vehicleColorService()
      .find(vehicleColorId)
      .then(res => {
        this.colors = '#' + res.hexColor;
        this.isEnabled = res.enabled;
        this.vehicleColor = new VehicleColorToEdit(
          res.id, res.name, res.hexColor
        );
      });
  }

  public disableVehicleColor(): void {
    this.bjtVehicleColorEditionService()
      .disable(this.vehicleColor.id)
      .then(() => {
        const message = this.$t('bjtVehicleColor.edit.colorDisabled', { name: this.vehicleColor.name });
        this.alertService().showAlert(message, 'danger');
        this.$router.push('/catalogs/vehicle/vehicle-color');
      });
  }

  public enableVehicleColor(): void {
    this.bjtVehicleColorEditionService()
      .enable(this.vehicleColor.id)
      .then(() => {
        const message = this.$t('bjtVehicleColor.edit.colorEnabled', { name: this.vehicleColor.name });
        this.alertService().showAlert(message, 'success');
        this.isEnabled = true;
        this.closeEnableDialog();
      });
  }

  public closeDisableDialog(): void {
    (<any>this.$refs.removeEntity).hide();
  }

  public closeEnableDialog(): void {
    (<any>this.$refs.enableEntity).hide();
  }
}
Now the edition page has the disable/enable action instead of the listing, so I handle two dialogs and service calls for each action, the other modifications are the loading of the color data.
-
bjt-vehicle-color-edit.vue
<template>
<div>
...
<b-card :header="$t('bjtVehicleColor.edit.editColor', { name: vehicleColor.name })" header-tag="h6" class="mb-4" v-if="isEnabled">
<b-form name="editForm" role="form" novalidate v-on:submit.prevent="save()">
<input type="hidden" id="id" name="id"
v-model="vehicleColor.id" />
...
</b-form>
</b-card>
<b-card :header="$t('bjtGlobal.otherActions')" header-tag="h6" class="mb-4">
<div class="container">
<div class="row" v-if="isEnabled">
<div class="col-sm col-sm-3 ">
<b-button variant="danger" v-b-modal.removeEntity>
<span v-text="$t('bjtVehicleColor.edit.disableColor')"></span>
</b-button>
</div>
<div class="col-sm alert alert-danger" role="alert" v-text="$t('bjtVehicleColor.edit.disableMessage')">
</div>
</div>
<div class="row" v-if="!isEnabled">
<div class="col-sm col-sm-3 ">
<b-button variant="success" v-b-modal.enableEntity>
<span v-text="$t('bjtVehicleColor.edit.enableColor')"></span>
</b-button>
</div>
<div class="col-sm" v-text="$t('bjtVehicleColor.edit.enableMessage')"></div>
</div>
</div>
</b-card>
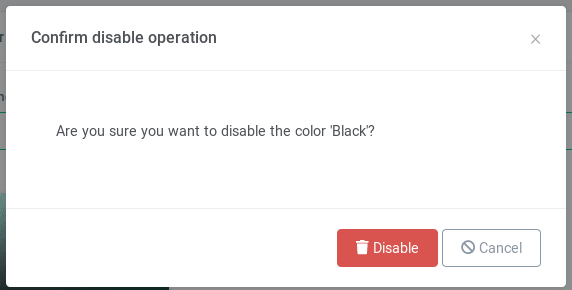
<b-modal ref="removeEntity" id="removeEntity" v-if="isEnabled">
<span slot="modal-title"><span id="carwashApp.vehicleColor.delete.question" v-text="$t('bjtGlobal.disableOperationTitle')"></span></span>
<div class="modal-body">
<p id="bjt-delete-vehicleColor-heading" v-text="$t('bjtVehicleColor.edit.disableQuestion', { name: vehicleColor.name })"></p>
</div>
<div slot="modal-footer">
<b-btn variant="danger" v-on:click="disableVehicleColor()">
<font-awesome-icon icon="trash"></font-awesome-icon> <span v-text="$t('bjtGlobal.disable')"></span>
</b-btn>
<b-btn variant="outline-secondary" v-on:click="closeDisableDialog()">
<font-awesome-icon icon="ban"></font-awesome-icon> <span v-text="$t('entity.action.cancel')">Cancel</span>
</b-btn>
</div>
</b-modal>
<b-modal ref="enableEntity" id="enableEntity" v-if="!isEnabled">
<span slot="modal-title"><span v-text="$t('bjtGlobal.disableOperationTitle')"></span></span>
<div class="modal-body">
<p v-text="$t('bjtVehicleColor.edit.disableQuestion', { name: vehicleColor.name })"></p>
</div>
<div slot="modal-footer">
<b-btn variant="success" v-on:click="enableVehicleColor()">
<i class="fas fa-check"></i> <span v-text="$t('bjtGlobal.enable')"></span>
</b-btn>
<b-btn variant="outline-secondary" v-on:click="closeEnableDialog()">
<font-awesome-icon icon="ban"></font-awesome-icon> <span v-text="$t('entity.action.cancel')">Cancel</span>
</b-btn>
</div>
</b-modal>
</div>
</template>
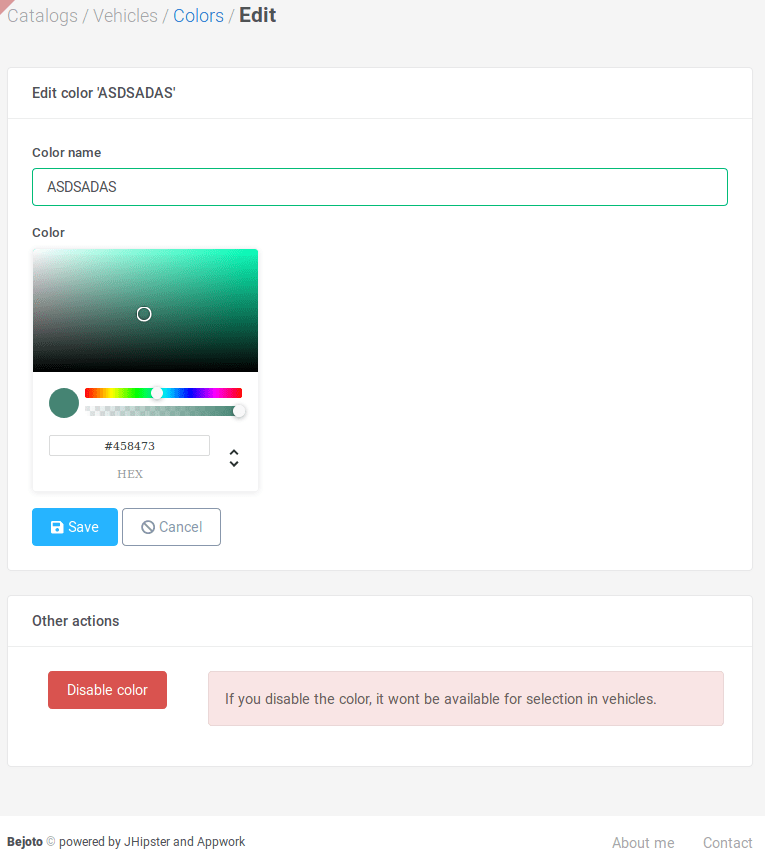
The component is almost the same, with some extra details (like using the name of the entity for the header), but most important, it integrates the two dialogs to allow disable or enable the color.
-
bjt-vehicle-color-edition.service.ts
public update(entity: IVehicleColorToEdit): Promise<number> {
  return new Promise<number>(resolve => {
    axios.put(`${baseApiUrl}`, entity).then(function(res) {
      resolve(res.data);
    });
  });
}

public disable(id: number): Promise<number> {
  return new Promise<number>(resolve => {
    axios.get(`${baseApiUrl}/${id}/disable`).then(function(res) {
      resolve(res.data);
    });
  });
}

public enable(id: number): Promise<number> {
  return new Promise<number>(resolve => {
    axios.get(`${baseApiUrl}/${id}/enable`).then(function(res) {
      resolve(res.data);
    });
  });
}
The services for my custom actions.
Then, putting everything togheter, I have my first custom crud component.


Top comments (0)