When I observed Neon Postgres for the first time, I was really impressed how easy it is to set up a free Cloud database there.
Neon has an amazing set of Web APIs which you can use to create projects, databases, branches (like in GIT) and so much more.
I was really interested in what I can build with Neon APIs. And I decided to build a Cloud Multitenant Application on Azure.
Today I want to share my journey on building a Multitenant Cloud Application with Azure Functions and Neon.
On my website: antondevtips.com I share .NET and Architecture best practices.
Subscribe to my newsletter to improve your .NET skills.
Download the source code for this newsletter for free.
A Quick Introduction To Multitenancy
Multitenancy is a software architecture that allows a single instance of a software application to serve multiple customers, called tenants.
Each tenant's data is isolated and remains invisible to other tenants for security reasons.
There are several approaches to separate data for each tenant in multi-tenant applications:
- Database-per-Tenant: each tenant has its own database. This model offers strongest data isolation but may introduce database management complexities and increase costs with many tenants.
- Schema-per-Tenant: a single database with separate schemas for each tenant. It provides a balance between isolation and resource sharing.
- Table-per-Tenant: a single database and schema, with tenant-specific tables. This model is efficient but may complicate data management.
- Discriminator Column: a single database, schema, and tables, with a column indicating the tenant. This is the simplest but least isolated model.
Today I want to show you how Neon greatly simplifies a Database-per-Tenant approach.
With Neon APIs you can automate database creation, updating and deletion for each tenant.
Prerequisites
Before we start, ensure you have the following:
- Azure Subscription: An active Azure account to create and manage your resources.
- Neon Postgres Account: Sign up and set up your Neon Postgres instance, you can start for free.
For Neon database, you have two options:
- Setup a database in Neon Cloud
- Setup "Neon Serverless Postgres" as native Azure container
For both options, you can select a free subscription option and upgrade as-you-go.
In one of the previous articles I explained how to build a Products API and deploy it to Azure with .NET Aspire and Neon.
This application lets you manage products and allows users to create a shopping cart with multiple items.
Today we will evolve this application and make it multi-tenant.
A tenant in this system will be a store that has their own products, stored in separate databases.
Users will be able to order products in each of these stores.
Building such an application involves the following steps:
- Adding
Tenantdata models and APIS to the Products API service - Creating Azure Function for managing tenant databases with Neon API
- Setting up .NET Aspire project
- Adding communication between Products API and Tenant Management Azure Function
- Migrating a tenant database and managing connection strings in Azure KeyVault with Caching support
- Deploying and testing our solution in Azure
You can download source code for the entire solution at the end of the post.
Let's dive in.
Step 1: Adding Tenant To Products API
Create a Tenant entity in the Products API (simplified version to keep it simple):
public class Tenant
{
    public Guid Id { get; set; }
    public string Name { get; set; }
}
In Product and ProductCart entities add a foreign key to the Tenant:
public class Product
{
    public int Id { get; set; }
    public string Name { get; set; } = string.Empty;
    public decimal Price { get; set; }
    public string Description { get; set; } = string.Empty;

    public Guid? TenantId { get; set; }
}

public class ProductCart
{
    public Guid Id { get; set; }
    public int Quantity { get; set; }

    public int UserId { get; set; }
    public User User { get; set; } = null!;

    public List<ProductCartItem> CartItems { get; set; } = [];

    public Guid? TenantId { get; set; }
}
Let's define the APIs for managing tenants in our application:
public record CreateTenantRequest(string Name);
public record UpdateTenantRequest(string CurrentName, string NewName);

app.MapPost("/tenants", (CreateTenantRequest request) => { });
app.MapPatch("/tenants/{currentName}", (string currentName, UpdateTenantRequest request) => { });
app.MapDelete("/tenants/{name}", (string name) => { });
app.MapGet("/tenants", () => { });
Our first step is ready, we will return to implement these endpoints later.
Step 2: Creating Tenant Management Azure Function
To create Azure Function in Visual Studio, select "Azure Function" project template and select the Function's type to "HTTP" trigger.
You can find a detailed manual here.
For JetBrains Rider, install Azure Toolkit for Rider and create "Azure Function" project.
You can find a detailed manual here.
In our Tenant Management Function, make sure the following Nuget packages are installed:
<ItemGroup>
    <FrameworkReference Include="Microsoft.AspNetCore.App" />
    <PackageReference Include="Microsoft.Azure.Functions.Worker" Version="2.0.0" />
    <PackageReference Include="Microsoft.Azure.Functions.Worker.Extensions.Http.AspNetCore" Version="2.0.0" />
    <PackageReference Include="Microsoft.Azure.Functions.Worker.Sdk" Version="2.0.0" />
    <PackageReference Include="Refit.HttpClientFactory" Version="8.0.0" />
</ItemGroup>
Before diving into the code, let's briefly discuss the structure of Neon.
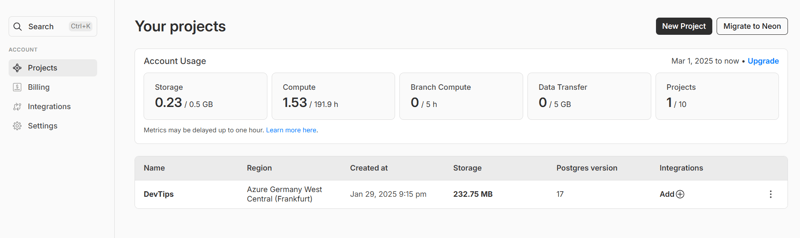
First, you need to create a project in Neon:
Each project has 1 or more branches (like in GIT):
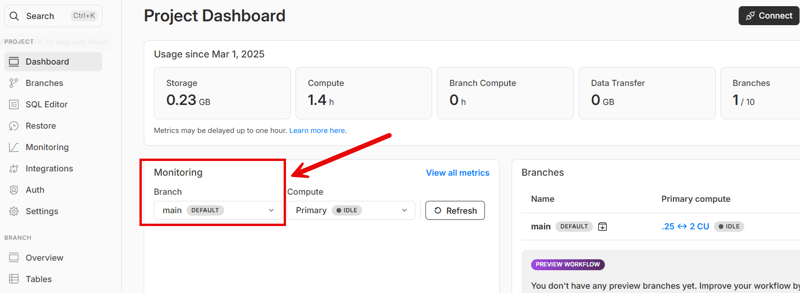
Each branch contains a database.
We need to implement the following API requests:
- create a database
- update a database
- delete a database
- get all databases for reference
- get database connection string
We will use a Refit library to simplify our API calls to Neon to manage databases.
Refit is a wrapper around HttpClientFactory that turns REST calls into simple method calls, which makes our code cleaner and easier to work with.
Let's explore INeonApi interface used for communication with Neon:
public interface INeonApi
{
    [Get("/api/v2/projects/{projectId}/branches/{branchId}/databases")]
    Task<NeonDatabaseListResponseJson> GetDatabasesAsync(
        [AliasAs("projectId")] string projectId,
        [AliasAs("branchId")] string branchId);

    [Post("/api/v2/projects/{projectId}/branches/{branchId}/databases")]
    Task<NeonDatabaseCreateResponse> CreateDatabaseAsync(
        [AliasAs("projectId")] string projectId,
        [AliasAs("branchId")] string branchId,
        [Body] CreateNeonDatabaseRequest request);

    [Patch("/api/v2/projects/{projectId}/branches/{branchId}/databases/{databaseName}")]
    Task<NeonDatabaseCreateResponse> UpdateDatabaseAsync(
        [AliasAs("projectId")] string projectId,
        [AliasAs("branchId")] string branchId,
        [AliasAs("databaseName")] string databaseName,
        [Body] UpdateNeonDatabaseRequest request);

    [Delete("/api/v2/projects/{projectId}/branches/{branchId}/databases/{databaseName}")]
    Task<NeonDatabaseCreateResponse> DeleteDatabaseAsync(
        [AliasAs("projectId")] string projectId,
        [AliasAs("branchId")] string branchId,
        [AliasAs("databaseName")] string databaseName);

    [Get("/api/v2/projects/{projectId}/connection_uri")]
    Task<ConnectionStringResponse> GetConnectionStringAsync(
        [AliasAs("projectId")] string projectId,
        [AliasAs("branch_id")] string? branchId,
        [AliasAs("database_name")] string databaseName,
        [AliasAs("role_name")] string roleName);
}
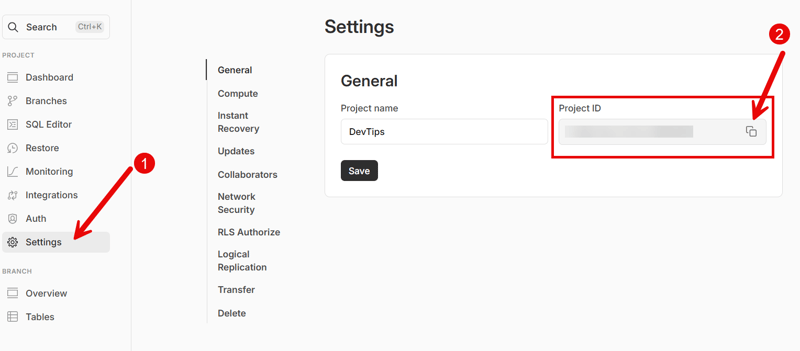
Each API call needs a project and a branch identifier.
You can find project identifier in the settings tab:
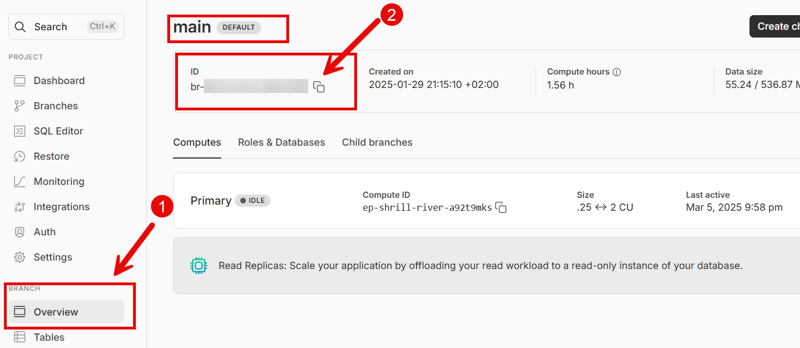
You can find branch identifier in the overview tab:
To learn more about Neon API, get started with documentation here.
You can also examine all the requests and responses in details and even execute them in the complete Neon API reference.
To be able to send API requests to Neon, you need to create an API Key.
You can create one in the "Account settings" > "API keys":

We use Azure Functions to handle tenant database requests.
Each Azure Function has HTTP triggers and is designed to handle one task.
Let's explore the create database function:
internal record CreateTenantDatabaseRequest(string DatabaseName);
internal record CreateTenantDatabaseResponse(TenantDatabaseDetails Database,
    string ConnectionString);

public class CreateTenantDatabaseFunction(
    ILogger<CreateTenantDatabaseFunction> logger,
    NeonConfigurationProvider configurationProvider,
    INeonApi neonApi)
{
    private static readonly JsonSerializerOptions SerializerOptions = new()
    {
        PropertyNameCaseInsensitive = true,
        DefaultIgnoreCondition = JsonIgnoreCondition.WhenWritingNull
    };

    [Function(nameof(CreateNeonDatabase))]
    public async Task<HttpResponseData> CreateNeonDatabase(
        [HttpTrigger(AuthorizationLevel.Anonymous, "post", Route = "database/create")]
        HttpRequestData requestData)
    {
        try
        {
            var requestBody = await new StreamReader(requestData.Body).ReadToEndAsync();
            var createRequest = JsonSerializer.Deserialize<CreateTenantDatabaseRequest>(
                requestBody, SerializerOptions);

            if (createRequest is null)
            {
                logger.LogError("Failed to deserialize request");

                var badRequestResponse = requestData.CreateResponse(HttpStatusCode.BadRequest);
                await badRequestResponse.WriteAsJsonAsync(new { error = "Invalid request body" });
                return badRequestResponse;
            }

            var neonResponse = await CreateNeonDatabaseAsync(createRequest);
            var connectionStringResponse = await GetConnectionStringAsync(
                createRequest.DatabaseName);

            logger.LogInformation("Database {DatabaseName} created: {@NeonResponse}",
                createRequest.DatabaseName, neonResponse);

            var response = requestData.CreateResponse(HttpStatusCode.OK);

            var tenantDatabaseDetails = neonResponse.MapToResponseDetails();

            var response = new CreateTenantDatabaseResponse(tenantDatabaseDetails,
                connectionStringResponse.Uri);

            await response.WriteAsJsonAsync(response);

            return response;
        }
        catch (Exception ex)
        {
            logger.LogError(ex, "Failed to create Neon database");
            var errorResponse = requestData.CreateResponse(HttpStatusCode.InternalServerError);
            await errorResponse.WriteAsJsonAsync(new { error = "Failed to create database" });
            return errorResponse;
        }
    }
}
Let's walk step by step:
- Deserialize the HTTP request body that triggers function.
- Create a Neon database in the given project and branch.
- Get connection string to a newly created database.
- Return response.
To create a database and get its connection string, we use the Refit interface:
private async Task<NeonDatabaseCreateResponse> CreateNeonDatabaseAsync(
    CreateTenantDatabaseRequest createRequest)
{
    var neonConfiguration = configurationProvider.Get();

    var neonRequest = new CreateNeonDatabaseRequest(new CreateDatabaseInfo
    {
        Name = createRequest.DatabaseName,
        OwnerName = neonConfiguration.OwnerName
    });

    return await neonApi.CreateDatabaseAsync(
        neonConfiguration.ProjectId,
        neonConfiguration.BranchId,
        neonRequest);
}

private async Task<ConnectionStringResponse> GetConnectionStringAsync(
    string databaseName)
{
    var neonConfiguration = configurationProvider.Get();
    return await neonApi.GetConnectionStringAsync(
        neonConfiguration.ProjectId,
        neonConfiguration.BranchId,
        databaseName,
        neonConfiguration.OwnerName);
}
Here is our Azure Function setup in Program.cs:
var builder = FunctionsApplication.CreateBuilder(args);

builder.AddServiceDefaults();

builder.Logging.AddConsole();
builder.ConfigureFunctionsWebApplication();

builder.Services.AddTransient<AuthDelegatingHandler>();
builder.Services.AddTransient<NeonConfigurationProvider>();

var neonUrl = builder.Configuration.GetConnectionString("NeonUrl")!;

builder.Services.AddRefitClient<INeonApi>()
    .ConfigureHttpClient(c => c.BaseAddress = new Uri(neonUrl))
    .AddHttpMessageHandler<AuthDelegatingHandler>()
    .AddStandardResilienceHandler();

builder.Build().Run();
In each API request to Neon, you need to provide an Authorization header with "Bearer API_KEY".
For this purpose I use DelegatingHandler that I add to the Refit HttpClientFactory:
public class AuthDelegatingHandler(IConfiguration configuration) : DelegatingHandler
{
    private readonly string _apiKey = configuration.GetConnectionString("NeonApiKey")
        ?? throw new InvalidOperationException("NeonApiKey configuration is missing");

    protected override async Task<HttpResponseMessage> SendAsync(
        HttpRequestMessage request,
        CancellationToken cancellationToken)
    {
        request.Headers.Authorization = new AuthenticationHeaderValue("Bearer", _apiKey);
        return await base.SendAsync(request, cancellationToken);
    }
}
This function has the following connection strings (coming from Aspire):
- NeonApiKey
- NeonUrl
And configuration parameters in local.settings.json (coming from Aspire):
{
    "IsEncrypted": false,
    "Values": {
        "AzureWebJobsStorage": "",
        "FUNCTIONS_WORKER_RUNTIME": "dotnet-isolated",
        "NEON_PROJECT_ID": "[COMING_FROM_ASPIRE]",
        "NEON_BRANCH_ID": "[COMING_FROM_ASPIRE]",
        "NEON_DATABASE_OWNER": "[COMING_FROM_ASPIRE]"
    }
}
Other functions are implemented in the same way.
Step 3: Setting up .NET Aspire project
You can find a detailed guide on how to add .NET Aspire to the project in one of my previous articles.
Let's explore our Aspire Host project:
using Projects;

var builder = DistributedApplication.CreateBuilder(args);

var neonApiKey = builder.AddConnectionString("NeonApiKey");
var neonUrl = builder.AddConnectionString("NeonUrl");

var configuration = builder.Configuration;

var neonProjectId = configuration["NeonProjectId"];
var neonBranchId = configuration["NeonBranchId"];
var neonOwnerName = configuration["NeonDatabaseOwner"];

var keyVault = builder.ExecutionContext.IsPublishMode
    ? builder.AddAzureKeyVault("Secrets")
    : builder.AddConnectionString("Secrets");

var function = builder.AddAzureFunctionsProject<Multitenancy_Function>("multitenancy-api")
    .WithReference(neonApiKey)
    .WithReference(neonUrl)
    .WithEnvironment("NEON_PROJECT_ID", neonProjectId)
    .WithEnvironment("NEON_BRANCH_ID", neonBranchId)
    .WithEnvironment("NEON_DATABASE_OWNER", neonOwnerName)
    .WithExternalHttpEndpoints();

var databaseConnectionString = builder.AddConnectionString("Postgres");

builder.AddProject<ProductService_Host>("product-service")
    .WithExternalHttpEndpoints()
    .WithReference(function)
    .WithReference(keyVault)
    .WithReference(databaseConnectionString)
    .WaitFor(function);

builder.Build().Run();
I use the following Nuget packages:
<ItemGroup>
  <PackageReference Include="Aspire.Hosting.AppHost" Version="9.1.0" />
  <PackageReference Include="Aspire.Hosting.Azure.Functions" Version="9.1.0-preview.1.25121.10" />
  <PackageReference Include="Aspire.Hosting.Azure.KeyVault" Version="9.1.0" />
</ItemGroup>
Here we specify:
- Azure Function that sends requests to Neon
- Products API application that manages products, product cart and sends request to our Azure Function
- Azure Key Vault for storing connection strings
Step 4: Integrating Products API with Tenant Management Azure Function
Add the Azure KeyVault Nuget package to the Products API project:
<PackageReference Include="Aspire.Azure.Security.KeyVault" Version="9.1.0" />
Register the dependencies in DI:
services.AddMemoryCache();
services.AddHttpContextAccessor();

builder.Configuration.AddAzureKeyVaultSecrets("Secrets");
builder.AddAzureKeyVaultClient("Secrets");
I will also use Refit for sending requests from Products API to the Azure Function:
public interface ITenantApi
{
    [Post("/api/database/create")]
    Task<CreateTenantDatabaseResponse> CreateDatabaseAsync([Body] CreateTenantDatabaseRequest request);

    [Patch("/api/database/update/{database}")]
    Task<DatabaseDetails> UpdateDatabaseAsync(string database, [Body] UpdateTenantDatabaseRequest request);

    [Delete("/api/database/delete/{database}")]
    Task<DatabaseDetails> DeleteDatabaseAsync(string database);

    [Get("/api/database")]
    Task<ListDatabasesResponse> ListDatabasesAsync();
}
Let's explore the create tenant endpoint:
app.MapPost("/tenants", async (
    CreateTenantRequest request,
    ITenantApi tenantApi,
    ApplicationDbContext applicationDbContext,
    IDatabaseMigrator databaseMigrator,
    ILogger<TenantEndpoints> logger) =>
{
    await using var transaction = await applicationDbContext.Database.BeginTransactionAsync();

    try
    {
        // Implementation code ...

        await transaction.CommitAsync();

        return Results.Ok(new
        {
            TenantId = tenant.Id,
            DatabaseName = databaseName
        });
    }
    catch (Exception ex)
    {
        logger.LogError(ex, "Failed to create tenant {TenantName}", request.Name);
        await transaction.RollbackAsync();
        return Results.Problem("Failed to create tenant");
    }
}
Make sure to wrap everything in a transaction, so we can rollback the changes in case if Azure Function returns failure.
Save tenant in the "master" database, the one that will hold all the tenants data:
var tenant = new Tenant
{
    Id = Guid.NewGuid(),
    Name = request.Name
};

applicationDbContext.Tenants.Add(tenant);
await applicationDbContext.SaveChangesAsync();
- Send request to create a tenant database:
var databaseName = $"products-{request.Name}";
var createDatabaseRequest = new CreateTenantDatabaseRequest(databaseName);
var response = await tenantApi.CreateDatabaseAsync(createDatabaseRequest);
- We need to somehow create tables in our newly created database, for this purpose we can use EF Core migrations and programmatically apply them to the database.
try
{
    await databaseMigrator.MigrateDatabaseAsync(tenant.Id.ToString(), connectionString);
}
catch (Exception ex)
{
    logger.LogError(ex, "Failed to apply migrations for tenant {TenantName}", request.Name);
    await transaction.RollbackAsync();

    try
    {
        await tenantApi.DeleteDatabaseAsync(databaseName);
    }
    catch (Exception cleanupEx)
    {
        logger.LogError(cleanupEx, "Failed to cleanup tenant database after migration failure");
    }

    return Results.Problem("Failed to setup tenant database");
}
You can like or dislike this approach, but it works for me, as it is fully automated.
- If everything worked fine - make sure to commit changes, otherwise delete the tenant database by sending a corresponding API request and rollback the transaction
Step 5: Migrating a Tenant Database and Managing Connection Strings
Let's explore how migrations are applied to a tenant database.
Here is the code for DatabaseMigrator:
await databaseMigrator.MigrateDatabaseAsync(tenant.Id.ToString(), connectionString);

public class DatabaseMigrator(IServiceScopeFactory scopeFactory) : IDatabaseMigrator
{
    public async Task MigrateDatabaseAsync(
        string tenantId,
        string connectionString,
        TimeSpan? cachingExpiration = null)
    {
        using var scope = scopeFactory.CreateScope();

        var tenantConnectionFactory = scope.ServiceProvider
            .GetRequiredService<ITenantConnectionFactory>();

        tenantConnectionFactory.SetConnectionString(tenantId, connectionString, cachingExpiration);

        using var dbContext = scope.ServiceProvider.GetRequiredService<ApplicationDbContext>();
        await dbContext.Database.MigrateAsync();

        await DatabaseSeedService.SeedAsync(dbContext);
    }
}
NOTE: here I am seeding the database just for the testing purpose.
I have created a ITenantConnectionFactory that supplies the correct connection string to the DbContext as it is created:
services.AddDbContext<ApplicationDbContext>((serviceProvider, options) =>
{
    var tenantConnectionFactory = serviceProvider.GetRequiredService<ITenantConnectionFactory>();

    var connectionString = tenantConnectionFactory
        .GetConnectionString(tenantConnectionFactory.GetCurrentTenant();

    options.EnableSensitiveDataLogging()
        .UseNpgsql(connectionString),
            npgsqlOptions =>
            {
                npgsqlOptions.MigrationsHistoryTable(
                    DatabaseConsts.MigrationHistoryTable,
                    DatabaseConsts.Schema);
            });

    options.UseSnakeCaseNamingConvention();
});
The connection factory retrieves connection string from the IMemoryCache, and if not found it calls the Azure SecretClient class to get connection string from the Azure KeyVault.
After creating tenant database I call SetConnectionString to save the connection string to IMemoryCache and Azure KeyVault.
public void SetConnectionString(
    string tenantId,
    string connectionString,
    TimeSpan? cachingExpiration = null)
{
    _memoryCache.Set(
        $"tenant-connection-string-{tenantId}",
        connectionString,
        cachingExpiration ?? TimeSpan.FromHours(1));

    _tenantId = tenantId;

    _secretClient.SetSecret(tenantId, connectionString);
}

public class TenantConnectionFactory : ITenantConnectionFactory
{
    public string? GetConnectionString(string? customTenantId = null)
    {
        var tenantId = customTenantId ?? GetCurrentTenant();

        if (tenantId is null)
        {
            return _configuration.GetConnectionString(DatabaseConsts.DefaultConnectionString);
        }

        return _memoryCache.GetOrCreate(
            $"tenant-connection-string-{tenantId}",
            entry =>
            {
                entry.SlidingExpiration = TimeSpan.FromHours(1);

                var secret = _secretClient.GetSecret(tenantId);
                return secret.Value.Value;
            });
    }
}
NOTE: for production make sure to tune the
IMemoryCacheexpiration time based on your requirements.
Keep in mind that Azure bills for sending requests to the Azure KeyVault, check out the official docs for pricing info
Step 6: Deploying and Testing our Solution in Azure
In this article you can find a step-by-step guide on how to deploy your application to Azure.
Let's run the following commands and wait for our resources to be created on Azure.
azd auth login

azd init

azd up
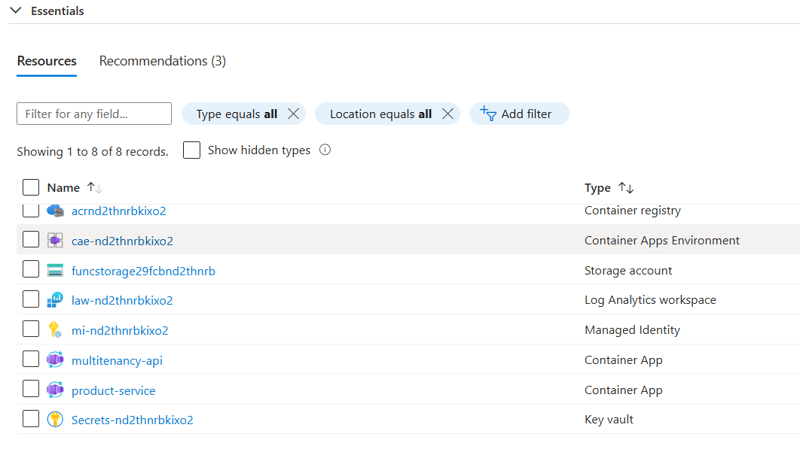
Once deployed, check the Azure Portal to see your containers running:
You can open the Aspire Dashboard by navigating from the product-service:

Use Postman or your preferred tool to send a request to create a tenant database:
{
  "name": "Shopify"
}
Shortly you will receive a response:
{
  "tenantId": "78b0c444-49aa-4308-b35f-9ff530b31920",
  "databaseName": "products-Shopify"
}
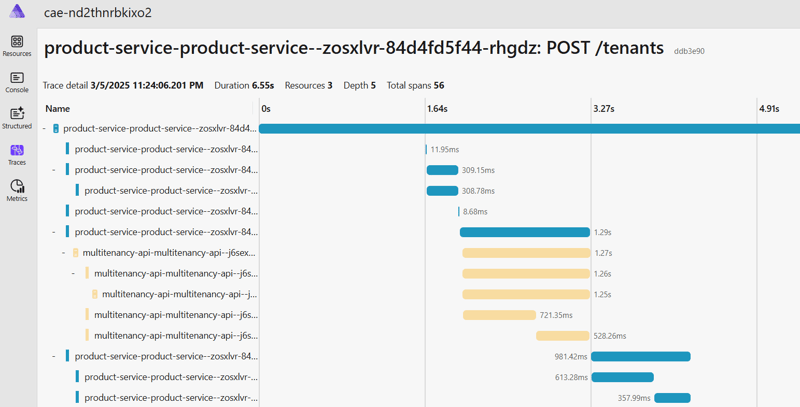
Here is what our services interactions look like:
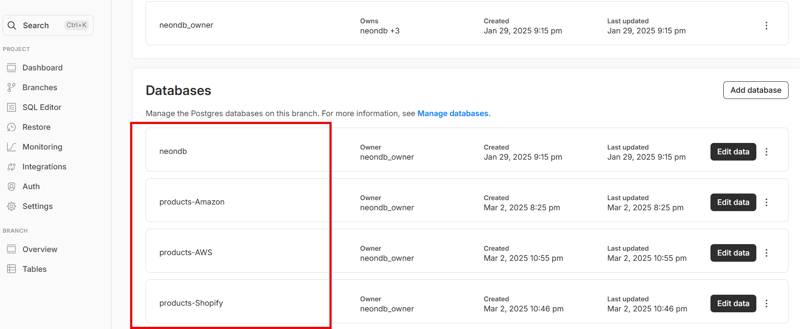
We can navigate to Neon to ensure that our database is created and populated with data:
Let's send a request to create a new product in our tenant database.
Make sure to pass a "X-TenantId" header with a value "78b0c444-49aa-4308-b35f-9ff530b31920" to ensure that product is created in the correct database:
{
  "name": "Samsung Galaxy S25 Ultra",
  "price": 1299.99
}
{
  "id": 51,
  "name": "Samsung Galaxy S25 Ultra",
  "price": 1299.99,
  "description": "",
  "tenantId": null
}
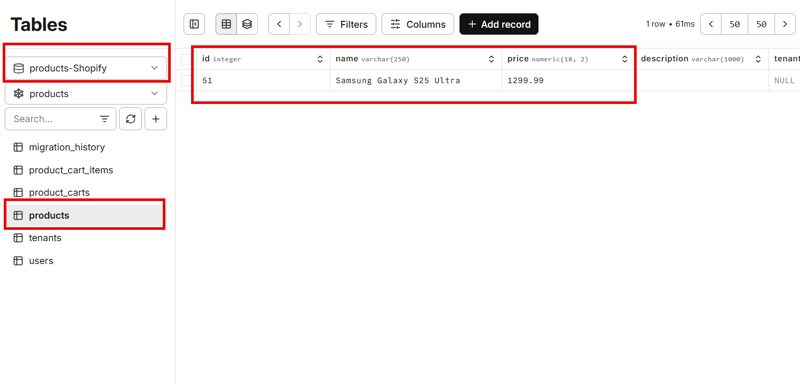
Everything is working fine. Our mission is complete.
Summary
We made a big journey today while building our Multi-Tenant Application in Azure with managing tenant databases with Neon APIs.
A few things to consider if you want to take this application a step further:
- Tune the
IMemoryCacheexpiration time for the connection strings - Set up the robust security settings for the Azure solution and for communication between the services
- Implement a user management API. Each tenant will have its own set of users
- Add authentication and authorization for users
- Check if a user can access provided "X-TenantId" in a header value
On my website: antondevtips.com I share .NET and Architecture best practices.
Subscribe to my newsletter to improve your .NET skills.
Download the source code for this newsletter for free.

Top comments (0)