
In this tutorial, we will see the how to Setup a React Application using Redux. We will setup the application in such a way that it manages the state globally, thus letting components use that state at any given point because that is the purpose of using Redux.
We will go step-by-step about how to create a store, how to create actions, and how to dispatch those actions to the reducer. Then we will see how the reducer updates the store and finally read the store from the components. As I am doing this, I will provide the code along.
If you aren’t familiar with the concepts of Redux, I would recommend you first go through Thisblog, to get an understanding of the basic concepts of Redux and the Flow of Redux. Before you see the implementation, it would be helpful for you to understand how things are connected in Redux.
Note: Redux has a lot of starter code that is difficult to set up for the first time. Also one of the most confusing things (and maybe annoying at some times) about Redux is that you can set up your files in many different ways. I have tried setting it up in a very basic way so it would be easy for you to understand.
We are going to develop a very basic App, called “Post Board”
Let’s Start………
Pre-requisites: You should have a React Project created
Step 1:
In your React app run, install the following dependencies,
npm install redux react-redux redux-devtools-extension redux-thunk @reduxjs/toolkit
Step 2:
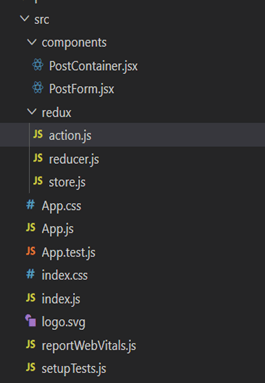
Create 2 folders redux and components in src Then create store.js, action.js,reducer.js in redux folder. Create PostContainer.jsx and PostForm.jsx in the component folder. The component structure will look like this:
Step 3:
In actions.js, create a functions that returns an action object when invoked. The two functions will be addPost and deletePost(). Don’t forget to export it!
export const ADD_POST = 'ADD_POST';
export const DELETE_POST = 'DELETE_POST';

export const addPost = (post) => ({
  type: ADD_POST,
  payload: post,
});

export const deletePost = (postId) => ({
  type: DELETE_POST,
  payload: postId,
});
Step 4:
In reducer.js , create a function to handle the actions and to update the state.
import { combineReducers } from 'react-redux';
import { ADD_POST, DELETE_POST } from './actions';

const initialState = {
  posts: [],
};

const postsReducer = (state = initialState, action) => {
  switch (action.type) {
    case ADD_POST:
      return {
        ...state,
        posts: [...state.posts, action.payload],
      };
    case DELETE_POST:
      return {
        ...state,
        posts: state.posts.filter((post) => post.id !== action.payload),
      };
    default:
      return state;
  }
};

export const rootReducer = combineReducers({
    posts: postsReducer
});
Step 5 :
In store.js ,using composeWithDevTools() we will add the support for Redux DevTools extension that can help you a lot in visualizing all the complex events that are happening in a redux application under the hood. Also, we will add the reducer in this.
import { configureStore ,applyMiddleware} from "@reduxjs/toolkit";
import postsReducer from './reducer'
import { composeWithDevTools } from "redux-devtools-extension";
import  thunkMiddleware  from "redux-thunk";
const composedEnhancer =composeWithDevTools(applyMiddleware(thunkMiddleware))
const store = createStore({
        reducer: rootReducer,
        composedEnhancer
    }
);

export default store;
Step 6:
In PostForm.jsx we will add the form that will allow us to “Add New Post, Delete Post ”. Notice here we use, useDispatch() to dispatch the action to the reducer.
import React , { useState } from "react";
import { useDispatch } from "react-redux";
import { addPost } from "../redux/action";
import { v4 as uuidv4 } from 'uuid'
const PostForm = () => {
    const dispatch = useDispatch()

    //Adding Some CSS to give a good look
    const myStyle={
        backgroundColor: "white",
        minHeight: "2rem",
        display: "flex",

        flexDirection: "column",
        alignItems: "center",
        justifyContent: "center",
        color: "black"
    }

    const [title, setTitle] = useState('')
    const [content, setContent] = useState('')

    const onTitleChanged = e => setTitle(e.target.value)
    const onContentChanged = e => setContent(e.target.value)

    const onSavePostClicked = () => {

        const newPost={
            id: uuidv4(), // Generate a unique ID
              title: title,
              content: content
        }
          dispatch(addPost(newPost))

        setTitle('')
        setContent('')
    }


    return (
        <section>
            <h2>Add a New Post</h2>
            <form style={myStyle}>
                <label htmlFor="postTitle">Post Title:</label>
                <input type="text"
                id="postTitle"
                name="postTitle"
                value={title}
                onChange={onTitleChanged}
                />

                <label htmlFor="postContent">Content:</label>
                <textarea id="postContent"
                name="postContent" value={content}
                onChange={onContentChanged}
                />
                <button style={{margin:'10px'}}
                type="button"
                onClick={onSavePostClicked}>
                    Save Post
                </button>
            </form>
        </section>
    )
}
export default PostForm
Step 7 :
In PostContainer.jsx, we will write the logic for Displaying the post and deleting it.
import React from 'react';
import { useSelector, useDispatch } from 'react-redux';
import {  deletePost } from '../redux/action';

const PostContainer = () => {
  const {posts} = useSelector((state) => state.posts)
  const dispatch = useDispatch();


  const handleDeletePost = (postId) => {
    dispatch(deletePost(postId));
  };

  return (
    <div>
    <h2>Posts</h2>
       <div className="box">
        {posts.map((post) => (
          <div key={post.id}>
            <div>{post.title}</div>
            <div>{post.content}</div>
            <button onClick={() => handleDeletePost(post.id)}>Delete</button>
          </div>
        ))}
      </div>


    </div>
  );
};

export default PostContainer;
Step 8:
InApp.js , Wrap Both the components PostForm.jsx and PostContainer.jsx in App Component.
import './App.css';
import PostForm from './components/PostForm';
import PostContainer from './components/PostContainer';

function App() {
  return (
    <div className="App">
      <PostForm />
      <PostContainer />
    </div>
  );
}

export default App;
Step 9:
Finally , In index.js, add import { Provider } from 'react-redux' and then wrap your <App> component in <Provider>. <Provider> makes Redux store available to any component nested within it.
That’s it. We are Done !! **
Now lets see the actual and Final Product and how does it works.
**PS: Don’t Focus on styling of UI , focus on functionality! 👀

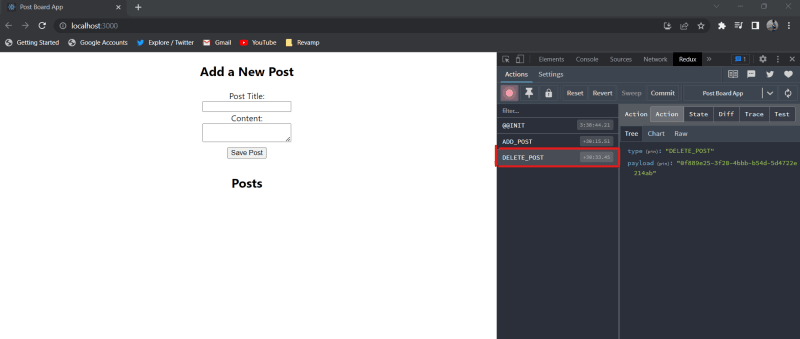
You Can Also Track the Changes of the state, which action is called, and much more via the Redux Dev Tools. Let’s see how that works. Remember download the Redux DEV Tools extension from Chrome before using it.

That’s it for this blog. Thanks for Reading the Blog. Happy Coding ! 😊

Top comments (1)
Good work..!