
Image Source: https://en.wikipedia.org/wiki/File:On\_Air\_DSC0004\_1.jpg
Sharing live video is an exciting way to connect with your audience. But, if the idea of setting up video live stream infrastructure seems daunting, I’d like to reassure you that it does not have to be! In this post, I’ll walk you through the steps to get a live video stream up and running in just 5 steps, where only 2 are made to the streaming server!
For simplicity, we’ll stream our video from your laptop camera & mic. The first thing you’ll need is some software to record your live stream and upload it to the streaming server. In this example, we’ll use OBS: it is free, and runs on Linux/Mac/Windows.
Create A Streaming Server
We’ll be using api.video for our streaming server. By sending just two simple API commands, we will be able to initiate our streaming server.
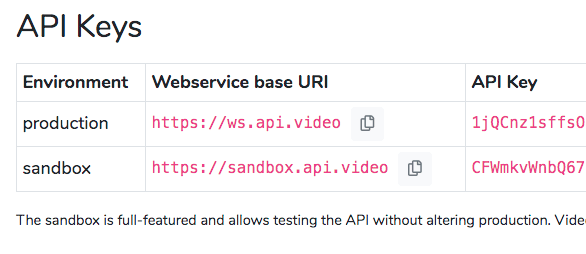
Live streaming with api.video is free for 1 hour a month (and every hour is just $5/hr). Once you’ve created an account, you’ll end up at the API dashboard, listing your API keys. We’ll need these in a second.
Creating the Live Stream
To create the live stream, we need to send some commands to api.video. We’ll use curl in the terminal to communicate with the API.
- The first thing we need to do is authenticate ourselves with our API key. We do that by sending our API key in a post request. In the example below, the stream is being created in the sandbox, so you should use your sandbox API key.
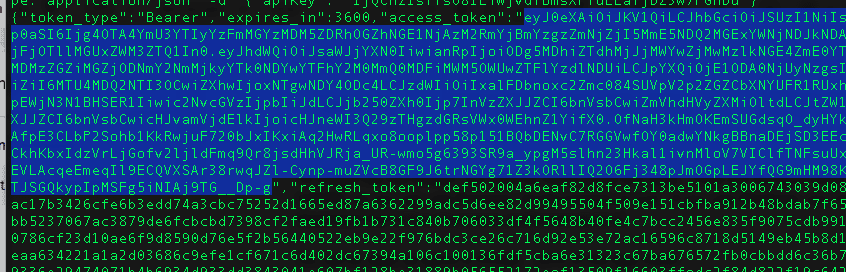
curl -X POST https://sandbox.api.video/auth/api-key -H ‘Content-Type: application/json’ -d ‘{“apiKey”: “”}’
Tip: Make sure you replace with the sandbox API key from api.video. Keep the double quotes around the API key.
You’ll get a response from the server with your Access Token. You’ll need this string, so copy all of the text between the quotes:
- Now we create the live stream (yes — it really is just two steps!). To do this, you need to tell api.video the name of your stream (and also provide the access token to prove that you are allowed to create the stream):
curl -X POST https://sandbox.api.video/live-streams -H ‘Content-Type: application/json’ -H ‘Authorization: Bearer ’ -d ‘{“name”:”Your Stream Name”}’
This command tells the Live Stream API that you are authorised to make changes (your access token), and then sends a small JSON package naming your stream “Your Stream Name” (feel free to change this if you’d like).
Tip: Make sure that when you paste in your access token, you still have that single quote after it.
The response to this command is a JSON file:
{“liveStreamId”:”li400mYKSgQ6xs7taUeSaEKr”,
“streamKey”:”30087931–229e-42cf-b5f9-e91bcc1f7332",
“name”:”Your Stream Name”,
“Record”:false,
“Broadcasting”:false,
“Assets”:{
“iframe”:””,
“player”:”https://embed.api.video/live/li400mYKSgQ6xs7taUeSaEKr",
“hls”:”https://live.api.video/li400mYKSgQ6xs7taUeSaEKr.m3u8",
“thumbnail”:”https://cdn.api.video/live/li400mYKSgQ6xs7taUeSaEKr/thumbnail.jpg"}}
The streamKey is used in the next step. You can also see that you have not started streaming yet (broadcasting=false), and there are a bunch of urls. If you open the “Player” url in a browser, you’ll see that you have a live stream! It is not actually streaming any video yet, but we’re getting there.

This background is the default image — We will show you how to change this at the end of the tutorial.
Sending Video to the Server
- Now we need to get OBS to start collecting video from your laptop camera, and send it to api.video.
You need to add video sources. Press the + under sources to add a source.

Select “Video Capture Device” and choose the built in camera from the drop down, and click Ok (example is from a Mac):

Now you should see your face on the screen, ready for live streaming.
- Now we can connect the OBS stream to the stream server at api.video. On the bottom right of OBS, click “Settings”, and open the “Stream” settings. Under Service, select Custom, and add “rtmp://broadcast.api.video/s” for the server, and copy the stream Key from the JSON respose in step 2.

Save the settings
- Click “Start Streaming” in OBS to start sending video from your camera to the streaming server. Open your browser to the Player URL from Step 2, and in a few short seconds, your live stream will appear!
A live Stream in 5 Steps!
That’s all there is to it! Share the links, place them on your site, and stream away. When you are done, just press “stop streaming” in OBS.
Bonus Step: Adding A Custom Background Poster
You may have noticed that the poster video for your live stream was the default image from api.video.If you’d like to change the background image to something more on brand while people wait for your live stream, you just need your liveStreamId and a jpg image:
curl -X POST https://sandbox.api.video/live-streams//thumbnail -H ‘Authorization: Bearer ’ -F file=@
This will update the poster thumbnail for your video.
Conclusion
Creating and sharing a live video stream might sound like a complicated process, but using api.video we were able to quickly and painlessly create a live stream. With just two API commands, we set up a streaming server that allows us to share our local stream with thousands of users around the world. Then we configured a local application to transmit the data to the server and began our broadcast.

Latest comments (1)
In video streaming, a very important role has always been played by the camera with which the video is broadcast. I recently learned about PTZ cameras. this is a camera that supports remote direction and zoom control, you can learn more about this view here. It is worth noting that this type of camera has a good zoom and high-quality focus, which is very important.