
A JSON Web Token (JWT) is an open standard (RFC 7519) that securely sends and receives data between parties (in the form of a JSON object).
In this article, we’ll implement JWT authentication to secure a Node.js application. We’ll also find out what JWT is all about and build a demo app.
Let's get going!
What is a JSON Web Token (JWT)?
As defined in open standard RFC 7519:
A JSON Web Token (JWT) is a compact, URL-safe means of representing claims to be transferred between two parties.
A JWT is encrypted and signed with a secret key (using the HMAC algorithm) or a cryptographically protected set of keys (with RSA or ECDSA).
This authentication contributes to a web application's integrity by ensuring the integrity of the claims within it, known as tokens. When tokens are signed with public/private key pairs, the signature also confirms that only the person holding the private key signed it.
The tokens consist of three compact parts:
- Header: The header is divided into two sections: the type of token (JWT) and the signing algorithm used (HMAC-SHA256 or RSA).
- Payload: Assertions about an entity and supporting data, known as claims.
- Signature: Made up of an encoded header, an encoded payload, a secret, and an algorithm.
When to Use a JWT in Your Node.js App
Here are a couple of scenarios where JSON Web Tokens can be useful to your web application:
Authorization: The most common use of JWTs in most business applications.
JWTs enable businesses to protect or restrict access to a portion of an application for a select group of users. For each logged-in user, a JWT token is sent along with other subsequent requests. This allows a user to access routes, services, and resources permitted with that token.
Information Exchange: JSON Web Tokens are an excellent way to securely transmit data between parties.
Because JWTs can be signed (for example, with public/private key pairs), you can be confident that the senders are who they claim to be. Furthermore, because the signature is calculated using the header and payload, you can be certain that the content has not been tampered with.
Pre-requisites
Before you get started, ensure you have met the following requirements.
Create a New Project
Now let's create a project folder and a new Node.js project by running the commands below.
mkdir jwt-auth && cd jwt-auth
npm init -y
With the commands we:
- Create a new folder called jwt-auth
- Change the directory to the folder
- Create a
package.jsonfile to document the project dependencies
Now open the package.json file and add the start script to run the application.
...
"scripts": {
    ...
   "start": "node index.js"
},
With the above configuration set up, run the command below.
npm start
Install Node.js App Dependencies
With the project created and configured, we'll now install the following dependencies:
Run the command below to install the required dependencies:
npm install express jsonwebtoken dotenv bcryptjs
Set up an Express Server
Once the required dependencies are installed, create an index.js file in the project folder, and set up an Express server with the code snippet below.
const express = require("express");

const app = express();
app.use(express.json());

app.listen(3000, () => {
  console.log("Server is running on port 3000");
});
You have successfully created an Express server listening on port 3000, with middleware to parse the request payload.
Create A .env File
A .env file is used in Node.js to store environment variables for security purposes. Ensure that your .env file is included in your .gitignore file to avoid exposing your application's secrets to the public.
Create a .env file in the project's root directory and add your JWT secret.
JWT_SECRET = "YOUR SECRET GOES HERE"
Then go back to the index.js file and configure the application to load the environment variables into your application, using dotenv.
...
require("dotenv").config();
Build App Routes
With the environment variables set up, let's create a route to get all registered users in the application.
In index.js, create a user array and route to return users with the code snippet below.
...
const users = [];

app.get("/api/users", (req, res) => {
  res.json(users);
});
...
If you are integrating a database management system, you can run queries to find and return all the users instead. One thing to point out here is that this route is accessible to all users.
Create An Auth Route
Now let's create other routes to register and authenticate users in the application. We'll do that in the index.js file, starting with the register route.
...
const bcrypt = require("bcryptjs");

...
app.post("/api/register", async (req, res) => {
  const user = req.body;
  if (!user.email || !user.password) {
    return res.status(400).send("Username and password are required.");
  }
  const hash = await bcrypt.hash(user.password, 10);
  user.password = hash;
  users.push(user);
  res.json(user);
});
...
We import bcryptjs to hash a user's password before saving it. Then we check if the user provides the required fields before adding them to the user's array.
Next, create another route to log in registered users.
...
const jwt = require("jsonwebtoken");

...
app.post("/api/login", async (req, res) => {
  const user = req.body;
  //check if user exists
  const foundUser = users.find((user) => user.email === req.body.email);
  if (!foundUser) {
    return res.status(400).send("Invalid email or password");
  }
  //check if password is correct
  const isPasswordValid = await bcrypt.compare(user.password, foundUser.password);
  if (!isPasswordValid) {
    return res.status(400).send("Invalid email or password");
  }
  //create token
  const token = jwt.sign({ user }, process.env.JWT_SECRET, {
    expiresIn: "1h",
  });
  res.json({ token });
});
...
Here, we import jsonwebtoken to sign a token for the registered users.
First, we check if the users exist in the user's array. You can also run your find query if you are integrating a database.
Then we compare the password with the saved hashed version. When the user satisfies these checks, we then sign a token for the user passing the user's details, the JWT_SECRET, and expiration time.
Verify Your User's Token with Middleware
Now that we can register and authenticate a user in the application, let's create middleware to verify the user's token and thus protect our route.
Ensure this code snippet is above the app routes.
const verifyUserToken = (req, res, next) => {
  if (!req.headers.authorization) {
    return res.status(401).send("Unauthorized request");
  }
  const token = req.headers["authorization"].split(" ")[1];
  if (!token) {
    return res.status(401).send("Access denied. No token provided.");
  }
  try {
    const decoded = jwt.verify(token, process.env.JWT_SECRET);
    req.user = decoded.user;
    next();
  } catch (err) {
    res.status(400).send("Invalid token.");
  }
};
We send the token along with the request payloads in the request headers. We then check if the token was sent, and verify it using the jwt.verify method.
Once a user is verified, we can save their details in the request object to keep track of their activities in the application.
Let's protect the get users route. Restrict access to only authorized users by adding the verifyUserToken function as a middleware to the route.
...
app.get("/api/users", verifyUserToken, (req, res) => {
  res.json(users);
});
...
Now, your application should look like this:
const express = require("express");
require("dotenv").config();
const bcrypt = require("bcryptjs");
const jwt = require("jsonwebtoken");

const app = express();
app.use(express.json());

const users = [];
const verifyUserToken = (req, res, next) => {
  if (!req.headers.authorization) {
    return res.status(401).send("Unauthorized request");
  }
  const token = req.headers["authorization"].split(" ")[1];
  if (!token) {
    return res.status(401).send("Access denied. No token provided.");
  }
  try {
    const decoded = jwt.verify(token, process.env.JWT_SECRET);
    req.user = decoded.user;
    next();
  } catch (err) {
    res.status(400).send("Invalid token.");
  }
};

app.get("/api/users", verifyUserToken, (req, res) => {
  res.json(users);
});

app.post("/api/register", async (req, res) => {
  const user = req.body;
  if (!user.email || !user.password) {
    return res.status(400).send("Username and password are required.");
  }
  const hash = await bcrypt.hash(user.password, 10);
  user.password = hash;
  users.push(user);
  res.json(user);
});

app.post("/api/login", async (req, res) => {
  const user = req.body;
  //check if user exists
  const foundUser = users.find((user) => user.email === req.body.email);
  if (!foundUser) {
    return res.status(400).send("Invalid email or password");
  }
  //check if password is correct
  const isPasswordValid = await bcrypt.compare(
    user.password,
    foundUser.password
  );
  if (!isPasswordValid) {
    return res.status(400).send("Invalid email or password");
  }
  //create token
  const token = jwt.sign({ user }, process.env.JWT_SECRET, {
    expiresIn: "1h",
  });
  res.json({ token });
});

app.listen(3000, () => {
  console.log("Server is running on port 3000");
});
Test Your Node.js Application
Go ahead and test the application to see if it works as it should. Launch Postman and send a GET request to the endpoint localhost:3000/api/users without authentication.

You should get an Unauthorized request message.
Now, register an account by sending a POST request to the endpoint localhost:3000/api/register, with the following JSON data in the request body.
{
  "email": "clara@gmail.com",
  "password": "1234"
}

Then, log in by sending a POST request to the endpoint localhost:3000/api/login with the same data shown above.
JWT will generate a token for you, as shown here:

Finally, copy the auth token to the request headers and send a request to the get users endpoint again. The token should appear in the form's headers.
Bearer Token
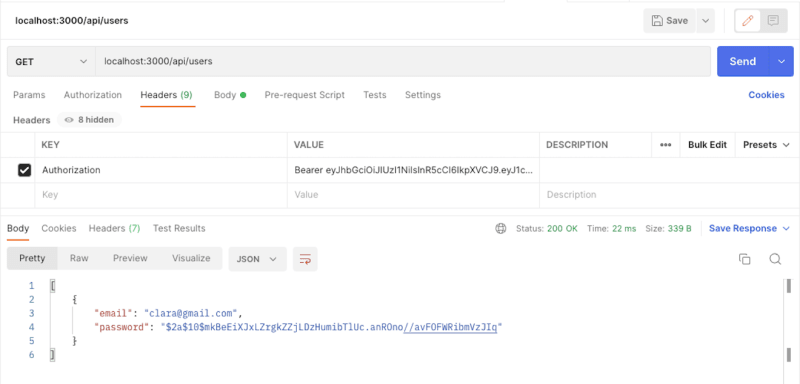
Now you have access to all users, until the token expires in one hour.
Wrapping Up
In this tutorial, you secured a Node.js application using JWT. We started by introducing you to JWT and touched on when you should use it, before building a demo app.
You can read more in the JWT documentation.
Happy coding!
P.S. If you liked this post, subscribe to our JavaScript Sorcery list for a monthly deep dive into more magical JavaScript tips and tricks.
P.P.S. If you need an APM for your Node.js app, go and check out the AppSignal APM for Node.js.

Top comments (0)