
Welcome to part one of the tutorial series, in which we will set up our project and create all our components.
For this you will need:
- yarn (you can also use npm and npx)
- create-react-app
The difficulty is on a scale of 0 to 5, where zero is a total beginner and 5 an extreme expert, a one [X| _ | _ | _ | _ ]. You should understand some concepts of javascript or programming in general. If not maybe you learn something or you just want to see some code.
No further talking let's start 😋
Setup
We first need to create a new react project with basic boilerplate. So navigate to a folder, where you want to create your project in, and type yarn create react-app todo-app in your terminal. Yarn created by the people who created react will go ahead and set up a new react app and automatically initialize git. Git is a code versioning tool created by Linus Torvalds read more.
After that is done you should cd todo-app and open it in your favorite IDE, mine is code so code .. We can see that react created some files and folders.
node_modules/
public/
├── favicon.ico
├── index.html
├── logo192.png
├── logo512.png
├── manifest.json
└── robots.txt
src/
├── App.js
├── App.css
├── App.test.js
├── index.js
├── index.css
├── serviceWorker.js
└── logo.svg
.gitignore
package.json
README.md
yarn.lock
We can ignore the public/ directory and just focus on our src, this is where we write our code which react will compile later to our final website. The package.json file contains all our packages and some scripts and configuration for our project. By default react keeps most of the "stuff" hidden and provides you with the react-scripts to keep your project simple. If you do not like this you can just run yarn eject and react is going to pull everything in WARNING This can not be undone!
So let's move on and delete the App.css, App.test.jsand logo.svg. Also, remove the unnecessary imports and the boilerplate JSX from App.js otherwise you will get some errors.
import React from 'react';

function App() {
  return (
    <div></div>
  );
}

export default App
Now it is time to install our CSS Framework, in this case, I will use bulma. It is based on flexbox, based on sass, simple to use and understand, free and open-source. We can easily customize any component, which we will not do but read their documentation if you are interested. Let us continue and install Bulma.
yarn add bulma
and you will need to also install node-sass to compile sass and scss to CSS
yarn add -D node-sass
Now rename your index.css -> index.scss and also change the import in your index.js. Remove all content from your index.scss and import Bulma.
@import "../node_modules/bulma/bulma.sass"
Now all your nested components will have access to the Bulma styling classes. I can recommend installing css-intellisense which will notice that and provide access to them in your IntelliSense preview window.
Start your project so you can live preview what you are doing.
yarn start
This will spin up a webpack live development server, without you configuring it.
You should see a blank white screen since we did not any content to our components.
Now create a new folder called components in your src directory and add a navbar.js, a todolist.js and a todo.js.
Navbar
In navbar.js add the following
import React from 'react'

export default function Navbar() {
  return (
    <div className="navbar has-shadow">
     <div className="navbar-brand">
        <div className="navbar-item">
          <p className="title">Easy Todo</p>
        </div>

        <a role="button" className="navbar-burger burger" aria-label="menu" aria-expanded="false" data-target="navbarBasicExample">
          <span aria-hidden="true"></span>
          <span aria-hidden="true"></span>
          <span aria-hidden="true"></span>
        </a>
      </div>

      <div className="navbar-menu">
        <div className="navbar-end">
          <div className="navbar-item">
            <div className="field has-addons">
              <p className="control is-expanded">
                <input type="text" className="input" />
              </p>
              <p className="control">
                <button className="button is-info has-text-weight-bold">
                  Add Todo
                </button>
              </p>
            </div>
          </div>
        </div>
      </div>
    </div>
  )
}
When we import that in our App.js ...
import React from 'react';

import Navbar from './components/navbar'

function App() {
  return (
    <div>
      <Navbar/>
    </div>
  );
}

export default App
... we will see a basic Navbar. When we shrink the browser window we will see a navigation burger show up, which does not do anything yet. Also, our addTodo form is embedded right there. Let's give the burger some functionality.
import React, { useState } from 'react'

export default function Navbar() {
  const [menu, setMenu] = useState(false)

  return (
    <div className="navbar has-shadow">
      <div className="navbar-brand">
        <div className="navbar-item">
          <p className="title">Easy Todo</p>
        </div>

        <a role="button" onClick={() => setMenu(!menu)} className={`navbar-burger burger ${menu ? "is-active" : ""}`} aria-label="menu" aria-expanded="false" data-target="navbarBasicExample">
          <span aria-hidden="true"></span>
          <span aria-hidden="true"></span>
          <span aria-hidden="true"></span>
        </a>
      </div>

      <div className={`navbar-menu ${menu ? "is-active" : ""}`}>
        <div className="navbar-end">
          <div className="navbar-item">
            <div className="field has-addons">
              <p className="control is-expanded">
                <input type="text" className="input" />
              </p>
              <p className="control">
                <button className="button is-info has-text-weight-bold">
                  Add Todo
                </button>
              </p>
            </div>
          </div>
        </div>
      </div>
    </div>
  )
}
Now when we shrink the window and press the button we can see the menu and the burger toggle. This is done by adding a hook in line 4 const [menu, setMenu] = useState(false) and setting the className properties based on the state of that hook as done in line 13 className={navbar-burger burger ${menu ? "is-active" : ""}}. The burger also get's an onClick event handler which will set the state of our burger onClick={() => setMenu(!menu)}. The Navbar is done 🎉
Todolist
Next up we will change the Todolist component. Set up a basic react functional component:
import React from 'react';

export default function TodoList() {
  return (
    <div>
      TodoList
    </div>
  );
}
Import that in our App.js:
import React from 'react';

import Navbar from './components/navbar'
import TodoList from './components/todolist'

function App() {
  return (
    <div>
      <Navbar/>
      <TodoList/>
    </div>
  );
}

export default App
You should see now the TodoList text right under the navbar. Now prettify that.
import React from 'react'

export default function TodoList() {
  return (
    <div>
      <div className="hero is-info">
        <div className="hero-body has-text-centered">
          <p className="title is-1">Todos</p>
        </div>
      </div>

      <section className="section">
        <div className="container">
          Todos will show up here later
        </div>
      </section>
    </div>
  )
}
We have added a header that tells us Todos and we have added a body where we will render our todos later. So let's add some sample data.
import React from 'react'

import Todo from './todo'

export default function TodoList() {
  const todos = [
    {
      "id": Date.now(),
      "value": "Buy milk",
      "done": false
    },
    {
      "id": Date.now()+1,
      "value": "Play with doge",
      "done": true
    }
  ]

  return (
    <div>
      <div className="hero is-info">
        <div className="hero-body has-text-centered">
          <p className="title is-1">Todos</p>
        </div>
      </div>

      <section className="section">
        <div className="container">
          {todos.map(todo => (
            <Todo key={todo.id} todo={todo}/>
          ))}
        </div>
      </section>
    </div>
  )
}
We have also added a Todo component that has two properties called key and todo. The key will purpose react to later identify each component uniquely and the todo property will be created and accessed by us in our Todo component.
You will notice that react throws an error now. No panic we just need to create our Todo component
Todo
import React from 'react'

export default function Todo(props) {
  return (
    <div className="card">
      <div className="card-content">
        <div className="level">
          <div className="level-left">
            <div className="level-item">
              <p className={`title ${props.todo.done ? "has-text-grey-light" : ""}`}>{props.todo.value}</p>
            </div>
          </div>
          <div className="level-right">
            <div className="level-item buttons">
              <button className={`button has-text-weight-bold ${props.todo.done ? "is-warning" : "is-primary"}`}>{props.todo.done ? "Undo" : "Done"}</button>
              <button className="button is-danger has-text-weight-bold">Delete</button>
            </div>
          </div>
        </div>
      </div>
    </div>
  )
}
In that, we will display a card wich has our todo.value on the left and some buttons on the right. Notice that we access our todo object with the props value. This is what react passes to each component.
Result
You should see something like this:
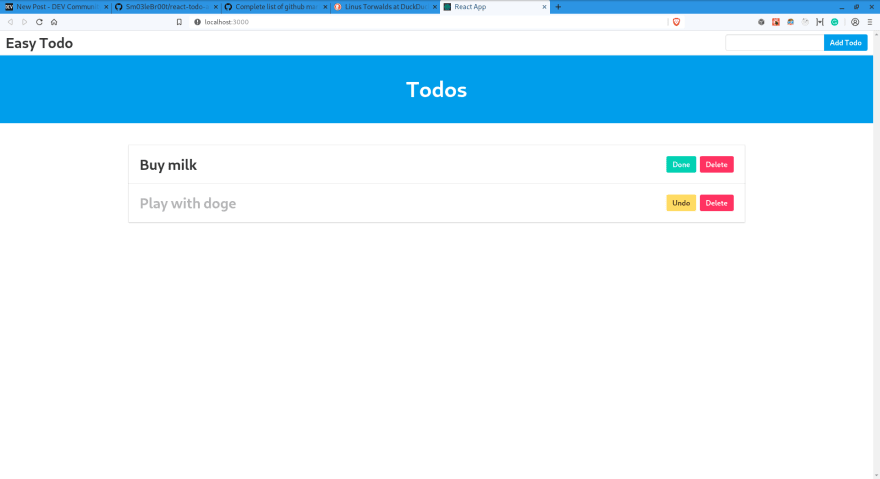
But there is no functionality yet, it is all hardcoded and not interactive. This is for our next tutorial part where we will add functionality using the react context API.
Thank you for reading this article, react and share. If I forgot anything or some code is just unacceptable feel free to tell me!
See you soon 😎

Latest comments (3)
Hi, I'm trying to replicate this tutorial but localhost only gives me a blank page.
I-m stuck on part 1, I think maybe I-m missing something, anyways, I think it's broken or something.
If you still have any problems, feel free to write me again ✌️
It's not always broken. Sometimes you may have misunderstood.
Clone the repo again.
Run
npm i.
Open debugger mode in the web browser.
Try that.