
Last part we got the todo app working with the build-in context-API. But we saw it's weaknesses as well. So this time we will work with a state management library called MobX, which is an alternative to the flux-based state management tools.
MobX
Simple, scalable state management
as it describes itself, it is extremely easy to use if you come from an object-oriented dev background. Even if not the concept is not to complicated.
The flow is very simple:
- call an action
- that action modifies the state
- this updates all computed values
- those will trigger reactions that can trigger actions again
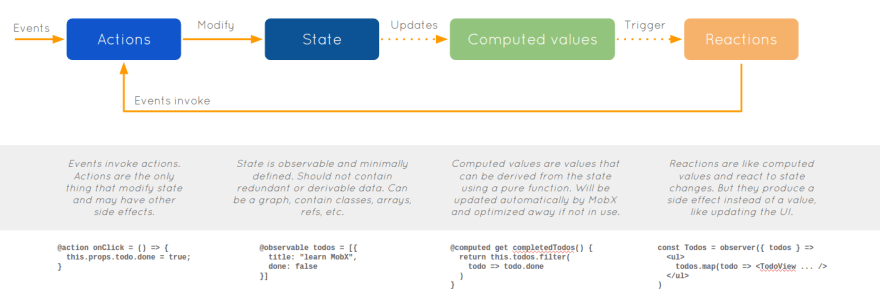
I think the chart summarizes that in words we all speak :happy:
The difficulty is on a scale of 0 to 5, where zero is a total beginner and 5 an extreme expert, a two [X|X| _ | _ | _ ]. You should have completed the other parts, at least look into them and you will need to know a little bit about object-oriented programming. There are some great videos on that!
So let's start 💥!
Setup
First, of all, we need to save the previous lesson. So commit it and create a new branch:
git commit -m "done with context-API"
git checkout -b "mobx"
Now we need to install the library
yarn add mobx react-mobx
Notice that we add two dependencies, mobx which does the state management and react-mobx which binds the state to our react application.
React, by default as of now, will NOT support the decorators in MobX. To enable this we will need to add some react customization. React developers might be screaming right now: "Do not eject!". Well earlier we would have but we can customize react a little bit different as well.
-
Install
customize-craandreact-app-rewiredas dev dependencies:
yarn add customize-cra react-app-rewired --dev -
Create a
config-overrides.jsfile in the src directory of your app:
touch config-overrides.js -
open up the file and paste in the following:
const {
  override,
  addDecoratorsLegacy,
} = require("customize-cra");
const path = require("path");

module.exports = override(
  // enable legacy decorators babel plugin
  addDecoratorsLegacy(),
);
This will change the babel configuration to use the
@babel/plugin-proposal-decoratorsplugin which you need to install as well
yarn add -D @babel/plugin-proposal-decorators -
modify your package.json
"scripts": {
  "start": "react-app-rewired start",
  "build": "react-app-rewired build",
  "test": "react-app-rewired test",
  "eject": "react-scripts eject"
},
The scripts
start,buildandtestwill need to use the react-app-rewired
WARNING stuff can break
Well, I tried it out and it works for me, but since you are playing with the configurations you need to keep in mind that stuff could break.
Don't worry just code! 😜
Creating the models
So, first of all, we need to create Objects for our data. Some object that holds our values. For this application purpose, I want to create a TodoModel and a TodoStore. Since we will be reusing the Todo a lot.
So first you should create your TodoStore.js, after that we import what we need.
import { observable, action, computed } from "mobx";
Here we imported the observable which holds a variable, which if changed emits an event. The action is used to manipulate the state, in MobX you could also manipulate the variable directly which sometimes makes your application look messy so keep an eye out for that! And last we import computed which will recalculate after a state got modified.
So now we can create our Todo Model:
export class Todo {
  @observable value
  @observable done

  constructor (value) {
    this.id = Date.now()
    this.value = value
    this.done = false
  }
}
Here we add two observables, value and done. We initialize them and the set the id, which since it should not change, due to its purpose as the identifier.
Next up we need to store our todos in a list, that if it gets changed needs to fire events as well:
export class TodoStore {
  @observable todos = []
  @observable filter = ""

  @action addTodo = (value) => {
    this.todos.push(new Todo(value))
  }
  @action toggleDone = (todo) => {
    this.todos[this.todos.indexOf(todo)].done = !this.todos[this.todos.indexOf(todo)].done
  }
  @action deleteTodo = (todo) => {
    this.todos = this.todos.filter(t => t !== todo)
  }

  @computed get filteredTodos () {
    const matchCase = new RegExp(this.filter, "i")
    return this.todos.filter(todo=> !this.filter || matchCase.test(todo.value))
  }
}
I have added a todo property to filter the todos later. Other than the observable todos, you should notice the actions we have added. One for creating todos, one for deleting them and one for toggling them. The last thing is the computed get filteredTodos, it will fire after the todos or the filter has changed and recalculated which todos should be visible right now. Computed values can only be getters!
Creating the store
Next up we need to initialize the TodoStore somewhere, so again let's do this in our App.js.
Import the TodoStore:
import {TodoStore} from './TodoStore';
initilize the store:
//...
function App() {
  const store = new TodoStore();
  //...
}
//...
and last thing left here, is to pass it down through props:
function App() {
  const store = new TodoStore()
  return (
    <div>
      <Navbar store={store}/>    {/*<= Here*/}
      <TodoList store={store}/>  {/*<= Here*/}
    </div>
  );
}
Now it is just some work to implement it in our components 😄
todolist
So there is one trick left... if you would just import our state and actions you will notice that the state changes will not show up. Why you might ask. If you will open the MobX dev tools, which are available in the chrome-web-store, you see that we have a state set up. [...] It is because we need to observe the state to update it.
import React from 'react'

import Todo from "./todo";
import { observer } from 'mobx-react';

// could be done as well
// @observer
function TodoList(props) {
  // Import the actions and properties
  const { todos, toggleDone, deleteTodo, filteredTodos } = props.store

  return (
    <div>
      <div className="hero is-info">
        <div className="hero-body has-text-centered">
          <p className="title is-1">{todos.length} Todos</p>
        </div>
      </div>

      <section className="section">
        <div className="container">
          <input className="input" placeholder="Search..." type="text" value={props.store.filter} onChange={(e) => props.store.filter = e.target.value} />
        </div>
      </section>

      <section className="section">
        <div className="container">
          {filteredTodos.map(todo => (
            <Todo key={todo.id} todo={todo} toggleDone={toggleDone} deleteTodo={deleteTodo} />
          ))}
        </div>
      </section>
    </div>
  )
}

// another way of using MobX
export default observer(TodoList)
We import our state and actions by destructuring the state property and initialize the TodoList component as an observer. In this code example, I have implemented another way of using MobX. The functional way, but using decorators make it so easy and readable that you should be using them.
The last part is to add our actions to our events and add a new filter input.
todo
Do not forget our todo component, it will need to watch the state as well.
import React from 'react'
import { observer } from 'mobx-react'

function Todo(props) {
  return (
    <div className="card">
      <div className="card-content">
        <div className="level">
          <div className="level-left">
            <div className="level-item">
              <p className={`title ${props.todo.done ? "has-text-grey-light" : ""}`}>{props.todo.value}</p>
            </div>
          </div>
          <div className="level-right">
            <div className="level-item buttons">
              <button onClick={props.toggleDone.bind(this, props.todo)} className={`button has-text-weight-bold ${props.todo.done ? "is-warning" : "is-primary"}`}>{props.todo.done ? "Undo" : "Done"}</button>
              <button onClick={props.deleteTodo.bind(this, props.todo)} className="button is-danger has-text-weight-bold">Delete</button>
            </div>
          </div>
        </div>
      </div>
    </div>
  )
}

export default observer(Todo)
We have just added the observer to it, everything else stays the same.
navbar
In our navbar it is the same concept as in our todolist:
Import and set up the observer and access our state and actions through the props.
import React, { useState } from 'react'
import { observer } from 'mobx-react'

function Navbar(props) {
  const [menu, setMenu] = useState(false)
  const [value, setValue] = useState("")

  const {addTodo} = props.store

  const prepareAddTodo = (e) => {
    e.preventDefault()
    addTodo(value)
    setValue("")
  }

  return (
    <div className="navbar has-shadow">
      <div className="navbar-brand">
        <div className="navbar-item">
          <p className="title">Easy Todo</p>
        </div>

        <a role="button" onClick={() => setMenu(!menu)} className={`navbar-burger burger ${menu ? "is-active" : ""}`} aria-label="menu" aria-expanded="false" data-target="navbarBasicExample">
          <span aria-hidden="true"></span>
          <span aria-hidden="true"></span>
          <span aria-hidden="true"></span>
        </a>
      </div>

      <div className={`navbar-menu ${menu ? "is-active" : ""}`}>
        <div className="navbar-end">
          <div className="navbar-item">
            <form onSubmit={prepareAddTodo} className="field has-addons">
              <p className="control is-expanded">
                <input value={value} type="text" onChange={(e) => setValue(e.target.value)} className="input" />
              </p>
              <p className="control">
                <button className="button is-info has-text-weight-bold">
                  Add Todo
                </button>
              </p>
            </form>
          </div>
        </div>
      </div>
    </div>
  )
}

export default observer(Navbar)
And done!
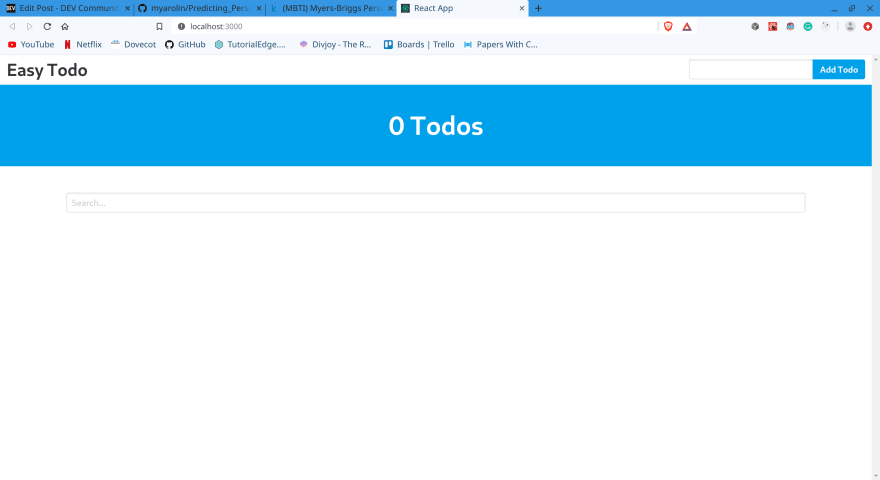
result
You should see a fully working todo app, if not make sure that you restarted it since we are using the react-app-rewired!
App just started:
Added some todos:

Still able to interact with them:

You can now filter through them: #feature

Thank you again for reading this part of the series 😎, I got very positive feedback and learned something myself. Part 4 is almost done so stay tuned! Also, I have added a part 6 where we will connect our stateful todo-app to a database. If you prefer a state management lib for that, write that in the comments and I will use it to build it out again. 😄
See you soon,
@sm03lebr00t

Top comments (7)
awsome todo-list, and you can also try it with concent:
stackblitz.com/edit/concent-todoli...
it is worth doing definitely!
concent is a predictable、zero-cost-use、progressive、high performance's enhanced state management solution, function component and class component can both enjoy the same api calling and writing style, and with feature: computed, watch, effect, setup etc...... your react app will become more funny and powerful.
hello concent:
stackblitz.com/edit/concent-doc-ho...
I am author of concent, you can ask me everything about it, i am very glad to answer your question or help you to resolve problem.
Thanks I will build it out later today 😁
Looks a little bit like vue. I can't read the github repo documentation, since I sadly can not read it, but I read a little through your examples.
Thank you for your reply so much, actually I've written a concent version todo-list
concent todo mvc vs redux&hook todo mvc
you may get some ideas from these two examples.
Thank you, I am going to look at it in a few hours 😁👍
some online example:
multi-ways-to-wirte-code
zero-cost-use
4-render-mode
setup
more examples see here