

Introduction
Data plays an integral part in any organization. With the data-driven nature of modern organizations, almost all businesses and their technological decisions are based on the available data. Let's assume that we have an application distributed across multiple servers in different regions of a cloud service provider, and we need to store that application data in a centralized location. The ideal solution for that would be to use some type of database. However, traditional databases are ill-suited to handle extremely large datasets and lack the features that would help data analysis. In that kind of situation, we will need a proper data warehousing solution like Google BigQuery.
What is Google BigQuery?
BigQuery is an enterprise-grade, fully managed data warehousing solution that is a part of the Google Cloud Platform. It is designed to store and query massive data sets while enabling users to manage data via the BigQuery data manipulation language (DML) based on the standard SQL dialect.
BigQuery also offers a robust set of tools to manage data sets, from its Cloud Console to BigQuery REST API with support for multiple programming languages such as Java, Python, .NET, etc.… Additionally, BigQuery provides built-in support for Machine Learning and AI integrations with BigQueryML, AI Platform, and TensorFlow. With its powerful BI Engine, BigQuery can be used to power any type of modern business intelligence platform.
Alternatives to BigQuery
Amazon Redshift - Fully managed cloud data warehousing solution to collect and store data offered by AWS.
Azure Synapse Analytics - Enterprise data warehousing and data analytics solution offered by Microsoft Azure
Utilizing BigQuery as a Data Warehouse
The best way for collecting data from multiple servers for a data warehousing solution would be to periodically sync (push) data from the application to the data warehouse.
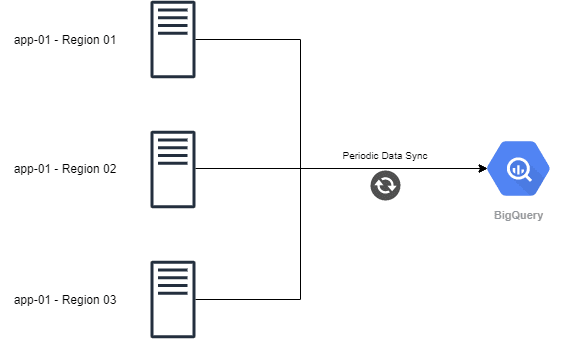
Let's have a look at the following diagram. There are three application servers distributed in multiple regions, and a script has been configured to push data from each server to BigQuery periodically. In this article, we will mainly focus on how a developer can interact with BigQuery store and query data.
Sample Solution Architecture
Sample Data Structure
We will be using the following table structure in BigQuery for demonstration purposes.
| Field Name | Field Type |
|---|---|
| user_id | INT |
| username | STRING |
| User_type | STRING |
| origin_ip | STRING |
| session_start | DATETIME |
| session_end | DATETIME |
| country | STRING |
Creating a BigQuery Project
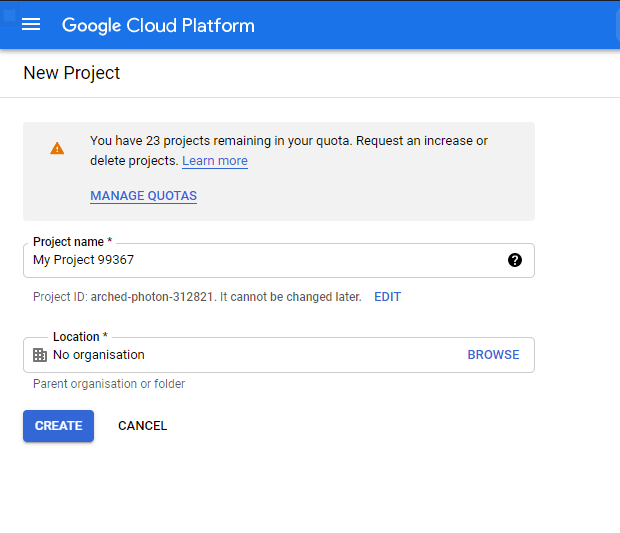
To interact with BigQuery, first, we need to create a BigQuery account. For that, simply navigate to BigQuery in Google Cloud Platform, sign up for a GCP account, and create a new project there. We will be utilizing BigQuery within this project.
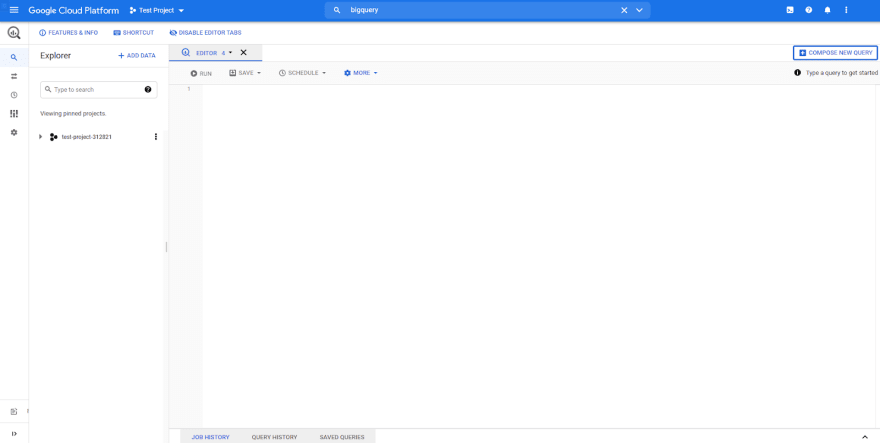
Then, navigate to BigQuery and the user will be presented with the Cloud Console where they can interact with BigQuery using the GUI or by running SQL queries.
Creating BigQuery Tables
We need to create a data set and underlying tables before inserting data into BigQuery so that we can correctly map and push the relevant data to BigQuery.
Step 1 - Create a BigQuery Data set
Data sets are top-level containers in BigQuery which are used to organize and control the underlying tables and views. This is analogous to a traditional database.
Creating Data Sets Using the Cloud Console
Click on the project and then click on "Create data set." Then, we will be presented with the data set creation panel. Provide a name and the data set location (the region where the data set will be located), and click on "CREATE DATA SET."

Creating Data Sets Programmatically
We can use the following code block written in Python to create a data set:
from google.cloud import bigquery
from google.oauth2 import service_account
# Create credentials object using a service account
creds = service_account.Credentials.from_service_account_file('test-project-xxxxxxxx.json')
client = bigquery.Client(credentials=creds)
# Define Dataset Name
dataset_id = "{}.Test_Data_Set02".format(client.project)
# Construct a Dataset object.
dataset = bigquery.Dataset(dataset_id)
# Specify the Dataset location
dataset.location = "US"
# Create the Dataset
dataset = client.create_dataset(dataset, timeout=30)
print("Created dataset {}.{}".format(client.project, dataset.dataset_id))
Step 2 - Create a BigQuery Table
A dataset consists of tables that act as the base to store the required data, similar to tables in a regular database.
Creating Tables via Cloud Console
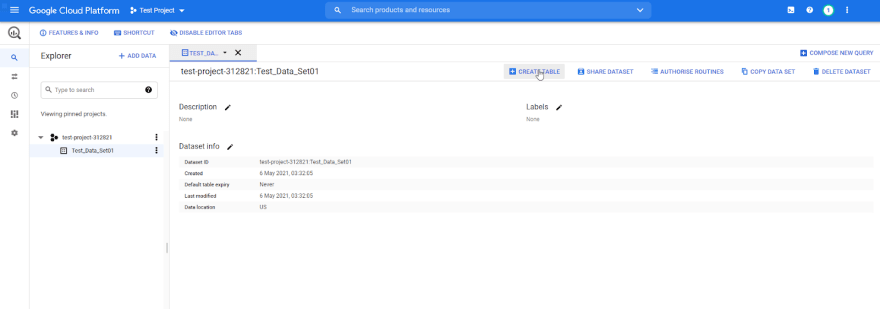
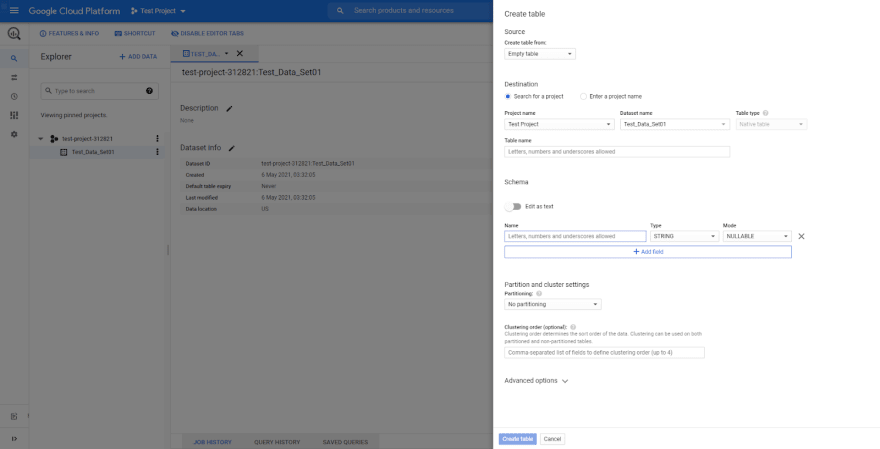
Click on the desired Dataset, and it will open the dataset view. Then click on the "CREATE TABLE" option there:
It will open the create table section. Provide the table name, define the table schema and finally click on "create table."
Create a Table using SQL
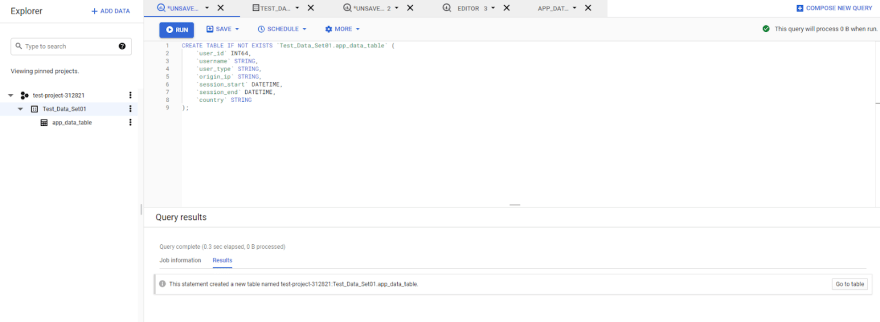
Since BigQuery supports the standard SQL dialect, we can use the "CREATE TABLE" command with appropriate data types to create the required tables. To do that, simply execute the following SQL query in the Cloud Console.
CREATE TABLE IF NOT EXISTS `Test_Data_Set01.app_data_table` (
`user_id` INT64 NOT NULL,
`username` STRING NOT NULL,
`user_type` STRING,
`origin_ip` STRING NOT NULL,
`session_start` DATETIME NOT NULL,
`session_end` DATETIME,
`country` STRING NOT NULL
);
Create a Table Programmatically
Another way to create a table is to create a script using the google client libraries. The following code block demonstrates how to create a table in BigQuery using Python.
from google.cloud import bigquery
from google.oauth2 import service_account
creds = service_account.Credentials.from_service_account_file('test-project-xxxxxxx.json')
client = bigquery.Client(credentials=creds)
# Configure a Table Name
table_id = "{}.Test_Data_Set01.app_data_table02".format(client.project)
# Define the Schema
schema = [
    bigquery.SchemaField("user_id", "INTEGER", mode="REQUIRED"),
    bigquery.SchemaField("username", "STRING", mode="REQUIRED"),
    bigquery.SchemaField("user_type", "STRING", mode="NULLABLE"),
    bigquery.SchemaField("origin_ip", "STRING", mode="REQUIRED"),
    bigquery.SchemaField("session_start", "DATETIME", mode="REQUIRED"),
    bigquery.SchemaField("session_end", "DATETIME", mode="NULLABLE"),
    bigquery.SchemaField("country", "STRING", mode="REQUIRED"),
]
# Create the Table
table = bigquery.Table(table_id, schema=schema)
table = client.create_table(table)
print(
"Created table {}.{}.{}".format(table.project, table.dataset_id, table.table_id)
)
Inserting Data to BigQuery
Now we know how to create Datasets and Tables. The next step would be to insert data. There are two available options when it comes to inserting data into BigQuery:
- Using SQL to insert data (DML)
- Stream Data
Both the above options are viable methods for inserting data. Let's have a look at each option.
Data Manipulation Language (DML)
BigQuery DML enables users to perform various operations on BigQuery tables such as insert, update and delete using the standard SQL dialect. This option offers the most flexibility as it allows us to create queries to match any requirement using DML.
One of the major limitations of using DML is that you can not manipulate recent data (rows) written to the table by streaming (typically for writes occurring within 30 minutes). You can refer to the GCP documentation to gain a complete understanding of BigQuery DML.
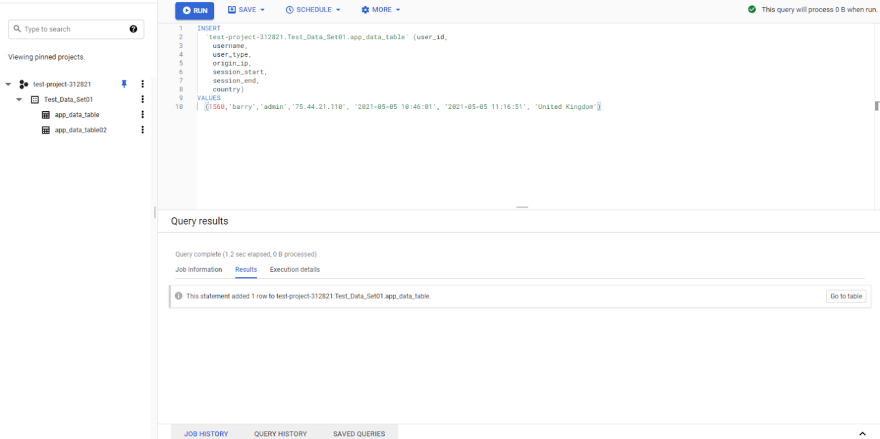
We can create a simple INSERT query by defining the table name with the data set and project name and then defining the columns and values as shown below.
Sample INSERT query
INSERT INTO
`test-project-312821.Test_Data_Set01.app_data_table` (user_id,
username,
user_type,
origin_ip,
session_start,
session_end,
country)
VALUES
(1560,'barry','admin','75.44.21.110', '2021-05-05 10:46:01', '2021-05-05 11:16:51', 'United Kingdom')
Sample Script
from google.cloud import bigquery
from google.oauth2 import service_account
creds = service_account.Credentials.from_service_account_file('test-project-xxxxxxx.json')
client = bigquery.Client(credentials=creds)
# Define the Table
table_id = "{}.Test_Data_Set01.app_data_table".format(client.project)
# Define the Columns
columns = "(user_id, username, user_type, origin_ip, session_start, session_end, country)"
# Define the Data
data = "(1560,'barry','admin','75.44.21.110', '2021-05-05 10:46:01', '2021-05-05 11:16:51', 'United Kingdom')"
# Create the Query
insert_data_query = f"""
INSERT `{table_id}` {columns}
VALUES {data}
"""
query_job = client.query(insert_data_query)
print(query_job.result())
results = query_job.result()
for row in results:
print(row)
Streaming Data
Streaming data enables users to send (stream) data as one record at a time or in batches using the "tabledata.insertAll" method. This is a relatively faster way than using a job to load data into BigQuery (Using DML). Refer to the official documentation by Google for more information about streaming data.
We are streaming data using the "insert_rows_json" method by defining the required data as a JSON string in the following code block.
Sample Script
from google.cloud import bigquery
from google.oauth2 import service_account
creds = service_account.Credentials.from_service_account_file('test-project-xxxxxxx.json')
client = bigquery.Client(credentials=creds)
# Define the Table
table_id = "{}.Test_Data_Set01.app_data_table".format(client.project)
# Define the rows to INSERT
rows_to_insert = [
{"user_id": 2054, "username": 'jake', "user_type": 'user', "origin_ip": '277.12.12.55',
"session_start": '2021-05-06 05:05:41', "session_end": '2021-05-06 10:10:15', "country": 'United States'},
{"user_id": 8755, "username": 'harry', "user_type": 'user', "origin_ip": '155.15.22.222',
"session_start": '2021-05-04 01:10:01', "session_end": '2021-05-04 03:45:15', "country": 'Japan'},
]
# Stream the Data
errors = client.insert_rows_json(table_id, rows_to_insert)
# Capture Errors
if errors == []:
print("New rows have been added.")
else:
print("Encountered errors while inserting rows: {}".format(errors))
Now that we know how to insert data. In our distributed application scenario, we can create a script that will stream data to BigQuery and triggered via a cron job at regular intervals. Let's assume that our distributed application saves the required data to a JSON file, and we need to stream that data to BigQuery at midnight every day. We can achieve this by running the following script on all the servers to stream the data.
Stream Data (Cronjob - 0 0 * * *)
from google.cloud import bigquery
from google.oauth2 import service_account
import datetime as dt
import json
creds = service_account.Credentials.from_service_account_file('test-project-312821-ebd8bff1ae68.json')
client = bigquery.Client(credentials=creds)
# Opening JSON file (JSON file for the specific day)
currnet_date = current_date = dt.date.today().strftime("%Y-%m-%d")
f = open(f'{currnet_date}-app-data.json')
# Load the JSON data
app_data = json.load(f)
# Define the Table
table_id = "{}.Test_Data_Set01.app_data_table".format(client.project)
# Stream the JSON data
errors = client.insert_rows_json(table_id, app_data)
# Capture Errors
if errors == []:
print("New rows have been added.")
else:
print("Encountered errors while inserting rows: {}".format(errors))
We are using streaming as we would not need to update or delete the newly added records using DML. The performance benefit gained by streaming is crucial as we stream multiple data streamings (multiple servers) through the internet.
Retrieving Data from BigQuery
The hard part is over, and now we are successfully streaming data from each application server to BigQuery. The next step is to read the data from BigQuery. We can use a simple SELECT statement to read data from BigQuery.
As BigQuery supports the standard SQL dialect, we can use various statements such as WHERE, ORDER BY, GROUP BY, LIMIT, and JOIN to filter and extract the required data set.
Sample SELECT queries
SELECT * FROM `test-project-312821.Test_Data_Set01.app_data_table` LIMIT 1000
SELECT
user_id AS `USER_ID`,
username AS `USERNAME`,
user_type AS `USER_TYPE`,
origin_ip AS `ORIGIN_IP`,
COUNT(user_id) AS `COUNT`
FROM
`test-project-312821.Test_Data_Set01.app_data_table`
WHERE
country = 'United Kingdom'
GROUP BY
user_id,
username,
user_type,
origin_ip
ORDER BY
user_id ASC;
Now let's see how to get these data to a python program through the BigQuery API. When handling large data sets, Pandas of the Python library is the best choice that allows developers to manage and transform data using Data Frames easily.
The below code block retrieves the data from BigQuery for the number of records grouped by each country.
from google.cloud import bigquery
from google.oauth2 import service_account
import pandas as pd
creds = service_account.Credentials.from_service_account_file('test-project-312821-ebd8bff1ae68.json')
client = bigquery.Client(credentials=creds)
# Define the Table
table_id = "{}.Test_Data_Set01.app_data_table".format(client.project)
# Create the SELECT Query
select_data_query = f"""
SELECT
country AS `COUNTRY`,
COUNT(user_id) AS `COUNT`
FROM
`Test_Data_Set01.app_data_table`
GROUP BY
country
ORDER BY
country ASC;
"""
# Create a Data Frame from the Results
results_df = client.query(select_data_query).to_dataframe()
print(results_df)
We can then use this data frame to visualize the data to gain a better understanding of the underlying data set. We will create a pie chart from the data retrieved from BigQuery to visualize the number of users from each country.
Sample Data Visualization Script
from google.cloud import bigquery
from google.oauth2 import service_account
import pandas as pd
import matplotlib
import pyarrow
creds = service_account.Credentials.from_service_account_file('test-project-312821-ebd8bff1ae68.json')
client = bigquery.Client(credentials=creds)
# Define the Table
table_id = "{}.Test_Data_Set01.app_data_table".format(client.project)
# Create the SELECT Query
select_data_query = f"""
SELECT
country AS `COUNTRY`,
COUNT(user_id) AS `COUNT`
FROM
`Test_Data_Set01.app_data_table`
GROUP BY
country
ORDER BY
country ASC;
"""
# Create a Data Frame from the results
results_df = client.query(select_data_query).to_dataframe()
results_df = results_df.set_index('COUNTRY')
print(results_df)
# Visualize the data as a Pie chart
plot = results_df.plot.pie(y='COUNT', figsize=(10, 10))
RESULT
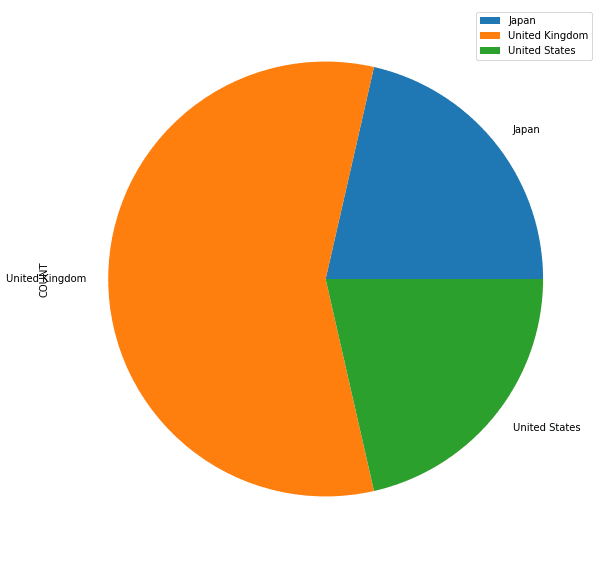
This is only a simple example, and we can pass data to various tools and libraries such as Google Data Studio, Power BI, etc., to visualize them more effectively.
Conclusion
That's all, and we have covered all the basics of BigQuery. Through this article, we gained an understanding of how to use BigQuery as a data warehouse for a distributed application by streaming data into a BigQuery data set. The next stage is to dig deep into BigQuery and the application to expand upon this foundation to build a comprehensive data analytics solution with BigQuery as the base.

Latest comments (0)