How to create a fully functional blog with Alpas, Kotlin, and Tailwind — part 3: validation rule, add the front-end, and blog away!
This final part of the series will mainly focus on the front-end. For the front-end, we are styling using TailwindCSS.
But first, let’s create a validation rule to make ensure metadata and blog content are included in the post before we write to the database.
Step 8: Create a validation rule
There is no out-of-the-box rule to support validating the blog post content. Luckily, it’s easy to create a new custom rule that can be called to validate a form entry.
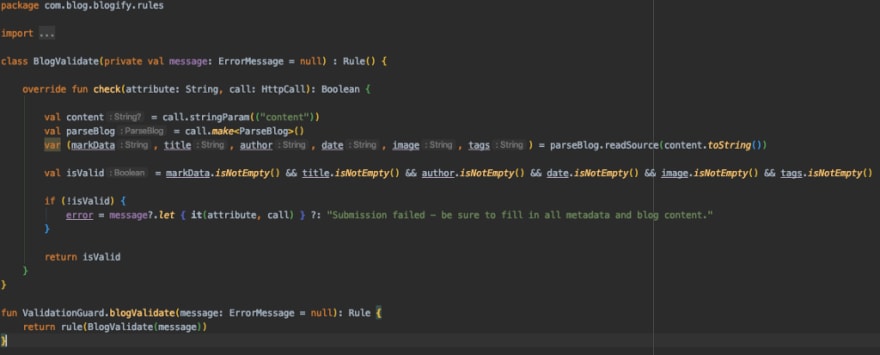
In this case, we want to validate all of the meta data fields are accounted for and that there is at least some content in the body of the blog post.
- Create a new validation rule using the
./alpas make:validation-rule BlogValidatecommand - Open up the BlogValidate.kt file and add in the code from Blogify repo on GitHub
- After updating the file, don’t forget to import the new rule into the BlogController.kt file
The rule simply checks to make sure all of the required content is present. As an added exercise, try to see if you can customize the validation to tell the front-end exactly which piece(s) failed validation.
Now all we need to do is create the front-end!
📄 Related Documentation
Step 9: Create the front-end
For the front-end of the website, we will be using Tailwind CSS. The Alpas starter project already comes pre-installed with Tailwind. All we need to do is customize it a bit and then apply some classes to create a slick looking interface!
For the majority of the step, feel free to get creative and let your design-side shine! 👩🎨
- Open the app.less file and let’s add some custom CSS to target HTML tags that were applied during the markdown to HTML conversion
- Add the CSS from GitHub repo; alternatively, you can work with the tailwind.config.js file to customize HTML tag styles
- Under the templates directory, create the following files
- _footer.peb and add contents from GitHub repo
- _header.peb and add contents from GitHub repo
- _nav.peb and add contents from GitHub repo
- blog.peb and add contents from GitHub repo
- editblog.peb and add contents from GitHub repo
- marked.peb and add contents from GitHub repo
- new.peb and add contents from GitHub repo
- Modify welcome.peb by replacing current contents with contents from GitHub repo
💡 If you change the css.less file or the tailwind.config.js file, you will need to recompile your project. You can do that by installing yarn for your project and then run yarn development or yarn watch commands
📄 Related Documentation
Step 10: Run the app and blog away!
Now for the fun part - run your new blog website on you local environment and blog away!
If you want to take your blog all the way, you can do the following:
- Add authentication and put the add/edit/remove blog post controls behind an authentication gate
- Provision a server and deploy your blog so that it is live on the world wide web for everyone to read
I hope that you found this blog about building a blog useful! If you create your own blog, I want to see it! Tweet me a screenshot/link or request to add your blog post to Alpas Resources. 😍

Top comments (0)