
In case it helped :)

We will cover briefly about creating a game
- Using Flame
- This article is an overview of using Flame
- Detailed explanation of Flame available here.
- Game assets were found at OpenGameArt
Note : For learning how to create a game, step by step, please follow this. This game itself was created by following this.
Introducing Flame….

As per the documentation :
Flame is a minimalist Flutter game engine…
Article here: https://flatteredwithflutter.com/how-to-create-game-in-flutter-web-using-flame/
Steps :
- Add this to your pubspec.yaml file
dependencies: flame: ^0.19.12. Create a Game class
In case of normal Flutter Apps, we tend to create a class which internally implements a MaterialApp,
but here, we define a class named GameTime that extends Flame’s Game class.
class GameTime extends Game {
  void render(Canvas canvas) {}
  void update(double t) {}
}
3. Overview of runApp
void main() => runApp(GameScreen());

class GameScreen extends StatefulWidget {
  const GameScreen({Key key}) : super(key: key);
  static final _game = GameTime();

  @override
  _GameScreenState createState() => _GameScreenState();
}

class _GameScreenState extends State {
  @override
  Widget build(BuildContext context) => GameScreen._game.widget;
}
This creates our page into a game !!
Notice that, GameTime class itself has a widget property.
As per the docs, widget
Returns the game widget. Put this in your structure to start rendering and updating the game. You can add it directly to the runApp method or inside your widget structure.
Our game — COVIDER !!!
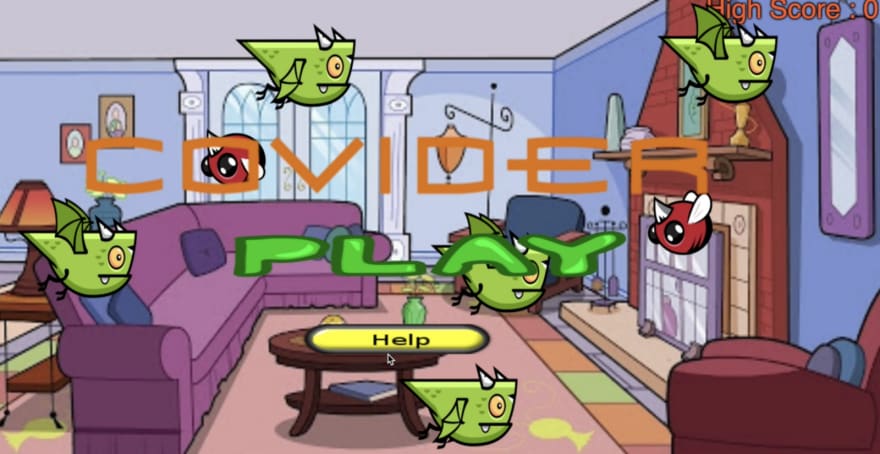
Rules :
- Tap on the virus to kill..
- Each virus killed, you earn a point
- There is a time associated with each virus, failing to kill in that time, you lose
- Tap outside the virus, you also lose.
Basics for COVIDER
Covider, (name of our game) is divided into
- Components
- Controller
- Views
- Game Class , (
GameTimeclass)
Every game requires resources, assets, variables etc to be loaded before anything else happens,
we do so by calling a function initialize inside the GameTime constructor
GameTime() {
    initialize;
}

Future<void> get initialize async {
  // YOUR STUFF HERE
}
Current size of the screen
We make use of the Flame’s utility called initialDimensions…
final _size = await Flame.util.initialDimensions();
and pass this value inside the resize function.
@override
 void resize(Size size) {
   screenSize = size;
   super.resize(size);
}
hence, at every point of time, we have the latest screensize….
Draw Background…
First, we download an asset and put inside the pubspec.yaml
assets:
    - assets/images/
    - assets/images/bg/room.png
Note: I had to specify the image path, to load, although I had already included the folder images
For loading images in Flame,
Flame.images.loadAll(['bg/room.png'])
We have a class called AssetsLoader wherein we load assets…This is called in the initState ofGameScreen ..
class _GameScreenState extends State<GameScreen> {
  @override
  void initState() {
    super.initState();
    AssetsLoader.loadImages();
  }
}
Lets create a Background Component, to separate the background’s logic…
class Background {
  Background({
    @required this.gameTime,
  }) {
    bgSprite = Sprite(GameUtils.roomImage);
    bgRect = Rect.fromLTWH(
      0.0,
      0.0,
      gameTime.screenSize.width,
      gameTime.screenSize.height,
    );
  }
  final GameTime gameTime;

  Rect bgRect;
  Sprite bgSprite;

  void render(Canvas c) {
    bgSprite.renderRect(c, bgRect);
  }
}
Sprite : From flame package, used to draw onto the screen.
In our case, we are passing the image, which we downloaded earlier, using bgSprite.
renderRect : To render the background image.
We create a rectangle, which is of the same dimensions as our screen. It takes in two parameters, canvas and the rectangle to be drawn…
Now for rendering the background inside GameTime….
- Initialize the instance of this component as
Background background;
and inside the GameTime initialize function, write this
background = Background(gameTime: this);
This will make sure, we always have the background instance…..
2. Inside the render method of GameTime ,
@override
void render(Canvas canvas) {
  // RENDER BACKGROUND
  background.render(canvas);
}
this calls the render method of background, which we defined earlier…Your background is visible now….
Note : Pretty much each component, uses this logic….
Include Audio
We downloaded assets for hit, lose and background music, put inside the pubspec.yaml
assets:
    - assets/audio/bgm/bg_music.mp3
    - assets/audio/sfx/hit1.mp3
    - assets/audio/sfx/hit2.mp3
    - assets/audio/sfx/laugh.mp3
Just like we loaded images, we now need to load sounds in Flame…
static void loadSounds() {
   Flame.audio.disableLog();
   Flame.audio.loadAll(GameUtils.sounds);
}
where GameUtils.sounds is the list of string
Flame package comes with AudioPlayer,meaning you don’t need to add any other package…
- Create a variable inside
GameTime
AudioPlayer playBGM;
- Inside
GameTimeinitialize method
// AUDIO PLAYERS
playBGM = await Flame.audio.loopLongAudio(GameUtils.bgMusic,   volume: 0.25);
audio.loopLongAudio : allows for audios of any length to be played. We set the volume (optional param) to 0.25..
Note : This is used to play the background music
- For one-time sounds, like hit or miss,
Flame.audio.play(GameUtils.laughSound); // LAUGH SOUND
use audio.play : makes uses of optimized features
Draw Virus
We downloaded assets for fly-up and fly-down and put inside the pubspec.yaml
assets:
    - assets/images/virus/virus_fly_up.png
    - assets/images/virus/virus_fly_down.png
Lets create Virus Component..
class Virus {
  Virus({
    @required this.gameTime,
  })

  final GameTime gameTime;

  double get virusSpeed => gameTime.tileSize * 2;

  void render(Canvas c) {}

  void update(double t) {}

  void onTapDown() {}

  void get setupVirusLocation {}
}
and from this class, we created two other classes called MovingVirus and MovingDragonVirus
MovingVirusComponent
class MovingVirus extends Virus {
  MovingVirus(
    GameTime gameTime,
    double left,
    double top,
  ) : super(gameTime: gameTime) {
    virusRect = Rect.fromLTWH(left, top, gameTime.tileSize, gameTime.tileSize);

    movingVirusSprite = <Sprite>[];
    movingVirusSprite.add(Sprite(GameUtils.virusUp));
    movingVirusSprite.add(Sprite(GameUtils.virusDown));

deadVirusSprite = Sprite(GameUtils.virusDead);
  }
}
Basically, for any flying motion, we always have used two images -(one for fly up) and (other for fly down). Then, adding to the sprites respectively..
In order to create different speeds for viruses, we override the virusSpeed
MovingDragonVirusComponent
class MovingDragonVirus extends Virus {
  MovingDragonVirus(
    GameTime gameTime,
    double left,
    double top,
  ) : super(gameTime: gameTime) {
    virusRect = Rect.fromLTWH(
        left,
        top,
        gameTime.tileSize * GameUtils.maxVirusSize,
        gameTime.tileSize * GameUtils.maxVirusSize);

    movingVirusSprite = [];
    movingVirusSprite.add(Sprite(GameUtils.dragonVirusUp));
    movingVirusSprite.add(Sprite(GameUtils.dragonVirusDown));

    deadVirusSprite = Sprite(GameUtils.virusDead);
  }

  @override
  double get virusSpeed => gameTime.tileSize * 5;
}
Note : For the motion of virus, kindly visit here for detailed explanation.
Storing High Scores…
For storing data, we made use of dart:html , which gives access to localStorage
For accessing the localStorage,
final _localStorage = html.window.localStorage;
To visit localstorage, (screenshot from Chrome)

and we store the data inside it as a String….
_localStorage[‘$key’] = value;
In case it helped :)
Hosted URL : https://fir-signin-4477d.firebaseapp.com/#/
Source code for Flutter Web App..

Top comments (0)