
This post is the start of a series of post on how I built a IoT connected BBQ as SaaS. This first post will kick everything off by briefly introducing the used hardware and AWS GreenGrass, which will be used to connect and send data to the cloud. In the coming post the architecture will be introduced followed be deep dive technical posts on each part of the architecture.
In the end I will have created a Serverless connected BBQ smoker as a SaaS solution. There will be deep dives into IoT setup, on-boarding, user management, data and tenant isolation.
HW Components
First, let's go over the required HW and what I'll be using in this series. I will be using a Raspberry Pi 3 model B that will connect to a Inkbird IBT-6xs over bluetooth LE.
However in this first post we'll setup a simulated device running on a small EC2 instance.
AWS Greengrass Core
AWS IoT Greengrass is an edge runtime and cloud service for building, deploying, and managing device software in an easy way. It support creation of custom software components that can easily be deployed to any device running Greengrass.
Greengrass Development Kit
To make development a bit easier I will be using Greengrass Development Kit to build new versions of the component. GDK however doesn't support AWS Identity Center and CLI profiles, making it impossible to publish new versions using this tool. Instead I will be manually creating new versions.
Initialize a component
First of I use GDK to initialize a new component. To do this run the init command. There is a need to specify the used language and template to base the component of. Available templates can be found in GitHub I will be using Python and base the component of HelloWorld template. I will also supply a name for it, this will create a new folder where all files are stored. Make sure the folder do not exist.
gdk component init -l python -t HelloWorld -n HelloBBQ
In the HelloBBQ folder there is now a configuration file gdk-config.json this need to be updated and the PLACEHOLDER values changed, and the component name specified.
{
  "component": {
    "com.example.hellobbq": {
      "author": "<PLACEHOLDER_NAME>",
      "version": "1.0.0",
      "build": {
        "build_system": "zip",
        "options": {
          "zip_name": ""
        }
      },
      "publish": {
        "bucket": "<PLACEHOLDER_BUCKET>",
        "region": "<PLACEHOLDER_REGION>"
      }
    }
  },
  "gdk_version": "1.3.0"
}
Add device code
Update the main.py file and add code to connect and publish fake temperatures to IoT Core on a topic e/{THING_NAME}/data
import os
import time
import uuid
import random
import json
import awsiot.greengrasscoreipc.clientv2 as clientV2
from awsiot.greengrasscoreipc.clientv2 import GreengrassCoreIPCClientV2
from decimal import Decimal


# MQTT
IPC_CLIENT: GreengrassCoreIPCClientV2 = clientV2.GreengrassCoreIPCClientV2()
THING_NAME = os.getenv("AWS_IOT_THING_NAME")
OPERATIONS_TOPIC = f"c/{THING_NAME}/operation"
DATA_TOPIC = f"e/{THING_NAME}/data"
QOS = "1"
SESSION = str(uuid.uuid4())


def publishToTopic(topic, payload):
    IPC_CLIENT.publish_to_iot_core(topic_name=topic, qos=QOS, payload=payload)


def createRandomDecimal():
    return random.randint(0, 1000) / 10


def generateSimulatedTemperature():
    tempProbe0 = str(round(Decimal(createRandomDecimal()), 2))
    tempProbe1 = str(round(Decimal(createRandomDecimal()), 2))
    tempProbe2 = str(round(Decimal(createRandomDecimal()), 2))
    tempProbe3 = str(round(Decimal(createRandomDecimal()), 2))
    tempProbe4 = str(round(Decimal(createRandomDecimal()), 2))
    tempProbe5 = str(round(Decimal(createRandomDecimal()), 2))

    # Add the temperatures to the array
    temps = [
        tempProbe0,
        tempProbe1,
        tempProbe2,
        tempProbe3,
        tempProbe4,
        tempProbe5,
    ]

    temp_dict = {"session": SESSION, "temperatures": temps}

    return temp_dict


def main():
    # Continually request information from the iBBQ device
    while True:
        try:
            temps = generateSimulatedTemperature()
            publishToTopic(DATA_TOPIC, json.dumps(temps))
            time.sleep(5)
        except Exception as e:
            print(f"ERROR IN WHILE LOOP, TRY AGAIN! {e.message}")


if __name__ == "__main__":
    main()
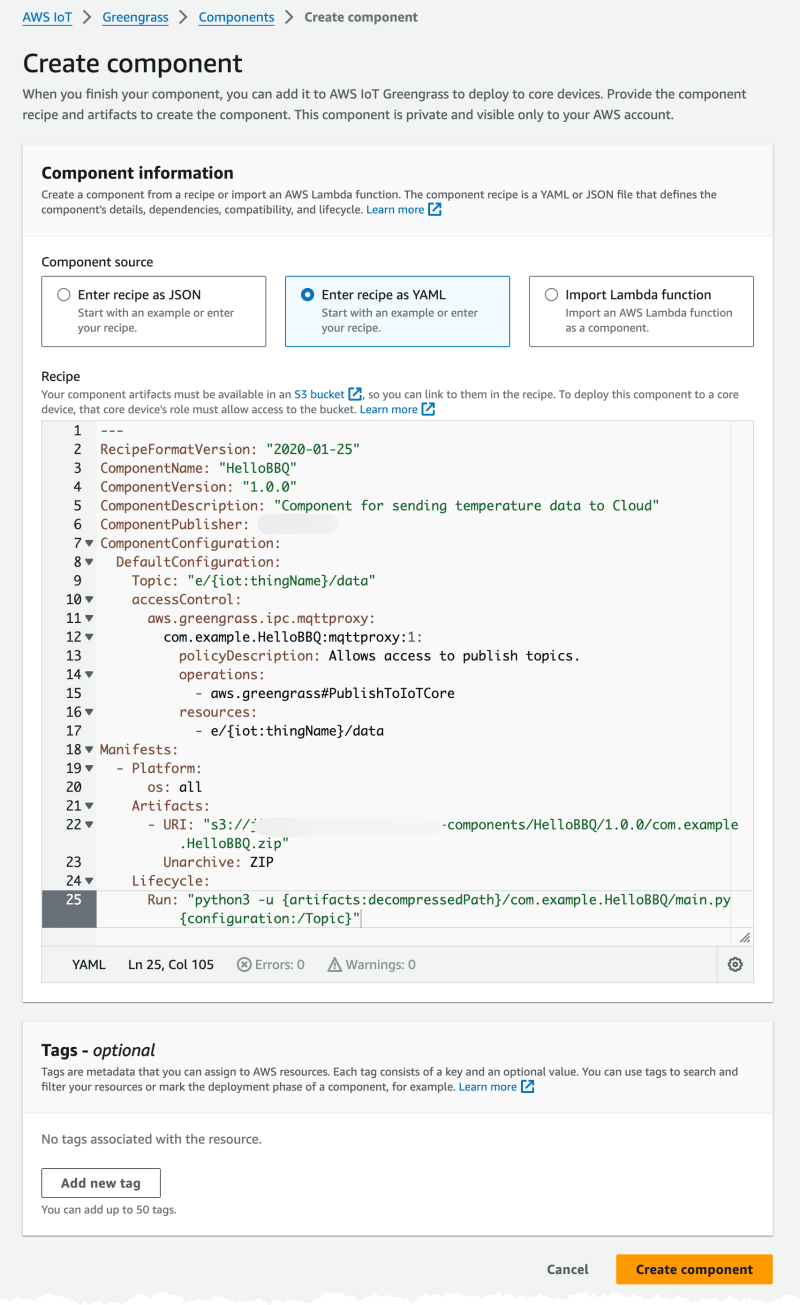
Create the recipe
In the same folder the GreenGrass recipe file is also created. This need to be updated to match GDK configuration. In the recipe it's possible to variables like {artifacts:decompressedPath}, full reference can be found here
To send data over MQTT to AWS IoT Core we need to add permissions for the mqttproxy and specify which topics it can publish to. W'll only allow the device to publish to topics it "owns" that is include the thing name. For this we can use the variable {iot:thingName}
---
RecipeFormatVersion: "2020-01-25"
ComponentName: "com.example.hellobbq"
ComponentVersion: "1.0.0"
ComponentDescription: "Component for sending temperature data to Cloud"
ComponentPublisher: "YOUR-NAME"
ComponentConfiguration:
  DefaultConfiguration:
    Topic: "e/{iot:thingName}/data"
    accessControl:
      aws.greengrass.ipc.mqttproxy:
        com.example.hellobbq:mqttproxy:1:
          policyDescription: Allows access to publish to device topics.
          operations:
            - aws.greengrass#PublishToIoTCore
          resources:
            - "e/{iot:thingName}/data"
Manifests:
  - Platform:
      os: all
    Artifacts:
      - URI: "s3://PLACEHOLDER_BUCKET/com.example.hellobbq/1.0.0/com.example.hellobbq.zip"
        Unarchive: ZIP
    Lifecycle:
      Run: "python3 -u {artifacts:decompressedPath}/com.example.hellobbq/main.py {configuration:/Topic}"
Build component
With the GDK config and recipe update it's time to build the component. That is done with command.
gdk component build
The build will produce a zip file located in folder greengrass-build/COMPONENT_NAME/VERSION/
With build completed copy the zip file to the S3 bucket used in the recipe.
aws s3 cp greengrass-build/artifacts/com.example.HelloBBQ/1.0.0/com.example.hellobbq.zip s3://PLACEHOLDER_BUCKET/com.examle.hellobbq/1.0.0/com.example.hellobbq.zip
With the zip file uploaded the component can be created in the AWS Console.
Create component
To create the component we navigate to the IoT Core part of the console, expand Greengrass devices and select Components, click on Create Component button to the right.
Paste the recipe and click on Create Component
Create simulation device
To simulate the device we can use a small EC2 instance. I will create a small t3.micro instance that I will be using.
We need create an IAM Role, that we assign to the EC2 Instance, this role will be used to provision the instance as an IoT Thing and all the needed resources. The minimum access needed can be found in the aws documentation below is an example.
{
    "Version": "2012-10-17",
    "Statement": [
        {
            "Sid": "CreateTokenExchangeRole",
            "Effect": "Allow",
            "Action": [
                "iam:AttachRolePolicy",
                "iam:CreatePolicy",
                "iam:CreateRole",
                "iam:GetPolicy",
                "iam:GetRole",
                "iam:PassRole"
            ],
            "Resource": [
                "arn:aws:iam::ACCOUNT-ID:role/GreengrassV2TokenExchangeRole",
                "arn:aws:iam::ACCOUNT-ID:policy/GreengrassV2TokenExchangeRoleAccess",
                "arn:aws:iam::aws:policy/GreengrassV2TokenExchangeRoleAccess"
            ]
        },
        {
            "Sid": "CreateIoTResources",
            "Effect": "Allow",
            "Action": [
                "iot:AddThingToThingGroup",
                "iot:AttachPolicy",
                "iot:AttachThingPrincipal",
                "iot:CreateKeysAndCertificate",
                "iot:CreatePolicy",
                "iot:CreateRoleAlias",
                "iot:CreateThing",
                "iot:CreateThingGroup",
                "iot:DescribeEndpoint",
                "iot:DescribeRoleAlias",
                "iot:DescribeThingGroup",
                "iot:GetPolicy"
            ],
            "Resource": "*"
        },
        {
            "Sid": "DeployDevTools",
            "Effect": "Allow",
            "Action": [
                "greengrass:CreateDeployment",
                "iot:CancelJob",
                "iot:CreateJob",
                "iot:DeleteThingShadow",
                "iot:DescribeJob",
                "iot:DescribeThing",
                "iot:DescribeThingGroup",
                "iot:GetThingShadow",
                "iot:UpdateJob",
                "iot:UpdateThingShadow"
            ],
            "Resource": "*"
        }
    ]
}
I create a Role named SimulatedBBQDeviceInstanceRole with the above permissions, and assign this the EC2 instance used to simulated the BBQ device.
When the EC2 instance is running I connect to it using EC2 Instance Connect.
Install Requirements
First of all Java need to be installed on the instance, since i use a Amazon Linux 2023 based instance Java is installed with command.
sudo dnf install java-11-amazon-corretto -y

java -version
Next Python and PIP are needed. Amazon Linux 2023 should come with Python 3.9 installed, verify this by running which python3. If Python should not be installed run:
sudo dnf install python3.9 -y
Next install PIP for the corresponding Python version
sudo dnf install python3.9-pip -y
Finally install AWS IoT SDK fpr Python, but before you do this ensure you have the latest version of AWS CLI installed, follow this guide.
sudo pip3 install awsiotsdk --user
Setup GreenGrass Core
To setup GreenGrass Core on the device navigate back to the IoT Console, select Greengrass and Core devices then click on Set up one Greengrass core device I give it a name and don't assign any Thing group.
The rest of the steps are in the wizard but summarized we should:
1: Download the installer
curl -s https://d2s8p88vqu9w66.cloudfront.net/releases/greengrass-nucleus-latest.zip > greengrass-nucleus-latest.zip && unzip greengrass-nucleus-latest.zip -d GreengrassInstaller
2: Run installer
sudo -E java -Droot="/greengrass/v2" -Dlog.store=FILE -jar ./GreengrassInstaller/lib/Greengrass.jar --aws-region eu-west-1 --thing-name SimulatedBBQDeviceOne --component-default-user ggc_user:ggc_group --provision true --setup-system-service true --deploy-dev-tools true
There should be a print in the end indicating success Successfully set up Nucleus as a system service and the device should now be visible in the IoT Core Console.
Install components
Now let's install the component that is needed. Navigate to Deployments in the GreenGrass section of IoT Core console, and locate the Deployment for the Simulated device.
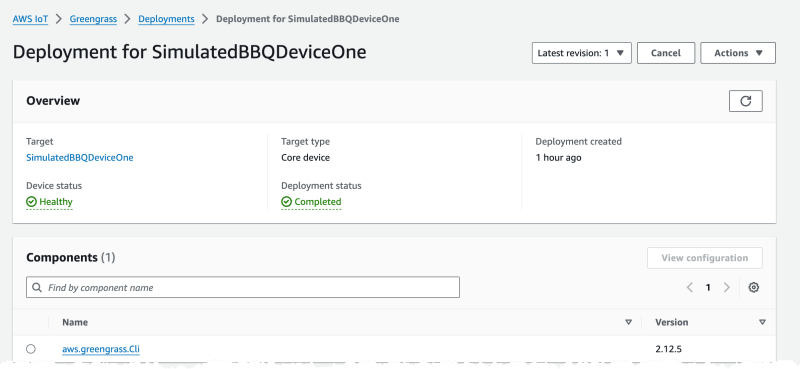
From the Actions menu select Revise and the Revise Deployment button.
Leave target as is and just click next.
Select the HelloBBQ component, LogManager, CloudWatch, and Nucleus, and click next.

Next there is a need to configure LogManager and Nucleus components.

In the Configuration screen select LogManager and click Configure, add the below JSON to the merge config.
{
    "logsUploaderConfiguration": {
        "systemLogsConfiguration": {
            "uploadToCloudWatch": "true"
        },
        "componentLogsConfigurationMap": {
            "com.example.hellobbq": {}
        }
    }
}
Now repeat the process for Nucleus where we need to set interpolateComponentConfiguration otherwise {iot:thingName} will not be inflated to a proper value.
{
  "reset": [],
  "merge": {
    "reset": [],
    "merge": {
      "interpolateComponentConfiguration": "true"
    }
  }
}
Now just click next in rest of the dialog and confirm the deployment to start the process.
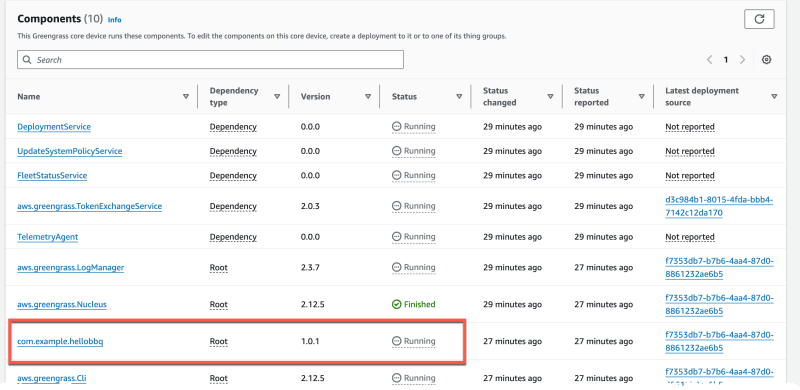
To verify that everything now is running navigate to Core Devices, select the simulated device, and check that all components are running.
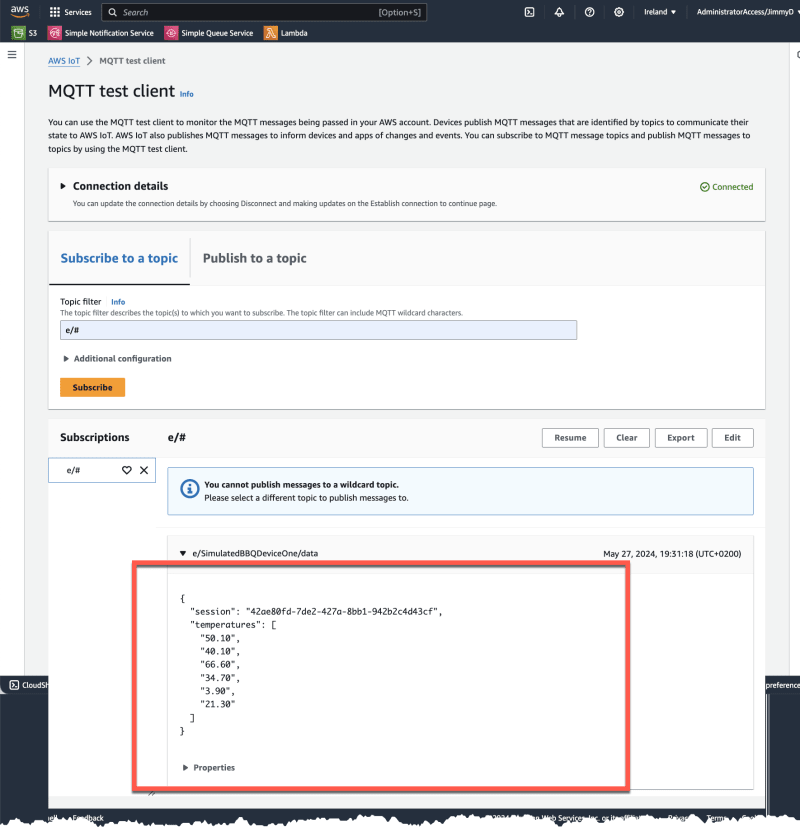
Verify data
To verify that data is sent as expected open the MQTT test client in the console and create a subscription to e/#. Data should start flowing in the format we defined in the code.
Cloudwatch Logs
To check the logs from the device, navigate to CloudWatch Logs, there should a Log group with the component name e.g. /aws/greengrass/UserComponent/eu-west-1/com.example.hellobbq
Device Logs
It's also possible to get the logs on the device it self. Connect to the instance, using Instance Connect. Logs can be found in folder /greengrass/v2/logs
Final Words
This was the first part in building a connected BBQ as a SaaS solution. We looked at creating a GreenGrass Core component and device running as a simulation on an EC2 instance.
Check out My serverless Handbook for some of the concepts mentioned in this post.
Don't forget to follow me on LinkedIn and X for more content, and read rest of my Blogs
As Werner says! Now Go Build!

Top comments (0)