Where DocumentDB is a document store that is built around the MongoDB API, DynamoDB is a fully managed, serverless, NoSQL, key-value database. While originally built as a key-value database, DynamoDB also supports document data models, which allows you to get the speed of key-value databases along with the ability to do searches within the document that was stored as a value. It uses built-in horizontal scaling to scale to more than 10 trillion requests per day with peaks greater than 20 million requests per second over petabytes of storage. In other words, DynamoDB scales really well!
There are two different capacity modes in which you can configure each DynamoDB database, On-demand and Provisioned. If these terms sound familiar, that should not be a surprise as these are the same options you get with Amazon Aurora, AWS's serverless relational database offering. With on-demand capacity, you pay per request for data reads and writes into your database. You do not have to specify how many reads or writes there will be as DynamoDB scales itself to support your needs as that number increases or decreases. With provisioned capacity, you specify the number of reads and writes per second. You can use auto-scaling to adjust capacity based on the utilization for when the usage of your system may grow. Provisioned capacity is less expensive, but you may end up over-provisioning your server and paying more than you need.
Setting up a DynamoDB Database
The easiest way to get a feel for DynamoDB is to use it, so let’s set one up. Log in to the console, and either search for DynamoDB or find it using Services > Database > DynamoDB. Select the Create table button on the dashboard to bring up the Create table page. The first setup section is Table details and is shown in Figure 1.

Figure 1. Creating a DynamoDB table
There are three different values that you can enter. The first, Table name, is straightforward and needs to be unique by region. We used “Person” to identify the type of data that we are going to be storing in the table. The second value is the Partition key and the third value is an optional Sort key. A simple primary key is made up only of the partition key, and no two items in the table can share the same partition key. A composite primary key, on the other hand, is made up of both a partition key and a sort key. All items with the same partition key are stored together, sorted by the sort value. If using a composite primary key, you can have multiple instances of a partition key, however, the combination of partition key and sort key must be unique.
Note – One instance where we have seen a composite key used to great effect is when different versions are being kept. As a new version is created, it gets the same partition key but a new sort key, in that case, a version number.
The keys can have different types, Binary, Number, and String. In our case, as you can see in Figure 1, we created a string partition key of “Id” without a sort key.
The next configuration section on the page is Settings, where you can select either the Default settings or Customize settings. Going with the default settings takes all the fun out of the rest of the configuration section of this article, so select to customize settings.
The next section is Table class, where you have two options, DynamoDB Standard and DynamoDB Standard-1A. The determination between these two is based upon the frequency with which data will be accessed. The less frequently your table will have reads and writes performed against it, the more likely that the 1a version will be appropriate.
Next comes the Capacity calculator section. This is an interesting tool that helps you translate your typical (or predicted) usage into the generic Read and Write units that are used for configuration, pricing, and billing. You will need to expand the section before it becomes fully available, but when you do you will get a series of fields as shown in Figure 2.
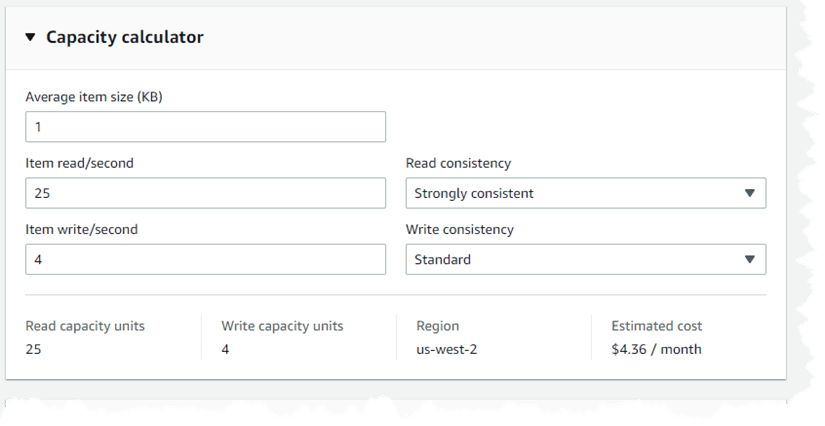
Figure 2. DynamoDB Capacity calculator
The questions that it asks are straightforward, how big your average payload is, how many reads per second will you have, how many saves per second, and what your business requirements are for those reads and writes. Let’s look at those options in a bit more detail. Average item size (kb) is an integer field capturing your average payload rounded to the nearest kilobyte. This can be frustrating, because many times your payloads may be considerably smaller than a kilobyte – but go ahead and choose 1 if your payloads are relatively small. The Item read/second and Item write/second are also straightforward integer fields and we used 25 items read per second and 4 items written per second.
The Read consistency and Write consistency fields are a little different as they are drop-downs. Read offers Eventually consistent, where it is possible that a read may not have the most recent version of the data (because it is coming from a read-only copy of the data), Strongly consistent where all reads will have the most recent version of the data (because it is coming from the primary table) and Transactional where multiple actions are submitted as a single all-or-nothing operation. Write consistency offers two approaches, Standard where the data is inserted into the primary, and Transactional which is the same as for Read consistency. In our example, we selected Strongly consistent for reads and Standard for writes. The calculator then estimated our costs at $4.36 a month in US-West-2. As you can see, it’s a pretty inexpensive option.
The next section in the table creation screen is the Read/write capacity settings. This is where the two modes we touched on earlier come in, On-demand and Provisioned. Since we went through the calculator and estimated a whopping $4.36 a month charge, we will go ahead and use the simpler On-demand option.
The next section is Secondary indexes. This is where DynamoDB varies from a lot of other Key/Value stores because it allows you to define indexes into the content - which tends to be more of a document database approach. There are two types of secondary indexes, Global and Local. A global secondary index provides a different partition key than the one on the base table while a local secondary index uses the same partition key and a different sort key. The local secondary index requires that the base table already be using both a partition key and a sort key, but there is no such constraint on the use of a global secondary key.
The next configuration section is Encryption at rest. There are three choices, Owned by Amazon DynamoDB where the application manages encryption using AWS keys, AWS managed key where AWS creates keys and then manages those keys within your AWS Key Management Service (KMS), and Customer managed key where you can create and manage the KMS key yourself. We selected the AWS-owned key.
The last configuration section is Tags. Once your table is configured, select the Create table button at the bottom. This will bring up the Tables listing with your table in a “Creating” status as shown in Figure 3. Once the creation is complete, the status will change to “Active”.

Figure 3. Tables listing after creating a table.
Unlike Amazon DocumentDB, DynamoDB gives you the ability to work directly with the data within the table. Once the table has been created, click on the table name to go into the table detail screen. This page gives you a lot of information, including metrics on table usage. We won’t go into that into much detail, simply because this could use its own book, so instead click on the button at the top, Explore table items. This will bring you to a page where you can interact with the items within the table. There is also a Create item button at the top. We used this button to create two simple items in the table, with the first shown in Figure 4.
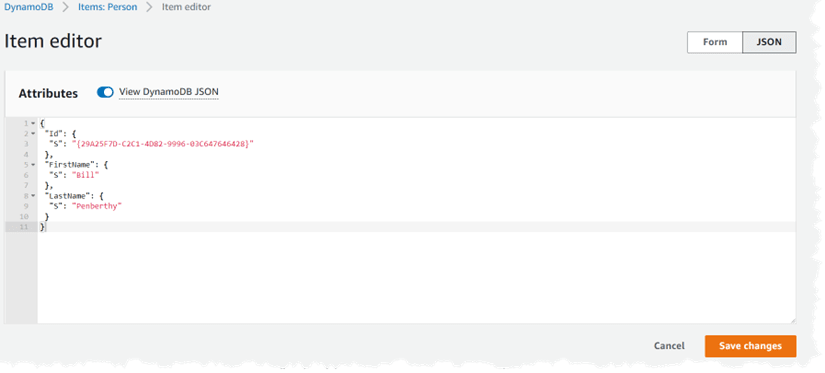
Figure 4. Creating an item in Amazon DynamoDB.
If this format seems a little unusual, it is because this is the DynamoDB JSON, which is different from “traditional” JSON in that it stores the items as their own key/value pairs. If you turn off the View DynamoDB JSON selector at the top, then you will see the more standard JSON:
{
 "Id": "{29A25F7D-C2C1-4D82-9996-03C647646428}",
 "FirstName": "Bill",
 "LastName": "Penberthy"
}
DynamoDB and AWS Toolkit for Visual Studio
Unlike DocumentDB, which has no support in any of the IDE toolkits, you have the ability to access DynamoDB from the Toolkit for Visual Studio. Using the toolkit, you can both view the table and look at items within the table as shown in Figure 5.

Figure 5. Using the Toolkit for Visual Studio to view DynamoDB items
You can even use the toolkit to filter returns by selecting the **Add **button within the top box. This will add a line with a drop-down that includes all of the field names (Id, FirstName, and LastName) and allow you to enter a filter value. Selecting “LastName” “Equal” “Steve” and then clicking the Scan Table button will result in only one result remaining in the list as shown in Figure 6.

Figure 6. Filtering DynamoDB items in Visual Studio
The toolkit will also allow you to add, edit, and delete items simply by double-clicking on the item in the result list. Since you are working with the items in a list form, you can even use the Add Attribute button to add a new “column” where you can capture new information. Once you add a value to that new column and Commit Changes, those items (where you added the value) will be updated.
As you can imagine, the ability to interact with the data directly in Visual Studio makes working with the service much easier, as you can look directly into the data to understand what you should get when parts of your code are run in Debug or when running integration tests. Unfortunately, however, this functionality is only supported in the AWS Toolkit for Visual Studio and is not available in either Rider or Visual Studio Code toolkits.
DynamoDB and .NET
The last step is to take a look at using DynamoDB within your .NET application. As mentioned earlier, using DynamoDB means that you will not be using Entity Framework as you did with the relational databases earlier. Instead, we will be using a DynamoDB context, which provides very similar support as does the DBContext in Entity Framework.
Note: One of the interesting features of using DynamoDB within your development process is the availability of a downloadable version of DynamoDB. Yes, you read that correctly, you can download and locally install a version of the DynamoDB as either a Java application, an Apache Maven dependency, or as a Docker image. Details on this can be found at https://docs.aws.amazon.com/amazondynamodb/latest/developerguide/DynamoDBLocal.html
In many ways, the .NET SDK for DynamoDB is one of the more advanced SDKs as it offers support in three layers:
- Low-level interface – the APIs in this interface relate very closely to the service model and there is minimal help functionality.
- Document interface – This API includes constructs around the Document and Table classes so there is minimal built-in functionality to help do things like converting to business objects.
- High-level interface – This is where AWS provides support around converting Documents to .NET classes and other helpful interactions.
Your code can interact with any of the interfaces based upon your business need. We will be relying on the high-level interface as we move into the code examples.
First, you need to add the appropriate NuGet package, AWSSDK.DynamoDBv2. Once you have that added, the next thing that you need to do is to configure your connection to the database. The following code snippet shows a constructor method to do this.
private AmazonDynamoDBClient client;
private DynamoDBContext context;

public DataClient()
{
    client = new AmazonDynamoDBClient();
    context = new DynamoDBContext(client);
}
There are two objects introduced in this snippet. The first class introduced is the Amazon.DynamoDBv2.AmazonDynamoDBClient. This class provides the default implementation for accessing the service. The constructor used in the example will default to credentials stored in the application’s default configuration. Running this on your local machine means that the application will use your “default” profile to connect. There are other constructors that you can use, ranging from passing in your Access Key ID and Secret Key, to using Credentials stored in AWS Key Manager. For this example, however, we will stick with the default constructor. The second object introduced is the Amazon.DynamoDBv2.DataModel.DynamoDBContext. The DataModel part of the namespace indicates that this is a high-level interface based upon the low-level interface offered by the AmazonDynamoDBClient class.
Now that we have defined the context, let’s look at how you would use it. The following is a method to save an object into the table.
public async Task SaveAsync<T>(T item)
{
    await context.SaveAsync<T>(item);
}
This is where you start to see the power offered by the high-level interface. Let’s step out of this class and look at how this is used.
public class Person
{
    public string Id { get; set; }
    public string FirstName { get; set; }
    public string LastName { get; set; }
}

public async Task<string> Add(string firstName, string lastName)
{
    var client = new DataClient();

    Person itemToAdd = new Person {
        Id = Guid.NewGuid().ToString("B").ToUpper(),
        FirstName = firstName,
        LastName = lastName
    };

    await client.SaveAsync<Person>(itemToAdd);
    return itemToAdd.Id;
}
This Add method is taking in a first name and a last name, creates a Person object, persists the information to DynamoDB, and then returns the Id to the calling method. And that is what the high-level interface offers. You could do the same work yourself using the Document interface, but you would have to manage all of the serialization and deserialization necessary to convert from the business objects to the JSON that is stored in the table.
One other feature of the high-level interface is much less obvious. Think about when we created the DynamoDB table earlier, and the name that we used – “Person”. By default, the high-level interface expects the class name of the item being persisted to be the same as the table name, as it is in our case.
We just went over adding an item to the table through the high-level interface. Let’s now look at an example of retrieving an item.
public async Task<T> FindByIdAsync<T>(string id)
{
    var condition = new List<ScanCondition> {
new ScanCondition("Id", ScanOperator.Equal, id) };
    AsyncSearch<T> search = context.ScanAsync<T>(condition);
    var list = await search.GetRemainingAsync();
    return list.FirstOrDefault();
}
You can see that this gets a little more complicated. Because this code is doing a scan of the data, it is going to always return a List, even though we set the Id as the primary key on the table. This happens because the high-level interface does not know anything about the definition of the table itself and thus generalizes the result set.
This scanning approach should not feel new, however. Think back to how the filtering was set in the AWS Toolkit for Visual Studio (Figure 6) and you will see that this is the same approach. This approach is used because of those enhancements into DynamoDB that make it more document database-like; it allows you to scan through the data looking for a specific condition, in this case, the Id equal to the value passed into the FindByIdAsync method. And, just as shown in the toolkit, you can use multiple conditions.
public async Task<List<T>> FindByValueAsync<T>(Dictionary<string,object> searchDict)
{
    var conditions = new List<ScanCondition>();
    foreach(string key in searchDict.Keys)
    {
        conditions.Add(
          new ScanCondition(key,
                    ScanOperator.Equal,
                    searchDict[key]));
    }
    AsyncSearch<T> search = context.ScanAsync<T>(conditions);
    return await search.GetRemainingAsync();
}
In this instance, we are simply accepting a Dictionary where we are assuming the key value will be the field name, such as LastName, and the dictionary value will be the value to use when filtering. An empty dictionary means that no filters will be set which, as you can imagine, would be somewhat terrifying if you consider a massive table with petabytes of data. That’s where the return class from the ScanAsync method comes into play, the AsynchSearch class.
AsynchSearch is an intermediate class that provides several ways of interacting with the service. In the code example above, the method used on that object was GetRemainingAsync(). The GetRemainingAsync method is used to get all the remaining items that match the filter condition and bring them back as a single unit. However, there is another method on AsynchSearch, GetNextSetAsync, which manages a finite set of items – up to 1MB of items. You can examine a property on the AsynchSearch object, IsDone, which tells you whether the current result set is the final one and gives you the ability to manage the pagination yourself.
We have spent time going through the High-level interface provided by the SDK. We have not even touched on the powerful Document interface and how that provides more specific control over the values stored in DynamoDB. There are many examples of development teams using the Document-level interfaces and writing their own high-level interfaces where they can incorporate their specific requirements rather than using the SDK’s more generic approach. That approach is not wrong, as no one understands your needs as well as you do – but having the High-level interface allows you to easily get a large majority of requirements fulfilled and then you can customize using the Document interface as you see fit.
There is a lot more that we can go into about using DynamoDB with .NET, like an entire book, so we won’t do that here. Let it suffice to say, yes, you can use DynamoDB with .NET.

Top comments (0)