Introduction
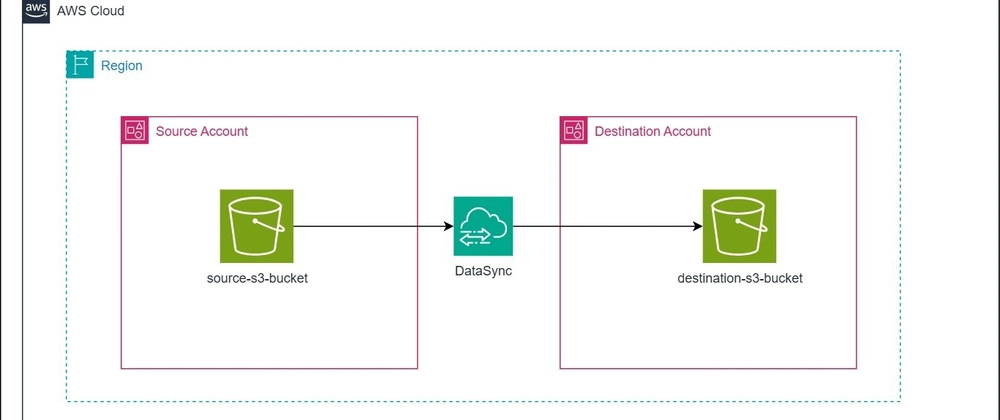
In multi-account AWS environments, teams often need to transfer data across Amazon S3 buckets residing in different AWS accounts. While traditional methods like S3 cross-account replication or AWS CLI-based transfers exist, AWS DataSync provides a more robust, managed solution that enables automated, secure, and high-performance data transfers with monitoring and scheduling capabilities.
This guide walks you through setting up AWS DataSync to transfer data from a source S3 bucket in one AWS account to a destination S3 bucket in another AWS account.
Step 1: Create IAM Roles for AWS DataSync
AWS DataSync requires IAM roles to access the source and destination S3 buckets securely.
1.1 Create IAM Role in the Source Account
Role: datasync-source-role
- Go to IAM → Roles → Create Role
- Select AWS Service → Choose DataSync as the trusted entity
- Attach the following trust policy to allow DataSync to assume this role:
{
    "Version": "2012-10-17",
    "Statement": [
        {
            "Effect": "Allow",
            "Principal": {
                "Service": "datasync.amazonaws.com"
            },
            "Action": "sts:AssumeRole"
        }
    ]
}
Attach the following inline policy to allow access to the source S3 bucket:
{
    "Version": "2012-10-17",
    "Statement": [
        {
            "Sid": "Statement1",
            "Effect": "Allow",
            "Action": [
                "s3:GetBucketLocation",
                "s3:ListBucket",
                "s3:ListBucketMultipartUploads"
            ],
            "Resource": [
                "arn:aws:s3:::source-bucket"
            ]
        },
        {
            "Sid": "Statement2",
            "Effect": "Allow",
            "Action": [
                "s3:GetObject",
                "s3:GetObjectTagging",
                "s3:ListMultipartUploadParts"
            ],
            "Resource": [
                "arn:aws:s3:::source-bucket/*"
            ]
        }
    ]
}
Role: datasync-destination-role
- Go to IAM → Roles → Create Role
- Select AWS Service → Choose DataSync
- Attach the following trust policy to allow DataSync to assume this role:
{
    "Version": "2012-10-17",
    "Statement": [
        {
            "Effect": "Allow",
            "Principal": {
                "Service": "datasync.amazonaws.com"
            },
            "Action": "sts:AssumeRole"
        }
    ]
}
Attach the following inline policy to allow DataSync to write to the destination S3 bucket:
{
    "Version": "2012-10-17",
    "Statement": [
        {
            "Sid": "Statement1",
            "Effect": "Allow",
            "Action": [
                "s3:GetBucketLocation",
                "s3:ListBucket",
                "s3:ListBucketMultipartUploads"
            ],
            "Resource": [
                "arn:aws:s3:::destination-bucket"
            ]
        },
        {
            "Sid": "Statement2",
            "Effect": "Allow",
            "Action": [
                "s3:GetObject",
                "s3:GetObjectTagging",
                "s3:ListMultipartUploadParts",
                "s3:PutObject",
                "s3:PutObjectTagging",
                "s3:AbortMultipartUpload",
                "s3:DeleteObject"
            ],
            "Resource": [
                "arn:aws:s3:::destination-bucket/*"
            ]
        }
    ]
}
Step 2: Update the S3 Bucket Policy in the Destination Account
To allow AWS DataSync to write data to the destination S3 bucket, add the following bucket policy to destination-bucket:
Navigate to S3 → destination-bucket → Permissions → Bucket Policy
Add the following policy, replacing SOURCE_ACCOUNT_ID with the actual AWS Account ID:
{
    "Version": "2012-10-17",
    "Statement": [
        {
            "Sid": "Allowdatasync",
            "Effect": "Allow",
            "Principal": {
                "AWS": "arn:aws:iam::SOURCE_ACCOUNT_ID:role/datasync-destination-role"
            },
            "Action": [
                "s3:List*",
                "s3:Get*",
                "s3:AbortMultipartUpload",
                "s3:DeleteObject",
                "s3:PutObject",
                "s3:PutObjectTagging"
            ],
            "Resource": [
                "arn:aws:s3:::destination-bucket/*",
                "arn:aws:s3:::destination-bucket"
            ]
        }
    ]
}
Step 3: Configure AWS DataSync in the Source Account
3.1 Create the Source Location in AWS DataSync
- Open the AWS DataSync console in the source account.
- Click Create *Location *→ Select Amazon S3.
- Choose the source-bucket as the location.
- Select datasync-source-role as the IAM role.
Click Create Location.
3.2 Create the Destination Location (via AWS CloudShell)Since the destination S3 bucket belongs to a different AWS account, use AWS CLI (or AWS CloudShell) to create the destination location.
Run the following AWS CLI command in the source account:
aws datasync create-location-s3 \
    --s3-bucket-arn arn:aws:s3:::destination-bucket \
    --s3-config '{ "BucketAccessRoleArn": "arn:aws:iam::SOURCE_ACCOUNT_ID:role/datasync-destination-role" }' \
    --region ap-southeast-2
Replace ap-southeast-2 with the region where your bucket exists.
you will get a response back as follows.
{
    "LocationArn": "arn:aws:datasync:ap-southeast-2:SOURCE_ACCOUNT_ID:location/loc-xxxxxxxx"
}
Then refresh the page will be able to see two locations now created.
Step 4: Create and Start the DataSync Task
4.1 Create the DataSync Task
- Open AWS DataSync in the source account.
- Click Create Task.
- Select Source Location (previously created).
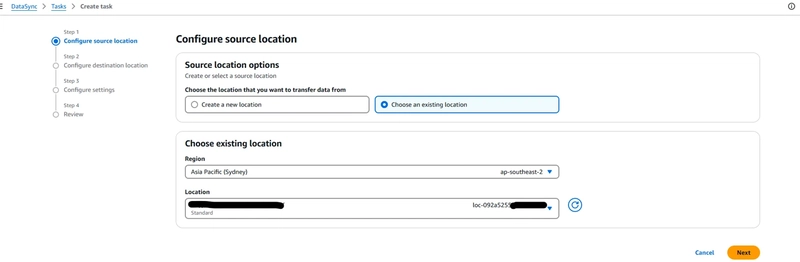
- Next Select Destination Location (created via CLI).
- Configure the following settings:
- Task Mode: Ensure Enhanced.
- keep rest of the settings as default.
- Click Create Task.
4.2 Start the DataSync Task
- Once the task is created, start the transfer using the AWS CLI or console.

- Start via Console:
- Navigate to AWS DataSync → Tasks.
- Select your newly created task.
- Click Start Task with defaults.
Step 5: Monitor the Data Transfer
- Go to AWS DataSync → Task Executions to view progress.
- Check CloudWatch logs for errors if the task fails.
- Validate that files appear in the destination S3 bucket after completion.
Conclusion
By following this approach, you can securely and efficiently transfer data across AWS accounts using AWS DataSync. This solution offers:
- Automated Data Movement: No need for manual copying.
- Incremental Transfers: Only modified files are transferred.
- Monitoring & Logs: AWS CloudWatch integration for tracking.
- Scalability: Can handle large-scale transfers.
- This method is ideal for one-time migrations as well as ongoing cross-account synchronization.

Top comments (0)