A Blazor 🔥 WebAssembly 🕸 app can be deployed as a set of static website assets and hosted on any server that publishes static files. As a browser application, it is capable of making calls to HTTP API endpoints. As a Single Page Application (SPA) it can render new pages dynamically from the data. Because it supports .NET Standard, it is possible to load NuGet packages that target .NET Standard, including the Cosmos DB 🌍 SDK. This makes it possible to connect to the Azure Cosmos DB SQL API backend directly. There is one major challenge: how can you connect securely without storing credentials in the client and hosting your own identity service?
The solution is to use Azure Active Directory for authentication and communicate securely with a serverless Azure Function. The function app uses securely stored master credentials to connect to Cosmos DB and generate an ephemeral token that grants limited access to a specific user for up to five hours. The client app then connects directly to Cosmos DB using the provided token.
The repository for this solution is at:
 JeremyLikness
/
AzureBlazorCosmosWasm
JeremyLikness
/
AzureBlazorCosmosWasm
A completely serverless solution to access Cosmos DB from Blazor WebAssembly using EF Core.
Azure Active Directory from a Blazor WebAssembly App to Access Cosmos DB
A completely serverless solution to access Cosmos DB from Blazor WebAssembly using EF Core.
To configure your application and learn more, read:
Azure AD Secured Serverless Cosmos DB from Blazor WebAssembly
"Quick" start
- Optional: fork the repo
-
git clone https://github.com/jeremylikness/AzureBlazorCosmosWasm.git(or your fork) - Create an app registration for the Blazor app (there is an Azure CLI script for this linked in the comments of the blog post)
- Update
wwwroot/appsettings.jsonin the Blazor WebAssembly client to use the tenant (directory) and client id - Create a Cosmos DB database and seed some initial values
- Deploy the Azure Functions app
- Add the Cosmos DB connection string as "CosmosConnection" under connection strings for the Azure Functions app
- Update authentication for the Azure Functions app to use Azure AD
- Update
wwwroot/appsettings.jsonin the Blazor WebAssembly project to point to your functions app (under…
The app requires some initial configuration that is explained in this blog post. This post explores how I built the solution and how you can build and configure your own app from the repo.
Blazor WebAssembly and Authentication
The first step is to setup authentication in the Blazor WebAssembly app. I’m no Azure AD expert, so it was extremely helpful to find dedicated documentation on how to use Blazor WebAssembly with Azure AD.
Special thanks to Javier Calvarro Nelson for investing his time to provide guidance for me to properly configure the solution.
I’ll summarize the high-level steps:
- Register your application in the Azure Active Directory App Registrations. This enables your application to authenticate the user against Azure AD and to make requests on behalf of the user using their identity and credentials.
- Be sure to note two important components of the app registration: the tenant (or directory) the registration is a part of (this is like the zip code of the Azure AD authentication service) and the client id that uniquely identifies your app (like a postal address).
- Generate the Blazor WebAssembly app using the built-in Azure AD template:
dotnet new blazorwasm -au SingleOrg --client-id "{CLIENT ID}" --tenant-id "{TENANT ID}"
This will scaffold an application that provides full integration with Azure AD. The document referenced earlier explains what code and components are generated by the authentication template and how they work. To use the sample project for this blog post, start by creating an application registration. After that is setup, update the appsettings.json file under the wwwroot folder in the AzureBlazorWasm project to use your tenant and client. It will look like this:
"AzureAd": {
   "Authority": "https://login.microsoftonline.com/{directory id}",
   "ClientId": "{clientid}",
   "ValidateAuthority": true
}
This information is stored as part of the client app and is “in the clear” meaning the user can easily access and read it. Fortunately, there are no secrets here. The configuration simply provides the endpoint to request authentication, using your organization’s tenant, and the unique identifier (client id) of your Blazor app. The login process redirects you to Azure AD where you are prompted to login using whatever process was configured for your tenant. This may include two-factor authentication. If authentication succeeds, a signed token is sent back to the Blazor WebAssembly client.

Now you have a secure Blazor client. You can use the [Authorize] attribute on any Razor component to prevent access by unauthorized users. I’ll show you that later in this post.
Secure Azure Functions with Azure AD
The next step is to create a secure connection to Azure Functions <⚡>. The functions app will communicate with Cosmos DB 🌍 to retrieve a token, so you don’t want just anybody accessing it. You can start with the existing CosmosAuthentication app and publish it to Azure. If you’re not familiar with the process, it is documented here: Develop Azure Functions using Visual Studio: Publish to Azure. The functions application is not yet secured. However, the code checks for an authenticated user and will fail by returning a 401 Unauthorized HTTP status code.
Follow the steps in this document to secure your functions app: Secure an Azure Functions App with Azure AD: Express Setup. I used the express option and created a new app registration. I chose the option to “Allow anonymous requests (no action)” because the code itself validates the identity of the connected user and the API is not intended to be accessed manually. The express setup will automatically create an application registration for the function app.
There is some additional configuration to perform. In the Azure Portal, navigate to “Azure Active Directory” then “App registrations” and finally open the registration for your functions app (not your Blazor WebAssembly client). Open “Authentication” and make sure that “Implicit grant” for “ID tokens” is set.

Next, we need to expose the API for consumption by other applications. Open the “Expose an API” tab. There are two steps. First, if it doesn’t already exist, you need to add a scope for user_impersonation which is in essence a permission that applies to the API. Tap “Add a Scope” and name it user_impersonation. If your access allows, choose “Admins and users” for the consent. Before the functions app can use any credentials, users must explicitly opt-in by providing consent. Some organizations require an administrator to provide consent. You can revoke consent at any time and effectively disable access to the functions app. Be sure the scope is enabled.

The scope is just a permission that the client app requests. In this case, the client app is the Blazor WebAssembly app. To allow it to work with the functions app, you need to authorize it. At the bottom of the same page is a section for “Authorized client applications.” Tap “Add a client application” and paste in the client id that was generated for your Blazor WebAssembly app registration. Under “Authorized scopes” ensure that user_impersonation is checked.
Note The full scope is the URL of the app registration (typically the same as your function app) and the scope name. You’ll need that later. The Blazor client assumes the functions app registration has the same name as the functions app.
My function app is named cosmosauthenticationfunc so my full scope is:
https://cosmosauthenticationfunc.azurewebsites.net/user_impersonation
Now is a good time to pause. What did we do?
- We created an app registration to secure a Blazor WebAssembly app with Azure AD.
- We generated the necessary code to authenticate with Azure AD from the Blazor WebAssembly app.
- We created an app registration to secure an Azure Functions app with Azure AD.
- We enabled support for tokens.
- We ensured the
user_impersonationscope (permission) is available. - We authorized our Blazor WebAssembly app to securely access the Azure Functions app using the
user_impersonationscope.
We’re not quite done yet! Even though the functions app is configured to grant permissions to the Blazor WebAssembly app, the Blazor app must explicitly ask for permissions. This is the last step to close the loop. In Azure Active Directory app registrations, navigate to your Blazor WebAssembly registration. Tap on “API Permissions” then “Add a permission.” Choose “My APIs” and select the Azure Functions app registration. Tap “delegated permissions” and make sure that user_impersonation is checked. Click “Add permissions” to apply and save.

Now the functions app is locked down! The job is not done yet. If you try to access the Azure Function from the Blazor WebAssembly app, even after you are logged in, you will receive a 401 Unauthorized HTTP status code. That is because the request doesn’t contain any authentication information. The HttpClient must be configured to stash the Azure AD token in the request header.
Configure Blazor WebAssembly to use the Azure AD Token
In Blazor WebAssembly apps, the HttpClient is injected using dependency injection. The default client is configured with the same base URL as the client, so that you can make calls to the local server using a partial path, like this:
var entity = await _client.GetJsonAsync<MyEntity>("/api/entity/get");
This is configured in Program.cs:
builder.Services.AddTransient(sp => new HttpClient()
   { BaseAddress = new Uri(builder.HostEnvironment.BaseAddress) });
The Azure Functions endpoint is at a different base URL and requires the request header to contain the authentication information. To configure the client, I added the Microsoft.Extensions.Http NuGet package that provides helper methods for creating an HttpFactory. This allows configuration of specific instances of the client that can be requested by name. More on that in a minute, first we need to set up authorization.
The application has a built-in AuthorizationMessageHandler that automatically configures the request header to contain the authorization token for local requests. We need a custom handler that allows the token to be sent to the remote functions address. In the Data folder, I created this:
public class CosmosAuthorizationMessageHandler : AuthorizationMessageHandler
{
    public CosmosAuthorizationMessageHandler(
        IConfiguration config,
        IAccessTokenProvider provider,
        NavigationManager navigation) : base(provider, navigation)
    {
        var section = config.GetSection(nameof(TokenClient));
        var endpoint = section.GetValue<string>(nameof(TokenClient.Endpoint));
        ConfigureHandler(new[] { endpoint });
    }
}
The main purpose of the custom handler is to authorize storing the Azure AD token in the request headers when the client accesses the functions endpoint. We’ll access the function endpoint from a class named TokenClient. To configure the endpoint, I created a section in appsettings.json that is deployed under wwwroot. This makes it possible to update the endpoint value as part of your CI/CD process. The section in the configuration file looks like this:
"TokenClient": {
   "Endpoint": "https://{functionapp}.azurewebsites.net/"
}
Replace the setting in your file with your endpoint. The handler uses this configuration to grab the endpoint. Now that the message handler is done, we can set up the HttpClient factory in Program.cs. First, I created a local helper method to retrieve the functions endpoint from configuration. Although it is configured for the authorized endpoint by the message handler, we need it to configure the base address of the HttpClient instance and to request the scope.
static string functionEndpoint(WebAssemblyHostBuilder builder) =>
   builder.Configuration
      .GetSection(nameof(TokenClient))
      .GetValue<string>(nameof(CosmosAuthorizationMessageHandler.Endpoint));
Next, I updated the template-generated authentication configuration to explicitly request the user_impersonation scope and registered my custom message handler.
builder.Services.AddMsalAuthentication(options =>
{
    options.ProviderOptions
    .DefaultAccessTokenScopes.Add($"{functionEndpoint(builder)}user_impersonation");
    builder.Configuration.Bind("AzureAd", options.ProviderOptions.Authentication);
});
builder.Services.AddTransient<CosmosAuthorizationMessageHandler>();
Finally, I registered the custom HttpClient to use the custom message handler and default to the base address of the functions endpoint.
// configure the client to talk to the Azure Functions endpoint.
builder.Services.AddHttpClient(nameof(TokenClient),
    client =>
    {
        client.BaseAddress = new Uri(functionEndpoint(builder));
    }).AddHttpMessageHandler<CosmosAuthorizationMessageHandler>();

// register the client to retrieve Cosmos DB tokens.
builder.Services.AddTransient<TokenClient>();
The first step uses the extensions to register a “named” HttpClient with the name “TokenClient.” The second registers the client we’ll use to retrieve tokens. Now we can look at the TokenClient implementation to see how this is used.
public class TokenClient
{
    private readonly HttpClient _client;

    public TokenClient(IHttpClientFactory factory)
    {
        _client = factory.CreateClient(nameof(TokenClient));
    }

    public async Task<CosmosToken> GetTokenAsync()
    {
        return await _client.GetJsonAsync<CosmosToken>($"api/RequestToken");
    }
}
The client is very simple. It uses the injected factory to get the named HttpClient configured with the message handler that will apply the Azure AD token to the request. Notice that it doesn’t use a fully qualified domain name because that has already been configured as the base URL. The service exposes the method GetTokenAsync() to request a token. When I built the app, I started by returning an empty token. The token definition is shared across projects and contains the Cosmos DB endpoint and the ephemeral token (key) that will be retrieved from Cosmos DB.
public class CosmosToken
{
   public string Endpoint { get; set; }
   public string Key { get; set; }
}
After this step, I was able to successfully retrieve an empty token from the Azure Functions app. Next, the Azure Functions app needs to retrieve the authenticated user’s information and use that to generate the Cosmos DB token.
Serverless Cosmos DB Token Generation
The Azure AD token is a signed and encoded payload that includes a set of trusted claims. These claims contain information including the user’s unique identity. You can configure custom claims as well. For example, to access the user’s email you would add an email claim. When the user is prompted to provide consent to your app, it will include email as one of the items being consented to.
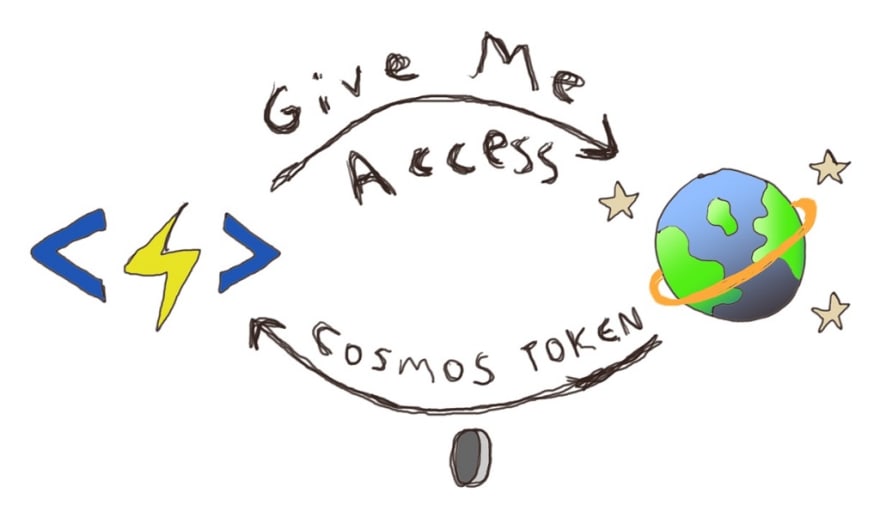
Here is my rough conceptualization of the token being passed from the Blazor WebAssembly app to the Azure Functions endpoint.

I used email as an illustration, but I don’t use it in this example.
On the Azure Functions side, we can now do this:
[FunctionName("RequestToken")]
public async Task<IActionResult> Run(
    [HttpTrigger(AuthorizationLevel.Anonymous, "get", Route = null)]
        HttpRequest req,
    ILogger log,
    ClaimsPrincipal principal)
{
    if (principal == null)
    {
        log.LogWarning("No principal.");
        return new UnauthorizedResult();
    }

    if (principal.Identity == null)
    {
        log.LogWarning("No identity.");
        return new UnauthorizedResult();
    }

    if (!principal.Identity.IsAuthenticated)
    {
        log.LogWarning("Request was not authenticated.");
        return new UnauthorizedResult();
    }

    var id = principal.FindFirst(ClaimTypes.NameIdentifier).Value;
    log.LogInformation("Authenticated user {user}.", id);

    return new OkResult();
}
Notice that I include ClaimsPrincipal in the parameters and Azure Functions automatically passes in the principal associated with the request, if one exists. The log messages are how I confirmed the token authentication was working. It’s not useful yet because we don’t have a token, but we can at least get the user’s unique NameIdentifier claim. To grab the token, I created a CosmosClientWrapper that is injected into the function class. If you’re not familiar with how to setup dependency injection in Azure Functions, read: Use Dependency Injection in Azure Functions.
The client wrapper uses dependency injection to grab the configuration. It expects a configuration string named “CosmosConnection.” Be sure to set that up in the ConnectionStrings portion of your configuration, whether in your local JSON settings or in the actual application’s app settings. This connection string uses the master key so it can manipulate permissions.
A logger is also injected to illustrate what is happening.
private readonly string CosmosConnection = nameof(CosmosConnection);

public CosmosClientWrapper(
    IConfiguration config,
    ILogger<CosmosClientWrapper> logger)
{
    _logger = logger;
    _client = new CosmosClient(config.GetConnectionString(CosmosConnection));
}
Cosmos DB Users and Permissions
Cosmos DB only supports Azure AD for the “control plane” or administration of the Cosmos DB account in the portal or using the command line interface. The “data plane” (what we’re interested in) requires master keys or resource tokens. This is why we use an Azure Function to “broker” the transaction and securely retrieve a token for the user. You can read more about Cosmos DB permissions in the previously linked article, but here is a brief summary:
- Create a named user that is scoped to the database.
- Apply a named permission that specifies if the user can update or only read data, what container they have access to, and optionally a partition key for multi-tenant solutions.
- Request a token to operate under the set of named permissions.
The token lasts for one hour by default. It can be configured to expire anywhere between ten seconds and five hours. Any time you request a token for a set of permissions, you receive a new token with a new expiration.
Conceptually, this is what we’ll do:
First, we need to check if the user exists. If not, we create the user. The user has the same name as the NameIdentifier claim so it is unique to each user. Although it is not part of this example, you could write code to delete the user when their Azure AD access is revoked.
private async Task<User> CreateOrReadUserAsync(
    Database database, string id)
{
    _logger.LogInformation("User request for {user}.", id);
    var user = database.GetUser(id);
    UserResponse userResult = null;
    try
    {
        userResult = await user.ReadAsync();
    }
    catch (CosmosException cex)
    {
        if (cex.StatusCode != System.Net.HttpStatusCode.NotFound)
        {
            throw;
        }
    }
    if (userResult?.Resource == null)
    {
        _logger.LogInformation("User {user} not found.", id);
        var newUser = await database.CreateUserAsync(id);
        user = newUser.User;
        _logger.LogInformation("User {user} created.", id);
    }
    else
    {
        _logger.LogInformation("User {user} exists.", id);
    }
    return user;
}
The following code creates a unique set of permissions for the user. We are granting read access to the container that holds blog posts. Instead of worrying about if the permissions already exist, we use the upsert functionality to either add or update them. We then request and return the token.
public async Task<CosmosToken> GetTokenForId(string id)
{
    var database = _client.GetDatabase(BlogContext.MyBlogs);
    var cosmosUser = await CreateOrReadUserAsync(database, id);
    var permissionId = $"Permission-{id}-blogs";
    var container = database.GetContainer(nameof(BlogContext));
    var permissions = new PermissionProperties(
        id: permissionId,
        permissionMode: PermissionMode.Read,
        container: container);
    await cosmosUser.UpsertPermissionAsync(permissions);
    _logger.LogInformation("Permissions upsert for {user} successful.", id);
    var token = await cosmosUser.GetPermission(permissionId).ReadAsync();
    return new CosmosToken
    {
        Endpoint = _client.Endpoint.ToString(),
        Key = token.Resource.Token
    };
}
The function app assumes that you already created a database named “myblogs”. The container, named “BlogContext” is created by Entity Framework Core. I explain how to set that up next.
Set up the Database
At this stage, you have everything you need to access Cosmos DB using a resource token. I use Entity Framework Core in this example to be consistent with my previous blog post that uses an ASP.NET Core hosted solution. That blog post explains the rationale for using EF Core and how the data model is setup.
To create the database for the first time and seed some data, update the SeedData class in the BlogData project with the blogs and posts you want to start with, and call it from a console application. You’ll need to modify the example to pass in a DbContextOptionsBuilder that configures the Cosmos DB connection string using the master keys. Install the EF Core Cosmos Provider then upgrade the referenced Cosmos DB SDK to version 3.9.1 or later by adding an explicit NuGet package reference.
Finishing the Client
Now all of the foundational pieces are in place. To retrieve the data from the Blazor WebAssembly app, I created a special client. It is designed to return a DbContext, but you can easily modify it to return a CosmosClient instance instead if you wish to use the SDK directly instead of via EF Core.
public class BlogClient
{
    private CosmosToken _credentials;

    private readonly TokenClient _tokenClient;

    public BlogClient(TokenClient tokenClient)
    {
        _tokenClient = tokenClient;
    }

    public async Task<BlogContext> GetDbContextAsync()
    {
        if (_credentials == null)
        {
            _credentials = await _tokenClient.GetTokenAsync();
        }

        BlogContext context = null;

        CosmosToken getCredentials() => _credentials;

        var options = new DbContextOptionsBuilder<BlogContext>()
            .UseCosmos(getCredentials().Endpoint,
                getCredentials().Key,
                Context.MyBlogs,
            opt =>
                opt.ConnectionMode(Microsoft.Azure.Cosmos.ConnectionMode.Gateway));

        try
        {
            context = new BlogContext(options.Options);
        }
        catch
        {
            _credentials = await _tokenClient.GetTokenAsync();
            context = new BlogContext(options.Options);
        }

        return context;
    }
}
The client creates an instance of the context to access the database and holds a reference to the resource token. If the constructor throws, it assumes it is due to the expired token and fetches a new one to try a second time. If it fails the second time, it is a different issue and the error will propagate.
The Index.razor page has a few interesting elements to point out. It uses:
@attribute [Authorize]
The attribute requires authorization for the component. The user will be forced to login before the component renders. The route is set to /cosmos so the default route can render a page that doesn’t require authentication. When it requests the context, it captures the AccessTokenNotAvailableException that is thrown by the message handler when a token is not available, revoked, or expired. The exception class provides a convenient Redirect() method that redirects the user to sign in again.
When I run the application against my Cosmos DB instance I see this render of blogs and posts:

This is what the resulting Azure Functions logs look like:

The browser’s network inspector shows this sequence of handshakes:
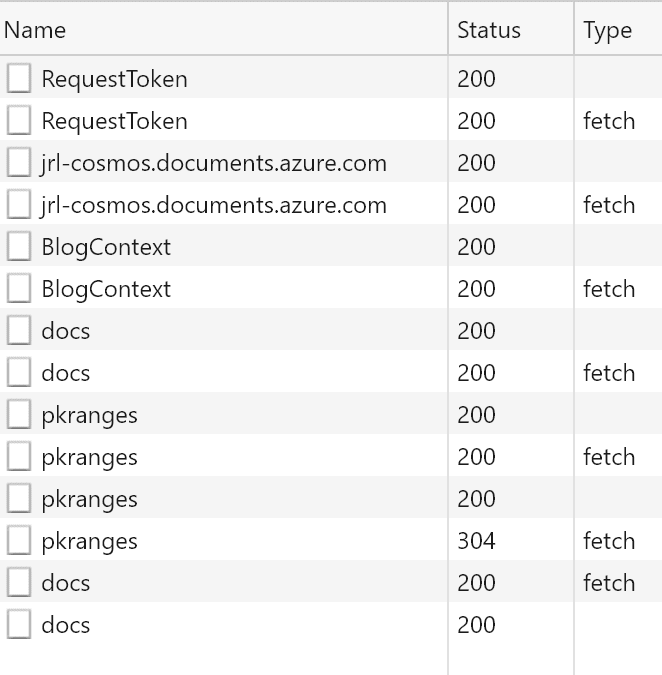
The requests are appear double because the first one is a CORS request followed by the actual API call. In order the calls:
- Request the token
- Authenticate with Cosmos DB and retrieve connection details
- Fetch details about the container
- Setup querying the container
- Retrieve information about partition keys (not configured for this)
- Retrieve the documents
The payload returned by the documents request looks like this:
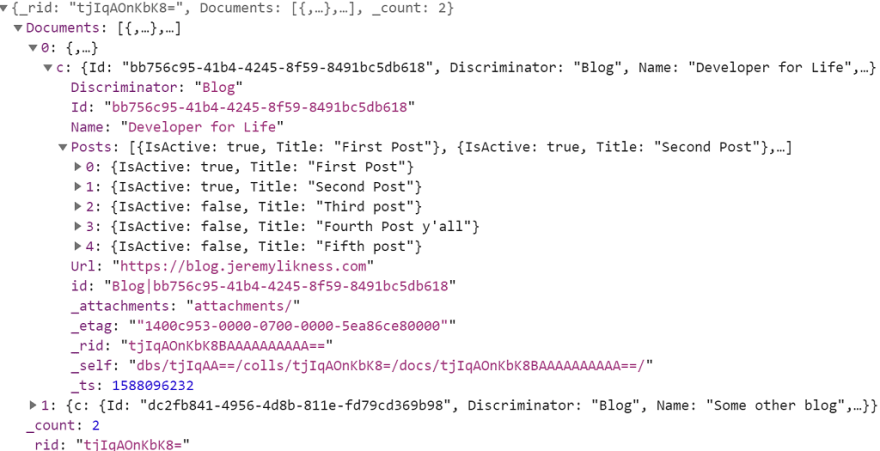
It is automatically parsed and materialized by EF Core.
Conclusion
That’s the end of the story. I would love to point you to a working example, but because this is a solution based on Azure AD it requires a configured instance you can log into. My goal with sharing this solution is to demonstrate the flexibility of Blazor, the power of having direct access to Cosmos DB and the steps necessary to properly secure a client application without storing any secrets or credentials.
As always, I appreciate your thoughts, feedback, questions, and comments, so scroll down to join or start the conversation!
Regards,


Latest comments (1)
Hi Jeremy
I was not able to run your sample using Blazor WASM on dot net 5. I got a NotImplmentedException when creating the context (about creating the proxy handler)