1. MicroProfile Config in Azure Kubernetes Service
The application should separates the external system configuration such like the connection information (DB and external HTTP endpoint). Because there is the difference in environment settings between development environment, test environment, and production environment.
If you separate the configuration from the program source code, you can easily change the setting and you can write the settings in a setting file.
By writing to an external setting file, you do not need to edit the application source code to switch the connection destination, and you can use the same source code without the test.
Excluding configuration information is very important for building cloud-native applications.
「Refer:The Twelve Factors III. Config : Store config in the environment」
Twelve-Factor strict separation of config from code.
With MicroProfile Config, the configuration information can be obtained from various locations.
These configuration locations are called ConfigSources, and if the same property is defined in more than one ConfigSource, apply a policy to specify which values are valid.
- From Java VM System Properties
- OS environment variables
- From external configuration files (.properties, .xml)
- External data sources such as LDAP, DB, and key-value stores
In some situations, you may want to switch some data sources dynamically. Then, the changed value must use the updated content from the program without restarting the application.
To meet these requirment, MicroProfile Config makes the configured values available immediately after modification.
About Runtime for MicroProfile Config
Microprofile Config specifies only API and it does not include implementation.
The MicroProfile Config implementation is provided separately by each MicroProfile implementation provider like follow.
- Apache Geronimo Config
- WebSphere Liberty
- Payara Server and Payara Micro
- WildFly & Thorntail
- microBean™ MicroProfile Config
Overview of MicroProfile Config
MicroProfile Config consists of a few APIs.
List of MicroProfile Config API 1.4
- Config
- ConfigBuilder
- ConfigProperty
- ConfigProvider
- ConfigProviderResolver
- ConfigSource
- ConfigSourceProvider
- Converter
Priority of ConfigSource
MicroProfile Config consists of org.eclipse.microprofile.config.spi.ConfigSource. The ConfigSources has a priority and are sorted according to order. This allows you to overwrite the settings from outside.
By default, there are three default ConfigSources.
- System.getProperties() (Priority = 400)
- System.getenv() (Priority = 300)
- META-INF/microprofile-config.properties file on ClassPath (default priority = 100, priority can be set individually by setting config_ordinal property in each file)
For example,at first you can be specified the default values in the property file when packaging the application, and the values can be overridden later for each deployment in the environment value. *** "The higher the priority, the higher the priority." ***
Obtain the Configuration Value
The MicroProfile Config specification provides two methods for obtain the setting value.
- Obtain the setting value programmatic
- Obtain the setting value using annotations
1. Obtain the setting value programmatic
The following is an example of creating a Config instance programmatically and obtaining a configuration information.
public class  MyAppWithGetConfigFromProgram {

    public Response invokeMicroserviceWithConfig() {
        // Create Config Instnce
        Config config = ConfigProvider.getConfig();
        // Obtain the URL Endpoint from Config for Microservices A
        String microserviceA = config.getValue("URL_OF_MICROSERVICE_A", String.class);
        // Invoke Microservices A
        return invokeMicroservice(microserviceA);
    }
}
To obtain the configuration information, at first you must get a Config instance. To get a Config instance programmatically, you can get it by calling ConfigProvider#getConfig() method.
(An instance of the Config class is registered with the context class loader after it is created.)
2. Obtain the setting value using annotations (Recommend)
The following is an example of obtaining a Config instance using annotations and get configuration information with @ConfigProperty.
@ApplicationScoped
public class MyAppWithGetConfigFromAnnotation {

    @Inject
    private Config config;

    //The property url.microserviceA must exist in one of the configsources, otherwise a
    //DeploymentException will be thrown.
    @Inject
    @ConfigProperty(name="url.microserviceA")
    private String urlOfMicroserviceA;

    //The following code injects an Optional value of port.microserviceA property.
    @Inject
    @ConfigProperty(name="port.microserviceA")
    private Optional<Integer> portOfMicroserviceA;
}
Sample Application of MicroProfile Config
1. Creating the MicroProfile Config sample project
Please access to the following URL and create the MicroProfile Project?
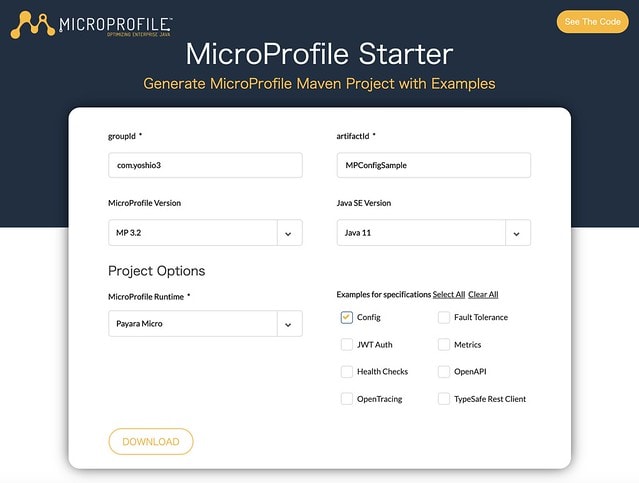
After enter the value to the form, you can get the MPConfigSample.zip file by pushing the "DOWNLOAD" button. After unarchive the zip file, you can see like the following directory structure.
.
├── pom.xml
├── readme.md
└── src
    └── main
        ├── java
        │   └── com
        │       └── yoshio3
        │           └── MPConfigSample
        │               ├── HelloController.java
        │               ├── MPConfigSampleRestApplication.java
        │               └── config
        │                   └── ConfigTestController.java
        ├── resources
        │   └── META-INF
        │       └── microprofile-config.properties
        └── webapp
            ├── WEB-INF
            │   └── beans.xml
            └── index.html
11 directories, 8 files
And the sample code of MicroProfile Config is wrote in ConfigTestController.java as follows.
package com.yoshio3.MPConfigSample.config;

import org.eclipse.microprofile.config.Config;
import org.eclipse.microprofile.config.ConfigProvider;
import org.eclipse.microprofile.config.inject.ConfigProperty;

import javax.enterprise.context.RequestScoped;
import javax.inject.Inject;
import javax.ws.rs.GET;
import javax.ws.rs.Path;

@Path("/config")
@RequestScoped
public class ConfigTestController {

    @Inject
    @ConfigProperty(name = "injected.value")
    private String injectedValue;

    @Path("/injected")
    @GET
    public String getInjectedConfigValue() {
        return "Config value as Injected by CDI " + injectedValue;
    }

    @Path("/lookup")
    @GET
    public String getLookupConfigValue() {
        Config config = ConfigProvider.getConfig();
        String value = config.getValue("value", String.class);
        return "Config value from ConfigProvider " + value;
    }
}
The above code is very simple that returns the value in the property as an HTTP response.
If you invoke the HTTP Endpoint like belows, the character string which you specify in Config value will be returned.
$ curl -X GET http://localhost:8080/data/config/injected
$ curl -X GET http://localhost:8080/data/config/lookup
The actual settings are configured in the microprofile-config.properties file under the META_INF directory.
# Location of the Property file
└── src
    └── main
        ├── resources
        │   └── META-INF
        │       └── microprofile-config.properties
The following properties are set by default.
injected.value=Injected value
value=lookup value
2. Build and run the sample project
Build the project and launch the application to confirm the MicroProfile Config behavior.
# Build the Project
$ mvn clean package

# Launch the Application
$ java -jar target/MPConfigSample-microbundle.jar

......
Payara Micro URLs:
http://192.168.100.7:8080/

'ROOT' REST Endpoints:
GET     /data/application.wadl
GET     /data/config/injected
GET     /data/config/lookup
GET     /data/hello
GET     /openapi/
GET     /openapi/application.wadl
]]
[2020-03-10T22:19:06.610+0900] [] [INFO] [] [PayaraMicro] [tid: _ThreadID=1 _ThreadName=main] [timeMillis: 1583846346610] [levelValue: 800] Payara Micro  5.194 #badassmicrofish (build 327) ready in 32,755 (ms)
[2020-03-10T22:19:33.646+0900] [] [INFO] [] [javax.enterprise.system.container.web.com.sun.web.security] [tid: _ThreadID=29 _ThreadName=http-thread-pool::http-listener(1)] [timeMillis: 1583846373646] [levelValue: 800] Context path from ServletContext:  differs from path from bundle: /
After the application is started as described above, execute the curl command to confirm the behavior.
If it works correctly, the string of the setting (Injected value, value) obtained from the property file is displayed as shown below.
# Invoke endpoint to the destination which is implemented as annotation
$ curl localhost:8080/data/config/injected
Config value as Injected by CDI Injected value

# Invoke endpoint to the destination which is implemented as programatic
$ curl localhost:8080/data/config/lookup
Config value from ConfigProvider lookup value
In MicroProfile, the setting value of the property file can be overwritten by the system property or environment value. Then you can overwrite the value set in the "microprofile-config.properties" file and confirm that the value set in the environment variable is displayed.
# Configure the Environment Value [Replace the character from .(dot) to _(under bar)]
$ export injected_value="Environment Value"

# Run the app with Java system properties which is configured on the environment variables
$ java -D"$injected_value" -jar target/MPConfigSample-microbundle.jar

# Confirm the Application Behavior
$ curl http://localhost:8080/data/config/injected
Config value as Injected by CDI Environment Value
Note: Although the property file is written in. (Dot) notation, environment variables cannot use. (Dot) notation in some OS environment. Therefore, in the environment variable settings, replace the .(Dot) notation with _(under bar). Conversion is performed automatically inside the implementation.
3. Run the Application on Local Docker Environment
Now the application has been verified in the local environment, next you can run MicroProfile in the local Docker environment.
To create a Docker image of Payara Micro's, please create the following Dockerfile.
FROM payara/micro:5.201

USER payara
WORKDIR ${PAYARA_HOME}

# Deploy Artifact
COPY ./target/MPConfigSample.war $DEPLOY_DIR

CMD ["--nocluster","--deploymentDir", "/opt/payara/deployments", "--contextroot", "app"]
Next, please build and create an image of the container using the above Dockerfile?
Please execute following command?
$ docker build -t tyoshio2002/payara-config-sample:1.0 .

# Console output will be look like follows
Sending build context to Docker daemon  151.2MB
Step 1/5 : FROM payara/micro:5.201
5.201: Pulling from payara/micro
050382585609: Already exists
59f5185426ac: Already exists
4d95208cd9c0: Pull complete
c1409397cf71: Pull complete
Digest: sha256:3ff92627d0d9b67454ee241cc7d5f2e485e46db81a886c87cf16035df7c80cc8
Status: Downloaded newer image for payara/micro:5.201
 ---> a11a548b0a25
Step 2/5 : USER payara
 ---> Running in cb755e484e79
Removing intermediate container cb755e484e79
 ---> 564283252ae4
Step 3/5 : WORKDIR ${PAYARA_HOME}
 ---> Running in f26dd5cd172c
Removing intermediate container f26dd5cd172c
 ---> f2bf88b18a77
Step 4/5 : COPY ./target/MPConfigSample.war $DEPLOY_DIR
 ---> 1b54373fe95a
Step 5/5 : CMD ["--nocluster","--deploymentDir", "/opt/payara/deployments", "--contextroot", "app"]
 ---> Running in 3eb731eb77c3
Removing intermediate container 3eb731eb77c3
 ---> 1d11549e99b8
Successfully built 1d11549e99b8
Successfully tagged tyoshio2002/payara-config-sample:1.0
After the container image is created, please start the container?
Please execute the following command to start the container?
$ docker run -p 8080:8080 -e injected_value=FOOBAR -it tyoshio2002/payara-config-sample:1.0

# Console output will be look like follows
.....
[2020-03-11T07:46:59.119+0000] [] [INFO] [] [PayaraMicro] [tid: _ThreadID=1 _ThreadName=main] [timeMillis: 1583912819119] [levelValue: 800] [[
{
    "Instance Configuration": {
        "Host": "3877abb54d57",
        "Http Port(s)": "8080",
        "Https Port(s)": "",
        "Instance Name": "payara-micro",
        "Instance Group": "no-cluster",
        "Deployed": [
            {
                "Name": "MPConfigSample",
                "Type": "war",
                "Context Root": "/app"
            }
        ]
    }
}]]
[2020-03-11T07:46:59.131+0000] [] [INFO] [] [PayaraMicro] [tid: _ThreadID=1 _ThreadName=main] [timeMillis: 1583912819131] [levelValue: 800] [[
Payara Micro URLs:
http://3877abb54d57:8080/app
'MPConfigSample' REST Endpoints:
GET /app/data/application.wadl
GET /app/data/config/injected
GET /app/data/config/lookup
GET /app/data/hello
]]
[2020-03-11T07:46:59.131+0000] [] [INFO] [] [PayaraMicro] [tid: _ThreadID=1 _ThreadName=main] [timeMillis: 1583912819131] [levelValue: 800] Payara Micro  5.201 #badassmicrofish (build 512) ready in 31,286 (ms)
Now that the created container has been started, please access to the application running on the container?
This time, the port 8080 inside the container is mapped to the local port 8080 at startup, so you can connect to the container application by accessing port 8080 in the local environment.
Please execute the following command?
$ curl http://localhost:8080/app/data/config/injected
Config value as Injected by CDI FOOBAR
Since we gave an startup argument of the environment variable (-e injected_value = FOOBAR), the character string will be displayed.
4. Run the Application on Azure Kubernetes Service
The basic operation was confirmed in the local Docker environment, so we will also confirm in the Azure Kubernetes Service environment.
Following is the procedure to confirm.
- Create a resource group for Azure Container Registry
- Create Azure Container Registry
- Confirm Azure Container Registry password
- Log in to Azure Container Registry and push the image
- Confirm the image which is pushed to Azure Container Registrys
- Create resource group for Azure Kubernetes Service
- Create service principal for Azure Kubernetes Service
- Grant ACR read permission so that AKS can reference ACR resources
- Create AKS
- Install kubectl command and get AKS connection information
- Create Deployment YAML
- Apply Deployment YAML
- Confirm the Pod behavior
- Set and update environment variables
- Getting configuration information from Kubernetes Config Map
- Update Config Map values and restart pod
4.1. Create a resource group for Azure Container Registry
First, please create Azure Container Registry and upload the image of Docker image which is created on local?
So, please create a resource group for the Azure Container Registry.
$ az group create --name WebApp-Containers --location "Japan East"
{
  "id": "/subscriptions/f77aafe8-****-****-****-d0c37687ef70/resourceGroups/WebApp-Containers",
  "location": "japaneast",
  "managedBy": null,
  "name": "WebApp-Containers",
  "properties": {
    "provisioningState": "Succeeded"
  },
  "tags": null,
  "type": "Microsoft.Resources/resourceGroups"
}
4.2. Create Azure Container Registry
Next, Pleasr create the Azure Container Registry with following options?
- --name: Specify the name of Container Registry
- --resource-group: Specify the name of the Resouce Group which is created in the above step
- --sku: Specify one of the following "Basic", "Standard", "Premium"
- --admin-enabled: If you specify "true", you can login to the registry by docker command.
$ az acr create --name containerreg4yoshio --resource-group WebApp-Containers --sku Basic --admin-enabled true
{
  "adminUserEnabled": true,
  "creationDate": "2020-03-12T02:27:59.357654+00:00",
  "id": "/subscriptions/f77aafe8-****-****-****-d0c37687ef70/resourceGroups/WebApp-Containers/providers/Microsoft.ContainerRegistry/registries/containerreg4yoshio",
  "location": "japaneast",
  "loginServer": "containerreg4yoshio.azurecr.io",
  "name": "containerreg4yoshio",
  "networkRuleSet": null,
  "policies": {
    "quarantinePolicy": {
      "status": "disabled"
    },
    "retentionPolicy": {
      "days": 7,
      "lastUpdatedTime": "2020-03-12T02:28:01.654662+00:00",
      "status": "disabled"
    },
    "trustPolicy": {
      "status": "disabled",
      "type": "Notary"
    }
  },
  "provisioningState": "Succeeded",
  "resourceGroup": "WebApp-Containers",
  "sku": {
    "name": "Basic",
    "tier": "Basic"
  },
  "status": null,
  "storageAccount": null,
  "tags": {},
  "type": "Microsoft.ContainerRegistry/registries"
}
4.3. Confirm Azure Container Registry password
Next, please confirm the password to connect to Azure Container Registry?
- --name: Specify container registry name
- --resource-group: Specify the resource group name which is created above
$ az acr credential show --name containerreg4yoshio --resource-group WebApp-Containers
{
  "passwords": [
    {
      "name": "password",
      "value": "4zaIiLk*************+H1XO4AlYFvN"
    },
    {
      "name": "password2",
      "value": "fT03XPs*************Oq2cAZiVHV+L"
    }
  ],
  "username": "containerreg4yoshio"
}
4.4. Log in to Azure Container Registry and push the image
Next, please execute the docker login command to connect to Azure Container Registry?
(For the password, enter the password obtained above.)
Once you have logged in, tag your images with the docker tag command. The new tag is used locally created Docker container image name with the "loginServer" name of the container registry (for example, "containerreg4yoshio.azurecr.io").
Finally, run the docker push command to push the image to Azure Container Registry.
# Login to the Azure Container Registry
$ docker login containerreg4yoshio.azurecr.io -u containerreg4yoshio
Password:
Login Succeeded

# Tag of Docker Image
$ docker tag tyoshio2002/payara-config-sample:1.0 containerreg4yoshio.azurecr.io/tyoshio2002/payara-config-sample:1.0

# Push the Docker Image to Azure Container Registry
$ docker push containerreg4yoshio.azurecr.io/tyoshio2002/payara-config-sample:1.0

The push refers to repository [containerreg4yoshio.azurecr.io/tyoshio2002/payara-config-sample]
bbd197848553: Pushed
ec40a5d738cc: Pushed
f95fe3528c56: Pushed
bded2364df91: Pushed
1bfeebd65323: Pushed
1.0: digest: sha256:689dbacc212d37afe09c43417bc79d8e241c3fa7b5cf71c27097ef535cf77f76 size: 1368
4.5. Confirm the image which is pushed to Azure Container Registry
Please verify that the image has been successfully pushed to Azure Container Registry?
$ az acr repository list -n containerreg4yoshio -g WebApp-Containers
Argument 'resource_group_name' has been deprecated and will be removed in a future release.
[
  "tyoshio2002/payara-config-sample"
]

$ az acr repository show-tags --name containerreg4yoshio  --repository tyoshio2002/payara-config-sample
[
  "1.0"
]
4.6. Create Resource Group for Azure Kubernetes Service
Next, please create resource group for Azure Kubernetes Service (AKS)?
$ az group create --name MC_yoshio-aks --location "Japan East"
{
  "id": "/subscriptions/f77aafe8-****-****-****-d0c37687ef70/resourceGroups/MC_yoshio-aks",
  "location": "japaneast",
  "managedBy": null,
  "name": "MC_yoshio-aks",
  "properties": {
    "provisioningState": "Succeeded"
  },
  "tags": null,
  "type": "Microsoft.Resources/resourceGroups"
}
$
4.7. Create service principal for Azure Kubernetes Service
Then please create Service Principal. In this time, there was no assignment for role.
$ az ad sp create-for-rbac --skip-assignment
{
  "appId": "884ac0da-****-****-****-c9e2d3fce495",
  "displayName": "azure-cli-2020-03-13-03-12-59",
  "name": "http://azure-cli-2020-03-13-03-12-59",
  "password": "03a0e079-****-****-****-a760333af0b0",
  "tenant": "72f988bf-****-****-****-2d7cd011db47"
}
4.8. Grant ACR read permission so that AKS can reference ACR resources
When you are using Azure, do not register the connection information to the container registry in Kubernetes (usually register and use the connection information in Secret), use the service principal of Azure Active Directory (Azure AD) of Azure , You can get images of containers that exist in the Azure Container Registry.
Refer: Azure Container Registry authentication by service principal
First, you need to get the ACR resource ID with the az acr show command to grant permissions to the ACR.
Next, use the az role assignment create command to grant acrpull to the service principal (created above) used by AKS for ACR.
- --assignee: specifiy appId ("appId": "884ac0da-*--***-c9e2d3fce495",)
- --scope: specifiy the ID of the above ACR
- --role: acrpull role allows you to pull images from ACR (no security settings in YAML)
$ az acr show --resource-group WebApp-Containers --name containerreg4yoshio --query "id" --output tsv
/subscriptions/f77aafe8-****-****-****-d0c37687ef70/resourceGroups/WebApp-Containers/providers/Microsoft.ContainerRegistry/registries/containerreg4yoshio

$ az role assignment create --assignee 884ac0da-****-****-****-c9e2d3fce495 --scope /subscriptions/f77aafe8-****-****-****-d0c37687ef70/resourceGroups/WebApp-Containers/providers/Microsoft.ContainerRegistry/registries/containerreg4yoshio --role acrpull
{
  "canDelegate": null,
  "id": "/subscriptions/f77aafe8-****-****-****-d0c37687ef70/resourceGroups/WebApp-Containers/providers/Microsoft.ContainerRegistry/registries/containerreg4yoshio/providers/Microsoft.Authorization/roleAssignments/72cbc68a-****-****-****-1a66c8568cba",
  "name": "72cbc68a-****-****- ****-1a66c8568cba",
  "principalId": "33472555-****-****-****-31e2064fb702",
  "principalType": "ServicePrincipal",
  "resourceGroup": "WebApp-Containers",
  "roleDefinitionId": "/subscriptions/f77aafe8-****-****-****-d0c37687ef70/providers/Microsoft.Authorization/roleDefinitions/7f951dda-****-****-****-43fe172d538d",
  "scope": "/subscriptions/f77aafe8-****-****-****-d0c37687ef70/resourceGroups/WebApp-Containers/providers/Microsoft.ContainerRegistry/registries/containerreg4yoshio",
  "type": "Microsoft.Authorization/roleAssignments"
}
4.9. Create AKS
Finally you can create the AKS with following options.
- --resource-group: specify the resource group name created in 4.6
- --name: specify the name of the AKS cluster
- --kubernetes-version: specify the Kubernetes version of the AKS cluster
- --node-vm-size: specifies the VM size
- --node-count: specifies the number of Kubernetes worker nodes
- --location: specifies East Japan as location
- --service-principal: specifies appId which is created on the step 4.7
- --client-secret: specifies the password which is created on the step 4.7
- --generate-ssh-keys: creates SSH keys (Public, Private) in .ssh directory in home directory.
$ az aks create \
    --resource-group MC_yoshio-aks \
    --name yoshioAKSCluster1164 \
    --kubernetes-version 1.16.4 \
    --node-vm-size Standard_DS2_v2 \
    --node-count 3 \
    --location japaneast \
    --service-principal "884ac0da-****-****-****-c9e2d3fce495" \
    --client-secret  "03a0e079-****-****-****-a760333af0b0" \
    --generate-ssh-keys
Note: The above commands is for development environment and verification environment. In order to build the production environment, you need more options like virtual network, subnet in association with external service, availability zone for availability. Many options need to be specified. See below for details on the az aks create command.
Refer:detail of az aks command
4.10. Install kubectl command and get AKS connection information
In order to manage the AKS, you need to use the kubectl command. If you are working with Kubernetes for the first time, you may not have the kubectl command in your operating environment. If the kubectl command is not installed, execute the az aks install-cli command to obtain it.
After got the kubectl command, you can manage the AKS by using the kubectl command. To connect to the created AKS, you need to get the connection information. Therefore, execute the az aks get-credentials command to obtain connection information (credentials) for AKS.
# Install the kubectl command
$ az aks install-cli
Downloading client to "/usr/local/bin/kubectl" from "https://storage.googleapis.com/kubernetes-release/release/v1.17.4/bin/darwin/amd64/kubectl"
Please ensure that /usr/local/bin is in your search PATH, so the `kubectl` command can be found.
$ which kubectl
/usr/local/bin/kubectl

# Obtain the connection infor(credential) for AKS
$ az aks get-credentials --resource-group MC_yoshio-aks --name yoshioAKSCluster1164
Merged "yoshioAKSCluster1164" as current context in /Users/yoterada/.kube/config

# Confirm which version of kubernetes is running
$ kubectl version
Client Version: version.Info{Major:"1", Minor:"17", GitVersion:"v1.17.4", GitCommit:"8d8aa39598534325ad77120c120a22b3a990b5ea", GitTreeState:"clean", BuildDate:"2020-03-12T21:03:42Z", GoVersion:"go1.13.8", Compiler:"gc", Platform:"darwin/amd64"}
Server Version: version.Info{Major:"1", Minor:"16", GitVersion:"v1.16.4", GitCommit:"224be7bdce5a9dd0c2fd0d46b83865648e2fe0ba", GitTreeState:"clean", BuildDate:"2019-12-13T20:40:52Z", GoVersion:"go1.12.12", Compiler:"gc", Platform:"linux/amd64"}
4.11. Create Deployment YAML
After evaluated the AKS running, in order to run the container on AKS, please create a YAML file for Deployment?
Create the following YAML file and save it as deployment.yaml.
apiVersion: apps/v1
kind: Deployment
metadata:
  name: payara-config-service
spec:
  replicas: 2
  selector:
    matchLabels:
      app: payara-config-service
  template:
    metadata:
      labels:
        app: payara-config-service
        version: v1
        stage: develop
    spec:
      securityContext:
        runAsUser: 1000
      containers:
      - name: payara-config-service
        image: containerreg4yoshio.azurecr.io/tyoshio2002/payara-config-sample:1.0
        resources:
          requests:
            cpu: 100m
            memory: 1Gi
          limits:
            cpu: 200m
            memory: 1Gi
4.12. Apply Deployment YAML
After created the Deployment YAML file, please apply the deployment yaml file to the AKS environment? Please execute the following command to apply the YAML file.
$ kubectl apply -f deployment.yaml
deployment.apps/payara-config-service created
4.13. Confirm the Pod behavior
If you execute the "kubectl get po" command, you can verify the STATUS is Running when it was deploied correctly.
$ kubectl get po
NAME                                     READY   STATUS    RESTARTS   AGE
payara-config-service-85f5cdd768-42sh8   1/1     Running   0          28s
payara-config-service-85f5cdd768-fhjrh   1/1     Running   0          28s
If the Running status is not showed, please execute the following command to confirm the cause?
$ kubectl describe po payara-config-service-85f5cdd768-42sh8

Or
$ kubectl logs payara-config-service-85f5cdd768-42sh8
If the status is Running, the application is running. however it is impossible to access to the application from outside of the AKS cluster. Because there is no public endpoint nor public IP addoress like follows (10.244.2.3 is private IP addoress).
$ kubectl get po -o wide
NAME                                     READY   STATUS    RESTARTS   AGE   IP           NODE                                NOMINATED NODE   READINESS GATES
payara-config-service-85f5cdd768-42sh8   1/1     Running   0          12d   10.244.2.3   aks-nodepool1-14395993-vmss000002   <none>           <none>
payara-config-service-85f5cdd768-fhjrh   1/1     Running   0          12d   10.244.1.5   aks-nodepool1-14395993-vmss000000   <none>           <none>
So In order to access to the application, please execute the following port-forard command? Then you can access to the application from localhost.
$ kubectl port-forward payara-config-service-85f5cdd768-42sh8 8080:8080
Forwarding from 127.0.0.1:8080 -> 8080
Forwarding from [::1]:8080 -> 8080
After executed the port-forward command, please open another new terminal and start the curl command (or open new browser) to access the application.
If the text is displayed as shown like below, the application is working properly.
$ curl localhost:8080/app/data/config/injected
Config value as Injected by CDI Injected value
4.14. Set and update environment variables
We could confirm the application is running in the above steps, but since the environment variables have not been set at this time, in this time the value is took from the properties file.
So we will modify the Kubernetes' Deployment YAML to take values from environment variables outside the application without redeploy.
The YAML settings to be added are as follows.
        env:
          - name: injected_value
            value: ENVIRONMENT VALUE
The modified all of YAML file is as follows.
apiVersion: apps/v1
kind: Deployment
metadata:
  name: payara-config-service
spec:
  replicas: 2
  selector:
    matchLabels:
      app: payara-config-service
  template:
    metadata:
      labels:
        app: payara-config-service
        version: v1
        stage: develop
    spec:
      securityContext:
        runAsUser: 1000
      containers:
      - name: payara-config-service
        image: containerreg4yoshio.azurecr.io/tyoshio2002/payara-config-sample:1.0
        env:
          - name: injected_value
            value: ENVIRONMENT VALUE
        resources:
          requests:
            cpu: 100m
            memory: 1Gi
          limits:
            cpu: 200m
            memory: 1Gi
After modified the above YAML file, please apply the YAML file.
$ kubectl apply -f  deployment.yaml
deployment.apps/payara-config-service configured
After applyed the YAML file, it will launch a new pod with a rolling upgrade. Obtain the name of new Pod and execute the port-foward command to access from locally.
# List of all Pods
$ kubectl get po
NAME                                    READY   STATUS    RESTARTS   AGE
payara-config-service-58cdfd6c7-gfvcl   1/1     Running   0          37s
payara-config-service-58cdfd6c7-hdm6c   1/1     Running   0          48s

# Port Forawrd for local access
$ kubectl port-forward payara-config-service-58cdfd6c7-gfvcl 8080:8080
Forwarding from 127.0.0.1:8080 -> 8080
Forwarding from [::1]:8080 -> 8080
After por-forward for new pod, you can access to the endpoint via curl command or browser.
Then, the environment variables defined in the YAML file will be displayed.
$ curl http://localhost:8080/app/data/config/injected
Config value as Injected by CDI ENVIRONMENT VALUE
4.15. Getting configuration information from Kubernetes Config Map
In Kubernetes, we can manage centrally the configuration separately from the container management (deployment.yaml).
Config Map
Therefore, we can configure the environment variables in the Config Map.
Please create the following Config Map YAML file and save it as configmap.yaml.
apiVersion: v1
kind: ConfigMap
metadata:
  name: microprofile-service-config
data:
  injected_value: "CONFIG MAP VALUE"
Next, Please apply the Config Map?
# Apply the Config Map
$ kubectl apply -f configmap.yaml
configmap/microprofile-service-config createds

# Confirm the applied Config Map
$ kubectl get cm
NAME                          DATA   AGE
microprofile-service-config   1      37m
Next, Please modify the Deployment YAML file to refer to the value of the Config Map from the Kubernetes Pod.
The modifications point is as follows.
        env:
          - name: injected_value
            valueFrom:
              configMapKeyRef:
                name: microprofile-service-config
                key: injected_value
The modified Deployment YAML is as follows.
apiVersion: apps/v1
kind: Deployment
metadata:
  name: payara-config-service
spec:
  replicas: 2
  selector:
    matchLabels:
      app: payara-config-service
  template:
    metadata:
      labels:
        app: payara-config-service
        version: v1
        stage: develop
    spec:
      securityContext:
        runAsUser: 1000
      containers:
      - name: payara-config-service
        image: containerreg4yoshio.azurecr.io/tyoshio2002/payara-config-sample:1.0
        env:
          - name: injected_value
            valueFrom:
              configMapKeyRef:
                name: microprofile-service-config
                key: injected_value
        resources:
          requests:
            cpu: 100m
            memory: 1Gi
          limits:
            cpu: 200m
            memory: 1Gi
Please apply after modifying Deployment YAML?
After applying, please confirm that STATUS is Running?
Please execute the port-forward to access to the pod.
# Apply the Deployment YAML
$ kubectl apply -f  deployment.yaml
deployment.apps/payara-config-service configured

# List of all Pods
$ kubectl get po
NAME                                     READY   STATUS    RESTARTS   AGE
payara-config-service-68bb7c8dfb-8tcbx   1/1     Running   0          22s
payara-config-service-68bb7c8dfb-f67x6   1/1     Running   0          20s

# Execute the port-forward to access to the Pod from local
$ kubectl port-forward payara-config-service-68bb7c8dfb-8tcbx 8080:8080
Forwarding from 127.0.0.1:8080 -> 8080
Forwarding from [::1]:8080 -> 8080
After executed the port-forward command, please access to the application endpoint. Then you can confirm that the value specified in Config Map (CONFIG MAP VALUE) is displayed.
$ curl http://localhost:8080/app/data/config/injected
Config value as Injected by CDI CONFIG MAP VALUE
Then we could confirm that we can get the value from Config Map of Kubernetes.
4.16. Update Config Map values and restart pod
Finally, please confirm how to update the value of the Config.
Update the value of Config Map like follows which is configured on the step 4.15.
apiVersion: v1
kind: ConfigMap
metadata:
  name: microprofile-service-config
data:
  injected_value: "CONFIG MAP VALUE NEW"
After saved the file, Please apply the updated Config Map?
After applied it, please execute the describe command to confirm the value had change correctly?
# Apply the new Config Map
$ kubectl apply -f configmap.yaml
configmap/microprofile-service-config configured

# Confirm the value had modified correctly on the Config Map
$ kubectl describe cm microprofile-service-config
Name:         microprofile-service-config
Namespace:    default
Labels:       <none>
Annotations:  kubectl.kubernetes.io/last-applied-configuration:
                {"apiVersion":"v1","data":{"injected_value":"CONFIG MAP VALUE NEW"},"kind":"ConfigMap","metadata":{"annotations":{},"name":"microprofile-...

Data
====
injected_value:
----
CONFIG MAP VALUE NEW
Events:  <none>
After applied the new Config Map, please access the application endpoint? In this time, you may confirm that the new settings are not reflected. Because the Kubernetes Pod read the environment value during the startup time and not automatically reloading. As a result it will show the old configuration information.
curl http://localhost:8080/app/data/config/injected
Config value as Injected by CDI CONFIG MAP VALUE
So you need to restart the pod to reflect the setting information.
In order to restart the pod, plese delete the existing pod? The Kubernetes Cluster will automatically create and launched the new pod. (Because the Pod is guaranteed to start for the number of replicas in Deployment YAML)
After getting the list of all pods and please delete one of the pod and wait for the new pod to be restarted.
# List of all Pod
$ kubectl get po
NAME                                     READY   STATUS    RESTARTS   AGE
payara-config-service-68bb7c8dfb-8tcbx   1/1     Running   0          4m24s
payara-config-service-68bb7c8dfb-f67x6   1/1     Running   0          4m22s

# Delete one of the Pod
$ kubectl delete po payara-config-service-68bb7c8dfb-8tcbx
pod "payara-config-service-68bb7c8dfb-8tcbx" deleted

# List of all Pod (payara-config-service-68bb7c8dfb-dx7sg is new created pod)
$ kubectl get po
NAME                                     READY   STATUS    RESTARTS   AGE
payara-config-service-68bb7c8dfb-dx7sg   1/1     Running   0          26s
payara-config-service-68bb7c8dfb-f67x6   1/1     Running   0          5m27s
Please execute the port-forwad command to accessed from locally?
$ kubectl port-forward payara-config-service-68bb7c8dfb-dx7sg 8080:8080
Forwarding from 127.0.0.1:8080 -> 8080
When you access to the application endpoint, you can confirm that the updated value (CONFIG MAP VALUE NEW) is displayed .
$ curl http://localhost:8080/app/data/config/injected
Config value as Injected by CDI CONFIG MAP VALUE NEW
Now we could confirm the MicroPrifile Config with AKS.
By taking out the configuration and managing them, we can dynamically change the external connection destination without modifying the source code. This greatly reduces the cost of testing and managing applications, and brings you one step closer to cloud-native apps.
Please enjoy!!

Top comments (0)