
Let's continue the series of posts and experiments about explicit software design.
Last time we finished designing the application core and created use case functions. In this post, we will write components for the user interface, discuss its interaction with the domain model, and look at the difference between different types of data that are displayed in the UI.
But first, disclaimer
This is not a recommendation on how to write or not write code. I am not aiming to “show the correct way of coding” because everything depends on the specific project and its goals.
My goal in this series is to try to apply the principles from various books in a (fairly over-engineered) frontend application to understand where the scope of their applicability ends, how useful they are, and whether they pay off. You can read more about my motivation in the introduction.
Take the code examples in this series sceptically, not as a direct development guide, but as a source of ideas that may be useful to you.
By the way, all the source code for this series is available on GitHub. Give these repo a star if you like the series!
Analyzing UI
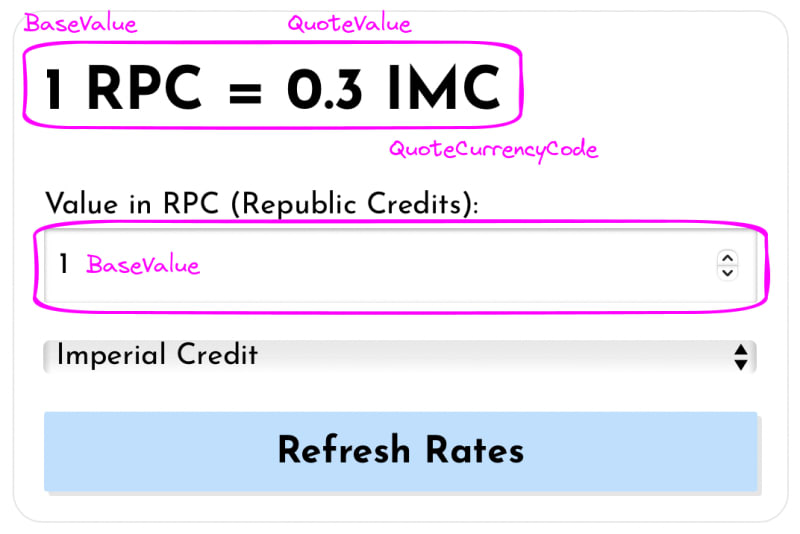
The very first thing we will do when developing the UI is to look at what it will consist of and what features it should provide to users. Our application (a currency converter) will consist of one screen, on which the converter component itself will be located:

The converter will store some state—data that will affect the components' render. To understand how to work with this data, let's look at what components will be displayed on the screen, how information will “flow” through the application while working with it.
UI as Function of State
The first thing we will pay attention to is the component header and the text field below it. The field contains the current value of the base currency, and the header contains the value of the quote currency calculated at the current rate:
We can think of these two components as a “transformation” of data from the domain model into a set of components on the screen:
[Domain Model]:   =>   [UI Components]:
_________________________________________

BaseValue         =>   <BaseValueInput />
BaseValue
  & QuoteValue    =>   <CurrencyPair />
  & ExchangeRate
The idea of describing UI as a function of data is not new and lies at the core of various frameworks, libraries, and patterns. This approach helps to separate the data transformations from various side effects related to rendering components and reacting to user input.
One of the reasons for such separation is that data and its representation on the screen change for different reasons and at different pace and frequency. If the code is not separated, then changes in one part seep into another and vice versa. In that case, stopping and limiting the spread of such changes becomes difficult, which makes updating the code unreasonably expensive.
When data and presentation are separated, effects are somewhat “isolated” somewhere on the edge of the application. This makes the code more convenient for understanding, debugging, and testing.
However, not all data that affects UI rendering is exclusively the domain model, and we should also consider (and separate in the code) other types of state.
Types of State
In addition to the model, which describes the domain and is represented in our code by a set of types and functions, we can also identify other types of data that affect the render of components on the screen.
For example, if you click on the “Refresh Rates” button in a currency converter, the application will load data from the API server. The data loaded from there is part of the server state. We have almost no control over it, and the UI task is to synchronize with it in order to show up-to-date information from there.
Actually, instead of “server state,” I would use the term “remote state” because the source of the data can be not only a server, but also local storage, file system, or anything else.
In addition to that, after the button is pressed, while the data is not yet loaded from the server, the button will be disabled, and the converter will show a loading indicator to provide feedback to the user. The flag responsible for the loading indicator can be considered as part of the UI state.
As a rule, UI state is data that describes the UI directly. For example, it includes things like “Is the button disabled?”, “How is the currency list sorted?”, “Which screen is currently open?” and responds to user actions even if the model does not change.
By the way, sometimes non-permanent states (such as “Loading,” “HasError,” “Retrying,” etc.) are placed in a separate category called “meta state”, and everything related to routing is placed in the “URL state.” This can be useful if the application is complex and different data is involved in different processes. In our application, there is no special need for this, so we will not describe everything in such detail.
Data Flow
In complex interfaces, components may depend on several types of state at once. For example, if the quote currency selector needs to be sorted, this component will be a function of both the model and UI state simultaneously:
[Domain Model]:   =>  [UI State]:    =>  [UI Component]:
___________________________________________________________

CurrentQuoteCode  =>  SortDirection  =>  <CurrencySelector
& CurrencyList                            selected={QuoteCurrencyCode}
                                          options={CurrencyList}
                                          sort={SortDirection} />
In code, we will strive to emphasize these dependencies and separate different types of state. We won't always physically separate them (on the file level), but at least we'll try to do it conceptually—in the types and values of variables passed to components.
Different types of state change for different reasons and at different frequencies. We will often put volatile code closer to the “edges of the application” than more stable code. This way, we will try to eliminate the influence of frequent changes on the core of the application, limit the spread of changes across the codebase, show that the data in the model is primary, and indicate the direction in which data “flows” through the app.
Ports and Adapters
Earlier, we represented the application as a “box with levers and slots” through which it communicates with the outside world. User input and the information rendered on the screen can be considered such “communication”:
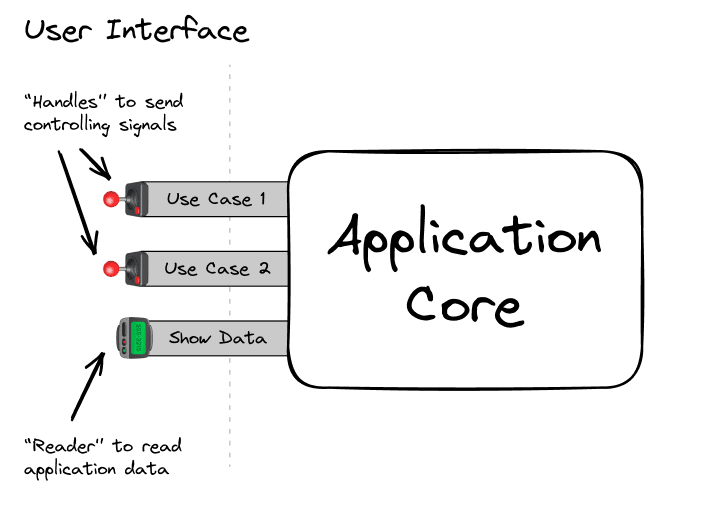
When a user clicks a button or changes the value in a text field, the UI sends a signal (a.k.a command or action) to the application core to initiate some use case. In our application, this signal will be a function that implements an input port.
// Input port to the app:
type RefreshRates = () => Promise<void>;

// Function that implements the `RefreshRates` type:
const refresh: RefreshRates = async () => {};

// When the button is clicked,
// the UI will invoke the `refresh` function,
// which implements the `RefreshRates` input port.
To handle a click event in React, we can write a component like this:
function RefreshRates() {
    return (
        <button type="button" onClick={refresh}>
            Refresh Rates
        </button>
    );
}
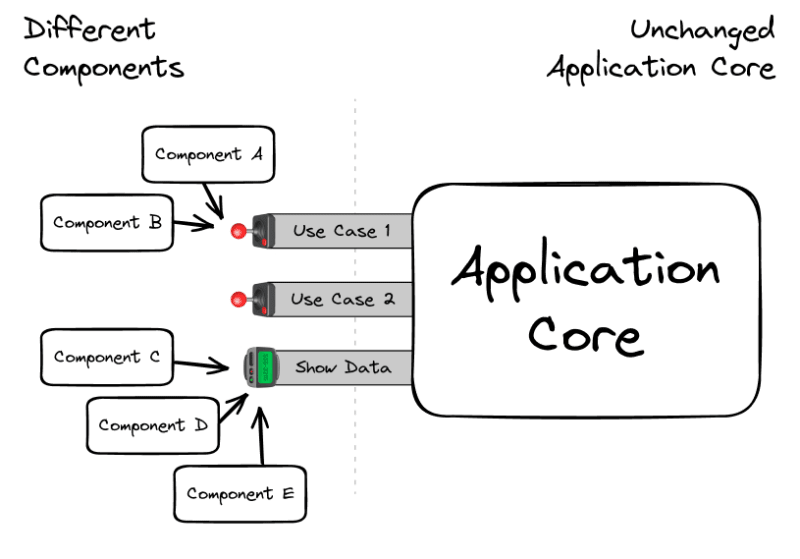
This component transforms a signal from the external world (click on a button) into a signal understandable by the application core (a function that implements the input port). In other words, we can call this component an adapter between the application and the UI.
Driving Adapters an UI
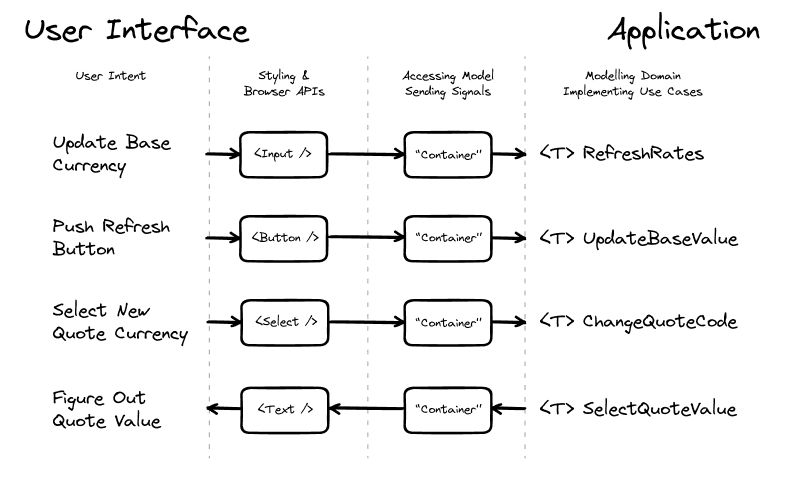
Components handle user input and display information on the screen. They “translate” signals from the application language to a language that is understandable to the user and browser API:

To make this a little more obvious, let's modify the component slightly so that it prevents default behavior when the button is clicked:
function RefreshRates() {
    const clickHandler = useCallback((e) => {
        // Interface of browser APIs:
        e.preventDefault();

        // Application core interface:
        // - function `refresh` implements the input port,
        // - the component relies on its type
        //   and expects the promised behavior.
        refresh();
    }, []);

    // User interface:
    // - the element looks like a button, so it can be clicked,
    // - it has a label that explains what will happen after clicking it.
    return (
        <button type="button" onClick={clickHandler}>
            Refresh Rates
        </button>
    );
}
The RefreshRates component effectively translates the user's intent into the language of the domain model:
UserIntent => ButtonClickEvent => RefreshRates
This conversion makes the component similar to an adapter because it becomes a function that makes two interfaces compatible with each other.
By the way, such adapters are usually called primary or driving adapters because they send signals to the application, indicating what needs to be done. In addition to them, there are also driven adapters, but we will talk more about them later.
“Adapters” can be not only components but also any function that can handle UI events:
window.addEventListener('focus', () => refresh());
window.onresize = debounce(refresh, 250);
setTimeout(() => refresh(), 15000);

// FocusEvent => RefreshRates
// ResizeEvent => Debounced => RefreshRates
// TimerFiredEvent => RefreshRates
The main value of these “adapters” is that they scope the responsibility of the UI code. It cannot directly interfere with the core functionality of the application because the only way to interact with it is by sending a signal through the input port.
Such separation helps to limit the spread of changes. Since all input ports are clearly defined, it doesn't matter to the core what will happen “on the other side.” The presentation on the screen can be changed however we want, but we will always be sure that communication with the core will follow predetermined rules:
Component Implementation
Let's now try to write UI components based on the application ports. We'll start with something simple and write a text field responsible for updating the value of the base currency.
BaseValueInput
First, let's create a component markup:
// ui/BaseValueInput

export function BaseValueInput() {
    return (
        <label>
            <span>Value in RPC (Republic Credits):</span>
            <input type="number" min={0} step={1} value={0} />
        </label>
    );
}
Now let's handle the user input and call the function that implements the UpdateBaseValue input port:
// ui/BaseValueInput

// For now, just a stub that implements
// the input port type:
const updateBaseValue: UpdateBaseValue = () => {};

export function BaseValueInput() {
    // “Adapter” component that translates
    // the signal from the field (the change event)
    // into a signal understandable by the application core
    // (call to the `updateBaseValue` port with the necessary parameters).

    const onChange = useCallback(
        (e: ChangeEvent<HTMLInputElement>) => updateBaseValue(e.currentTarget.valueAsNumber),
        []
    );

    return (
        <label>
            <span>Value in RPC (Republic Credits):</span>
            <input type="number" min={0} step={1} value={0} onChange={onChange} />
        </label>
    );
}
Since the component depends on the type of the port rather than the specific function, we can replace the stub with a function from the props. This will help simplify unit tests for the component:
type BaseValueInputProps = {
    updateBaseValue: UpdateBaseValue;
};

export function BaseValueInput({ updateBaseValue }: BaseValueInputProps) {
    return; /*...*/
}
By the way, it is not necessary to pass
updateBaseValueas a prop. It is acceptable to simply reference the specific function, and in many cases, this will even be preferable to abstracting through props. But since we are trying to follow all the possible guidelines from various books, we will make the components completely “decoupled” from the application core. Yet, again, it's not necessary.
In the component tests, we can pass a mock in the props that will check that when entering text into the input field, we are indeed calling this function with the correct parameters:
describe('when entered a value in the field', () => {
    it('triggers the base value update handler', () => {
        const updateBaseValue = vi.fn();
        render(<BaseValueInput updateBaseValue={updateBaseValue} />);

        // Find the field, input the string "42" in it:
        const field = screen.getByLabelText(/Value in RPC/);
        act(() => fireEvent.change(field, { target: { value: '42' } }));
        //        ↑ Better to use `userEvent` though.

        // Check that the input port was called with the number 42:
        expect(updateBaseValue).toHaveBeenCalledWith(42);

        // (The task of the component is to extract the required data from the field
        //  in the form of a number and pass it to the input port function.)
    });
});
Note that in the test we are only checking the code that is before the port. Everything that happens after calling updateBaseValue is already not the responsibility of the component. Its job is to call a certain function with the right parameters, and then the application takes responsibility for executing it.
In an integration test, this would be wrong: we would need to test the whole use case and ensure that the user sees the correct updated result on the screen. We will also write integration tests later when we start working on application composition. For now, let's focus on unit tests.
Whether to write unit tests for components is a controversial topic. Some argue that components should be tested mainly with integration tests and we shouldn't to write unit tests for them at all. I won't give any recommendations or advice on this topic because I don't know if there is a “right” way that would work in all cases. I can only advise you to weigh the costs and benefits of both options.
Trivial Tests
Sometimes we may find that a component is doing a trivial task, such as just calling a function in response to a user action, without any additional actions. For example:
const SampleComponent = ({ someInputPort }) => {
    return (
        <button type="button" onClick={someInputPort}>
            Click!
        </button>
    );
};
The test of such a component will come down to checking that the passed function was called on click:
describe('when clicked', () => {
    it('triggers the input port function', () => {
        // ...
    });
});
Whether to write tests for such components depends on preferences and project policy. Here I agree with Mark Seemann, who writes in the book “Code that Fits in Your Head” that such tests are not particularly useful. If the complexity of the function is equal to 1, then tests for such functions can be skipped to avoid cluttering the code.
It's a different story if in the tests we are checking various conditions for rendering the component. If, depending on the props, the component renders different text or is in different states such as loading, error, etc., it may be useful to cover it with tests as well. (However, the complexity of such components will be higher than 1, so the general rule still applies 🙃)
BaseValueInput's Value
In addition to reacting to user input, the base currency field should also display its value. Let's add a new input port that will provide this value:
// core/ports.input

type SelectBaseValue = () => BaseValue;
Now we can update the component dependencies, specifying this port as well:
// ui/BaseValueInput

type BaseValueInputProps = {
    updateBaseValue: UpdateBaseValue;
    selectBaseValue: SelectBaseValue;
};
The implementation of such a port can be any function, including a hook, so we can change the name in the dependencies to useBaseValue:
// ui/BaseValueInput

type BaseValueInputProps = {
    updateBaseValue: UpdateBaseValue;
    useBaseValue: SelectBaseValue;
};
After this, we can use this hook to get the necessary value and display it in the field:
export function BaseValueInput({ updateBaseValue, useBaseValue }: BaseValueInputProps) {
    // Get the value via the hook
    // that implements the input port:
    const value = useBaseValue();

    // ...

    return (
        <label>
            <span>Value in RPC (Republic Credits):</span>

            {/* Render the value in the text field: */}
            <input type="number" min={0} step={1} value={value} onChange={onChange} />
        </label>
    );
}
Usually, the value and the function to update it are put in the same hook to access them like this:
const [value, update] = useBaseValue();
This is a more canonical and conventional way of working with hooks in React. We didn't do this because in the future we will need more granular access to data and updating it, but in general we could have gathered input ports into such tuples.
By the way, to test the data selector useBaseValue, we will check the formatted value inside the field:
// ui/BaseValueInput.test

const updateBaseValue = vi.fn();
const useBaseValue = () => 42;
const dependencies = {
    updateBaseValue,
    useBaseValue
};

// ...

it('renders the value from the specified selector', () => {
    render(<BaseValueInput {...dependencies} />);
    const field = screen.getByLabelText<HTMLInputElement>(/Value in RPC/);
    expect(field.value).toEqual('42');
});
Such a test can also be considered trivial and not created separately, but checked altogether with an integration test.
However, if we still decide to write unit tests, it's important not to intrude into the
responsibility of other modules, but to test only what this component does.
Dependencies as Props
You may have noticed that we are currently passing the component dependencies as props:
type BaseValueInputProps = {
    updateBaseValue: UpdateBaseValue;
    useBaseValue: SelectBaseValue;
};
This approach is quite common, but it is kinda controversial and may raise questions. However, at this stage of development, we have several reasons for doing so:
- We don't have ready infrastructure (API, store) from which to import the
useBaseValuehook and use it directly. Therefore, we rely on the interface of this hook as a guarantee that this behavior will be provided by “someone, sometime later.” - The coupling between the UI and the core of the application is reduced due to the buffer zone between them, so designing the UI and business logic can be done in parallel and independently. This is not always necessary, but we follow this recommendation as part of our “by the book” coding approach.
- The composition of the UI and the rest of the application becomes more explicit, as if specific implementations of dependencies are not passed, the application will not be built.
This does not mean that we will have to use these props in the future. In one of the upcoming posts, we will note the moment when we are ready to remove such “explicit composition” and import hooks directly into the components.
In the source code for clarity, I will leave the composition explicit in all examples so that the boundary between different parts of the application is better visible. Remember that the code is “deliberately clean” and writing it exactly like that is not necessary.
Presentational Components and Containers
In addition to the components that provide a connection to the application core, we can also distinguish components that are solely responsible for rendering data on the screen—the so-called presentational components. They do not contain any business logic, are unaware of the application and depend only on their props, and their scope is limited to the UI layer.
In our case, such a presentational component might be the Input component. It's a wrapper for the standard text field with some preset styles:
import type { InputHTMLAttributes } from 'react';
import styles from './Input.module.css';

type InputProps = Omit<InputHTMLAttributes<HTMLInputElement>, 'className'>;

export function Input(props: InputProps) {
    return <input {...props} className={styles.input} />;
}
The task of this component is to correctly and nicely render a text field. It has no logic, does not use hooks, does not access any data or functionality, and all its behavior depends solely on its props.
We could use such a component in BaseValueInput like this:
import { Input } from '~/shared/ui/Input';

export function BaseValueInput(/*...*/) {
    const value = useBaseValue();
    const onChange = useCallback(/*...*/);

    return (
        <label>
            <span>Value in RPC (Republic Credits):</span>
            <Input type="number" min={0} step={1} value={value} onChange={onChange} />
        </label>
    );
}
Unlike the presentational Input component, the BaseValueInput component knows about the application and can send signals to it and read information from it. Some time ago, such components were called containers.
With hooks, the concept of containers has somewhat disappeared, although after the emergence of server components, people have started talking about them again. In any case, the term is quite old and seems useful for understanding the conceptual difference between different “kinds” of components.
Roughly speaking, the job of a presentational component is to look nice, while the job of a container is to provide a connection to the application. That's why BaseValueInput knows how to invoke “use cases” and how to adapt application data and signals to the presentational Input component:
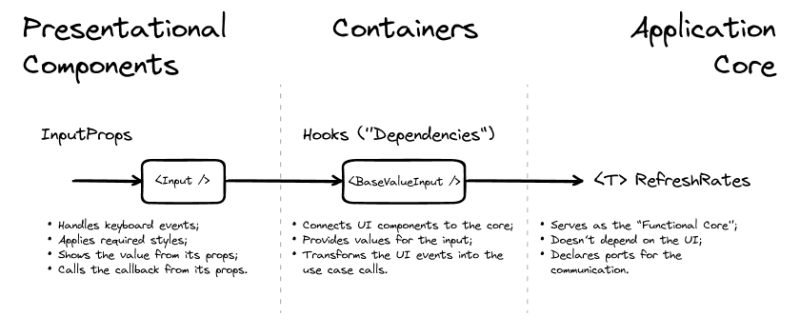
Presentational components become reusable because they don't know anything about the project context and the domain, and can be used independently of the application functionality.
Asynchronous Workflows
Let's go back to the stock quotes update button. We remember that clicking on it triggers an asynchronous process:
// core/ports.input

type RefreshRates = () => Promise<void>;
We can pass a function that implements the RefreshRates input port as a click handler for the button:
// ui/RefreshRates

type RefreshRatesProps = {
    refreshRates: RefreshRates;
};

export function RefreshRates({ refreshRates }: RefreshRatesProps) {
    return (
        <Button type="button" onClick={refreshRates}>
            Refresh Rates
        </Button>
    );
}
...But that won't be enough. For asynchronous processes, we would like to show state indicators in the UI, so that users receive feedback from the interface. We can achieve this by combining the domain and UI states in the component “dependencies”, which will be responsible for the status of the operation.
Let's update the type RefreshRatesProps and indicate that the component depends not only on the input port of the application, but also on some other state:
type RefreshAsync = {
    // The component still gets the function
    // that implements the input port:
    execute: RefreshRates;

    // But also it gets some new data that is associated
    // with the state of that operation:
    status: { is: 'idle' } | { is: 'pending' };
};

type RefreshRatesDeps = {
    // And we assume that the component
    // gets everything from a hook:
    useRefreshRates: () => RefreshAsync;
};
In our case, the
statusfield is a part of the UI state because it only affects the user interface. However, if the operation status somehow affected other business logic processes, we would probably have to include it in the model and describe various data states with regard to the status.
Inside the component, we can rely on the guarantees from useRefreshRates that when the status changes, the associated data will also change:
export function RefreshRates({ useRefreshRates }: RefreshRatesDeps) {
    const { execute, status } = useRefreshRates();
    const pending = status.is === 'pending';

    return (
        <Button type="button" onClick={execute} disabled={pending}>
            Refresh Rates
        </Button>
    );
}
We can loosely call such guarantees of status changes from
useRefreshRatesa form of a contract. We may not write pre- and post-condition checks, but we have them in mind while describing theRefreshAsynctype.
Now the component can be tested by passing a stub as a hook dependency, which will return a specific UI state:
const execute = vi.fn();
const idle: Status = { is: 'idle' };
const pending: Status = { is: 'pending' };

describe('when in idle state', () => {
    it('renders an enabled button', () => {
        const useRefreshRates = () => ({ status: idle, execute });
        render(<RefreshRates useRefreshRates={useRefreshRates} />);

        const button = screen.getByRole<HTMLButtonElement>('button');

        expect(button.disabled).toEqual(false);
    });
});

describe('when in pending state', () => {
    it('renders a disabled button', () => {
        const useRefreshRates = () => ({ status: pending, execute });
        render(<RefreshRates useRefreshRates={useRefreshRates} />);

        const button = screen.getByRole<HTMLButtonElement>('button');

        expect(button.disabled).toEqual(true);
    });
});

describe('when the button is clicked', () => {
    it('triggers the refresh rates action', () => {
        const useRefreshRates = () => ({ status: idle, execute });
        render(<RefreshRates useRefreshRates={useRefreshRates} />);

        const button = screen.getByRole<HTMLButtonElement>('button');
        act(() => fireEvent.click(button));

        expect(execute).toHaveBeenCalledOnce();
    });
});
...And we will write the actual implementation of the useRefreshRates hook in one of the next posts 🙃
Next Time
In this post, we described the user interface and discussed its interaction with the application core. Next time, we will create the application infrastructure, write API requests, and set up a runtime data store for the application.
Sources and References
Links to books, articles, and other materials I mentioned in this post.
UI as Function of State
Patterns and Principles
- Actions in Redux
- Adapter Pattern
- Anti-Corruption Layer
- Client-Side Architecture. Layers
- Command Pattern
- Containers and Presentational Components
- Dependency Injection in React
- Primary Adapters
- Single-responsibility principle, Wikipedia
Testing UI
- Design by Contract
- Functional design is intrinsically testable
- Write tests. Not too many. Mostly integration
Other Topics
- Code That Fits in Your Head by Mark Seemann
- Cyclomatic complexity, Wikipedia
- Material UI
- More functional pits of success
- Unrepresentable Invalid States
P.S. This post was originally published at bespoyasov.me. Subscribe to my blog to read posts like this earlier!

Top comments (2)
Hy Alex,
Thank you for sharing your insights and your code. Is there a running example to see the code in action?
For me it is interesting to see, how much overhead a platform like REACT can produce on such a little tool. It´s hard to imagine that a tool like this could need more than 10 lines of code, using more appropriate tooling :-).
Anyway, I know that your motivation was to show a design principle. But even for professional code developent it could be useful to be a bit more efficient....
Hi,
I believe, the introduction to the series addresses almost all issues you mention:
The series isn't about “how to write or not to write code.” The goal is to try to apply various principles from programming books in a frontend application and research where the scope of their applicability ends, how useful they are (if they are), and whether they pay off (if they do).
Regarding the size and complexity of the app, the introduction also says:
The focus is not on this particular app, or React for that matter, but on the cost and tradeoffs of “purism” and cost-benefit balance of made decisions. In React, the solution can be shorter, too; it wasn't the point of the posts.
I don't have examples with open source code, but I've got a couple of projects when I use some of the ideas. One of those is almost 8 years long now and lived through multiple major changes, works fine.
Again, I highlight that in production, depending on a project, I only use some of the ideas, not all of them and not at the same time. That's why this series is an “over-engineering experiment” and not a “tutorial” or “go-to manual”, as I mention in the introduction.
But your comment got me thinking that I should probably mention all this at the beginning of every post in the series because the readers might not be familiar with the introduction and lack the context. I'll update the text so that the intentions are clearer. Thank you!