Hi, I am Bharat Saraswat and this is my first blogpost about creating a small covid tracker dashboard using Vanilla JS.

Why Vanilla JS?
I wanted to create a small dashboard which is fast(like very fast) and shows the data, I didn't feel like to use frameworks like react, vue etc. while developing.
Sometimes you can build things using simple tools without taking part in framework race.
Getting Started:
If you want to have a look at the source code, I have made it available on github.
 bhansa
/
covid-tracker-lite
bhansa
/
covid-tracker-lite
covid data tracker with vanilla js
covid-tracker-lite
covid data tracker lite with vanilla js
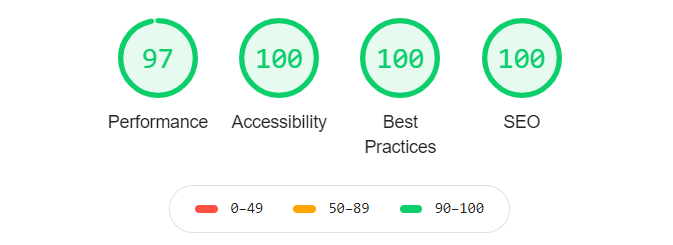
Lighthouse score
If you want to have a look at the demo, here it is: covidtrackerlite.in
I started with some html which have three cards "confirmed", "active" and "recovered". We can also show other metrics depending on the data.
To setup the skeleton I used skeleton boilerplate which is very lightweight and gives me the components which I wanted to use.
index.html
...
<!-- Referencing skeleton here -->
<link rel="stylesheet" href="https://cdnjs.cloudflare.com/ajax/libs/skeleton/2.0.4/skeleton.min.css"/>
...

<div class="container">
  <h1>
    Covid tracker, Data for
    <b class="strong">India</b>
  </h1>
  <div class="row">
    <div class="four columns">
      <div class="card card--red">
        <div class="card__heading">
          <h5>Confirmed</h5>
          <h2 id="confirmed">260000+</h2>
        </div>
      </div>
    </div>
    <div class="four columns">
      <div class="card card--blue">
        <h5>Active</h5>
        <h2 id="active">129000+</h2>
      </div>
    </div>
    <div class="four columns">
      <div class="card card--green">
        <h5>Recovered</h5>
        <h2 id="recovered">129000+</h2>
      </div>
    </div>
  </div>
</div>
I used an api to fetch the data which was available and the same is used by the covid india website
API reference: https://github.com/covid19india/api
Then I used javascript's fetch function to make an API call and set it to the respective DOM elements which I created earlier.
main.js
// fetch covid data and later set it to object cards
(function () {
  let countriesData = null;

  let elementIds = {
    confirmed: "confirmed",
    active: "active",
    recovered: "recovered",
  };

  function fetchData() {
    // use js fetch
    const apiURL = "https://api.covid19india.org/data.json";
    fetch(apiURL)
      .then((response) => response.json())
      .then((data) => {
        let summaryData = data.statewise[0];
        document.getElementById(elementIds.confirmed).textContent = Number(
          summaryData.confirmed
        ).toLocaleString("en-IN");
        document.getElementById(elementIds.active).textContent = Number(
          summaryData.active
        ).toLocaleString("en-IN");
        document.getElementById(elementIds.recovered).textContent = Number(
          summaryData.recovered
        ).toLocaleString("en-IN"); // to show correct number format
      })
      .catch((error) => console.log("api data fetch error", error));
  }
  // comment this method while developing to save api calls
  fetchData();
})();
I also added some styles for card details, Since everything till here is vanilla then why not use some CSS variables as well 😜😁
main.css
  /* CSS variables here */
:root {
  --primary-color: #fff;
  --secondary-color: #000;
  --bg-color: #fff;
  --font-color: #000;
  --heading-color: #000;
  --card-bg: #fff;

  /* color variants */
  --blood-red: #FF073A;
  --cold-blue: #057EFF;
  --nice-green: #2AA846;

  /* slider */
  --slider-color: #ccc;
}

/* dark theme variables here */
[data-theme="dark"] {
  --bg-color: #000;
  --font-color: #fff;
  --card-bg: #333;
}
Wait..., dark theme??
Yes, I kept some styles for dark theme as well. We will be implementing it later.
And few more styles which are global and used by page and the cards.
main.css
/* global styles */

body,
html {
  margin: 0;
  padding: 0;
  height: 100%;
  min-height: 100%;
}

body {
  background-color: var(--bg-color);
  color: var(--font-color);
  transition: all 0.3s ease-out;
}

.container {
  height: 80%;
}

.container .strong {
  border-bottom: 4px solid var(--font-color);
}

.container .row {
  display: flex;
  justify-items: center;
  align-items: center;
  flex-wrap: wrap;
  width: 100%;
  height: 80%;
}

/* card styles */
.card {
  padding: 20px;
  border: 1px solid var(--card-border-color);
  border-radius: 7px;
  box-shadow: 2px 2px 4px rgba(0, 0, 0, 0.15);
  background-color: var(--card-bg);
}

.card:hover {
  box-shadow: 3px 3px 10px rgba(0, 0, 0, 0.15);
}

/* card variants */
.card.card--red {
  border-bottom: 4px solid var(--blood-red);
}

.card.card--blue {
  border-bottom: 4px solid var(--cold-blue);
}

.card.card--green {
  border-bottom: 4px solid var(--nice-green);
}

/* footer styles */
footer {
  background: #000;
  color: #fff;
  padding: 15px;
  width: 100%;
}
Now, until here we have a template ready with cards and dynamic data getting populating. Cool... right?
Note: Do not forget to add references for CSS and JS files.
We can add the theme toggle (dark theme) functionality to our template.
So we need to add a toggle button which toggles the theme.
We can add an attribute data-theme="dark" to our document or html tag, since we have already written the styles earlier which basically updates the CSS variables.
First, we will add the theme toggle button in our html
index.html
<div class="theme-switch-wrapper">
<label class="theme-switch" for="theme-toggle">
<input type="checkbox" id="theme-toggle" />
<div class="slider round"></div>
</label>
<em>Enable Dark Mode</em>
</div>
and styles for the same.
main.css
/*Simple css to style it like a toggle switch*/
.theme-switch-wrapper {
  display: flex;
  align-items: center;
}

.theme-switch-wrapper em {
  margin-left: 10px;
  font-size: 1rem;
}

.theme-switch {
  display: inline-block;
  height: 34px;
  position: relative;
  width: 60px;
}

.theme-switch input {
  display: none;
}

.slider {
  background-color: var(--slider-color);
  bottom: 0;
  cursor: pointer;
  left: 0;
  position: absolute;
  right: 0;
  top: 0;
  transition: .2s;
}

.slider:before {
  background-color: var(--bg-color);
  bottom: 4px;
  content: "";
  height: 26px;
  left: 4px;
  position: absolute;
  transition: .4s;
  width: 26px;
}

input:checked+.slider {
  background-color: var(--font-color);
}

input:checked+.slider:before {
  transform: translateX(26px);
}

.slider.round {
  border-radius: 34px;
}

.slider.round:before {
  border-radius: 50%;
}
Okay, so the toggle switch looks good but it doesn't work.
Its because we have to write js code to toggle the class when we toggle the switch.
Below I have written some code which does the same
theme-toggle.js
// theme toggle function, toggles through light and dark mode
(function () {
  let themeToggle = document.getElementById("theme-toggle");
  themeToggle.addEventListener(
    "click",
    function (event) {
      if (event.target.checked) {
        document.documentElement.setAttribute("data-theme", "dark");
        localStorage.setItem("data-theme", "dark");
      } else {
        document.documentElement.setAttribute("data-theme", "light");
        localStorage.setItem("data-theme", "light");
      }
    },
    false
  );

  const currentTheme = localStorage.getItem("data-theme")
    ? localStorage.getItem("data-theme")
    : null;

  if (currentTheme) {
    document.documentElement.setAttribute("data-theme", currentTheme);

    if (currentTheme === "dark") {
      themeToggle.checked = true;
    }
  }
})();
Here you can find an detailed article about adding dark theme by ananyaneogi.
That's it 👏
Now you should have a dashboard which is getting dynamic data and has dark mode.
Well, this was my first article and I wanted to share the project with you people.
Let me know if it helped anyone, also please tell me if I need to update either the post(since I'm not a good writer 🙈) or the code.
Thanks for reading ✨


Top comments (0)