For this project, I wanted to create an easy-to-use, efficient, and cheap solution to an expensive Hospital Quality HR Monitor. This device would be so unbelievably simple, even your grandma and grandpa could use it. However, the setup process is a bit more rigorous so make sure you have enough snacks. This tutorial will be split into a few different parts: #1. The hardware: connecting wires, plugging in cables, and debugging. #2. The software: setting the hardware up using the Arduino IDE and programming the ESP8266 to connect to the Azure IoT Hub. Lastly, #3. Azure: connecting the Azure Applications to each other (for example: IoT Hub → Event Grid → Event Subscription → Logic App (basically an Azure Function) → Twilio API).
Prerequisites
Before we get started, make sure you have the following: an azure subscription, you can make one for free. This will allow us to use server-less applications and run our program in the cloud. Secondly, make sure you have the following hardware: Adafruit Huzzah Feather (ESP8266), Breadboard Cables, and DFRobot HR Sensor. Although you don't need to have the exact replicas, make sure your hardware is somewhat similar. Lastly, make sure you download the Arduino IDE and this ESP8266 Driver (your Huzzah/ESP8266 won't connect without it 🤗).
Connecting the Hardware
After you have unboxed all your packages and remembered to pop the bubble wrap, you will need to connect the DFRobot HR Sensor to the Huzzah. You will then have to connect the Huzzah to a power source (in this case, a computer so we can flash code onto it!) To do this, you will want to connect the three-prong cable (included with the HR Sensor) to 3 different breadboard cables. Then attach those breadboard cables to specific ports on the Huzzah. The three-prong cable is universal so it doesn't matter which breadboard cable you plug into which socket!

The names of the ports are the 3v3, GND, and A0/ADC. If you are having trouble finding them, I have attached a image of the Huzzah wiring here. If you are having issues, think of it as the 2nd, 4th, and 5th port on the reset button side of the Adafruit Huzzah Feather. Once your HR Sensor and Huzzah are connected, simply plug in your Huzzah to your computer with a micro USB cable. When everything is done, open up the Arduino IDE and make sure you install the driver (ESP8266 Driver) for compatibility between devices!
Coding the Software
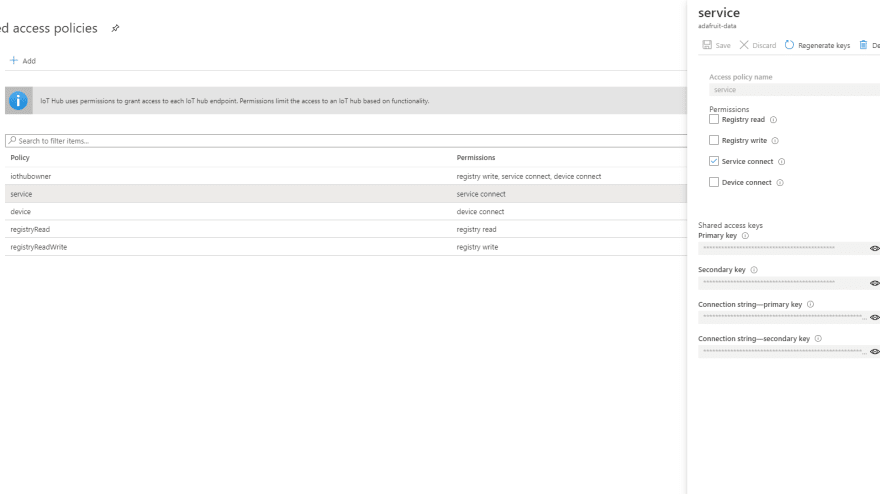
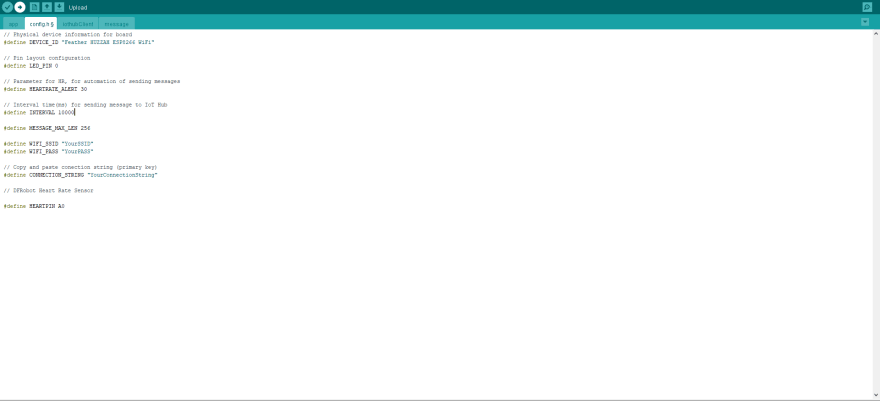
You should already have the ESP8266 driver installed (link above) and Arduino IDE (also linked above) ready to go. The first thing you need to do, is open up the Arduino IDE and open up the files linked in the GitHub. Once the files have been opened, you should see a file called config.h. In there, you should change the following: your WIFI SSID, WIFI PASS, and CONNECTION STRING. Your SSID and PASS are just the username and password for your home Wi-Fi. Make sure your internet doesn't have any extra steps (for example. account login or redirect) To find your connection string, you must create an Azure IoT Hub. It's pretty simple but if you have trouble, check out this helpful article. Once you have created an IoT Hub, follow these steps to find your connection string. Go to the Azure Portal and find your IoT Hub. On the left side, you should see Shared Access Policies. Then click on Service and you will see four strings. The string titled Connection String -- Primary Key is the one you will want to copy and paste. Make sure you don't share your connection string, it is super important!
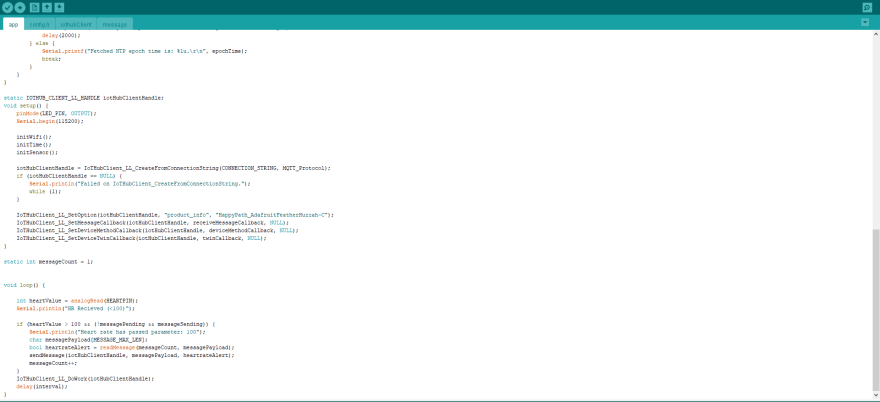
After you have finished configuring your config.h, you should have four different files named config.h, iothubClient.ino, main.ino, and message.ino opened. To flash your program to the ESP8266/Huzzah, verify your code and press the upload button in the top left corner. Before we do this, lets setup the rest of our Azure Applications!
Finalizing Azure Applications
You're on the final stretch! There are only a few more things we need to do. We are gonna start off by creating a Logic App. Azure Logic Apps allow us to use triggers to call actions like reading an email, interacting with a database, and most importantly, sending a text message. The first step is to create our own logic app. Follow this tutorial until you have to set a trigger. For our project, we will be using an HTTP Request. An HTTP request is just a format for request and responses between a client and a server. In simple words, it does magic to connect things together.
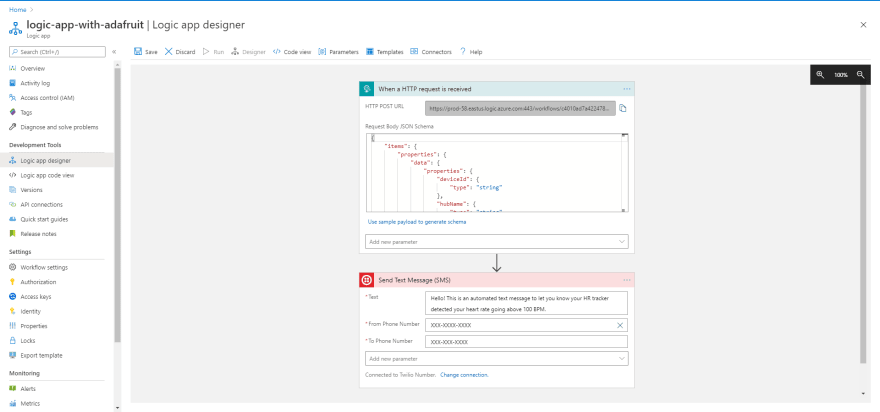
Once your logic app is setup, go to the logic app designer and create a new trigger. You should see the trigger When a HTTP request is recieved. After selecting it, you will see a box for Request Body JSON Schema. In the GitHub repo, you should see a folder called JSON. Open up the file called package.json and copy the code. Then click the blue text called use sample payload to generate schema. Paste the code and press done. If you get an error, try using the backup.json file. Next, create an action for your trigger. For this project, we need to use an API called Twilio. Twilio is a messaging API that allows us to send SMS messages when our HTTP request is triggered. If you have any trouble making an account and linking your ID and TOKEN, follow this tutorial.
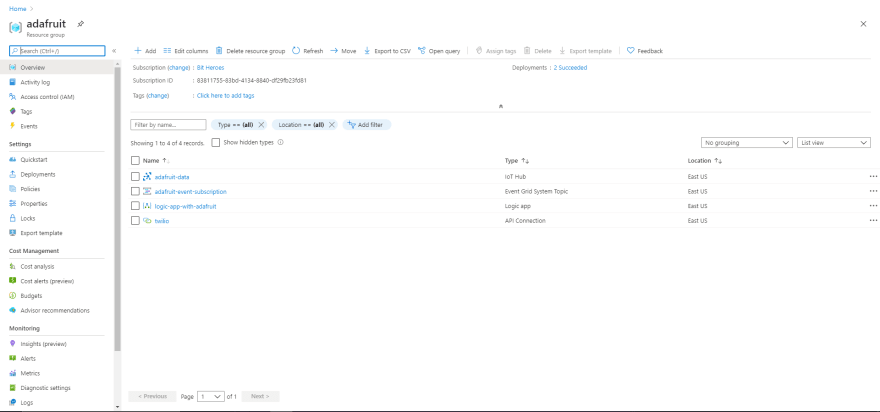
If everything went smoothly, you should now have a fully functional Azure Logic App that sends an SMS when an HTTP request is triggered! Lastly, we need to create an event subscription in our IoT Hub. This basically monitors incoming data and reacts to it. In this case, we want it to trigger the HTTP request using a webhook. Before we setup the event subscription, we need the HTTP Post URL. You can find this by opening your Logic App Designer and clicking on your trigger. Copy the link at the top and save it for later! Return to the Azure Portal and locate your IoT Hub. Once you're in your IoT Hub, go to Events and click New Subscription. Create a name, make sure the Event Schema is set to Event Grid Schema, and the filter is set to Device Telemetry. For the final step, set the Endpoint Type to Webhook and paste in the link you copied earlier. When you are finished, press Create. Congratulations, you finished. Flash your Huzzah, do some jumping jacks, and give yourself a huge pat on the back!


Top comments (0)