
Now that you have completed setting up your Mini City in HTML and CSS, have you ever wondered what your Mini City would look like at night? Let's create a day-to-night color palette change by adding buttons with JavaScript! JavaScript is a programming language that is used to create interactive designs, such as buttons, pop-up windows, and so on, and brings user interaction to web development projects.
In this tutorial, you will learn how to do the following:
Create buttons with HTML
Stylize elements with CSS
Add interactivity with JavaScript
Setting Up Elements in HTML and CSS
HTML Code
Before we start incorporating interactivity into our Mini City with JavaScript, we first need to set up these elements by adding to our HTML code.
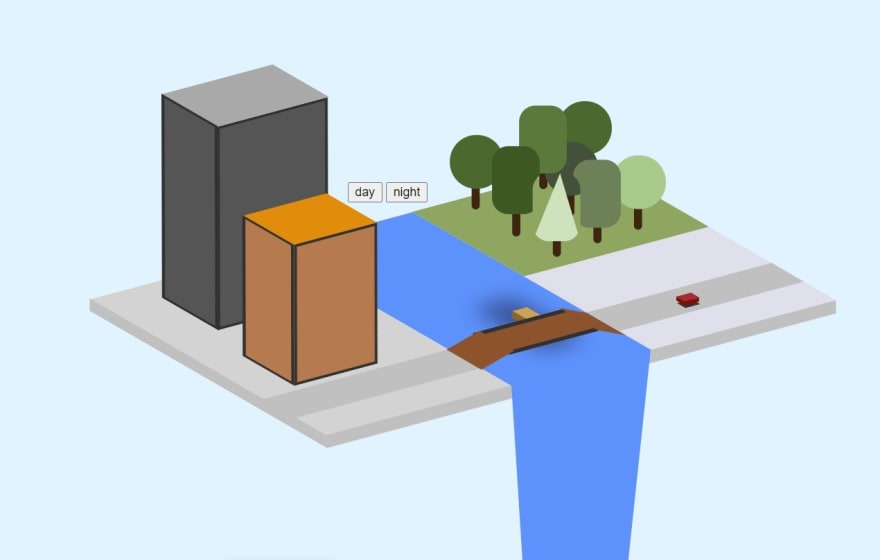
In order to switch from a daytime to nighttime color palette, we will create two clickable buttons, labelled "day" and "night", that will allow us to select the desired setting. To do this, we will add a set of <button></button> tags for each button in the body element:
...
<!--HTML-->
  <body>
    <button>day</button>
    <button>night</button>
...
To prepare for our planned color changes, we need to assign an id attribute for each element that is involved, and this allows these elements to be stylized in CSS and manipulate in JavaScript.
To create a sun that can change into a moon for our Mini City, we will add a <div> element with an id named "sun". To change the color of the sky, we must access the background-color attribute of the body element, so we will set up an id named "body". Add the following lines of code to the body element:
...
<!--HTML-->
  <body>
    ....
    <div id = "sun"></div>
    <body id = "body"></body>
...
This is what our completed additions to the HTML code should look like:
...
<!--HTML-->
  <body>
    <button>day</button>
    <button>night</button>

    <div id = "sun"></div>
    <body id = "body"></body>
...
This is what our Mini City should look like so far:
CSS Code: Sun and Moon Elements
Now that we have set up our elements in HTML, we can start adjusting and stylizing them in CSS.
For our sun element, we will be adding a #id selector into our CSS code:
...
<style TYPE="text/css">
    ...
    #sun {

    }
</style>
...
This kind of selector accesses the element that has the id listed after the hashtag, so whatever we add in this selector will affect the sun element, which we declared in our HTML code.
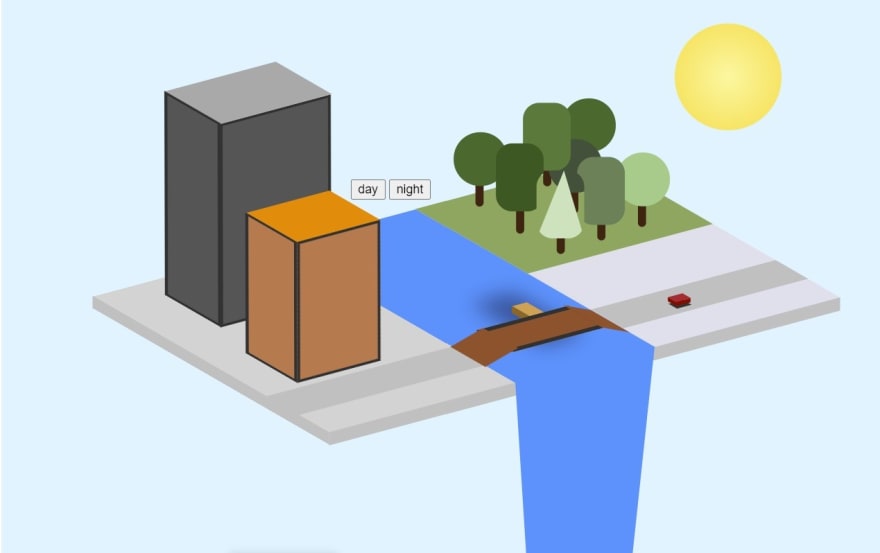
For our #sun selector, we will first create the shape and color of the sun using the following attributes:
...
#sun {
    width: 115px;
    height: 115px;
    border-radius: 50%;
    background: radial-gradient(#FFF89E, #FFDE45);
}
...
With our width and height attributes having the same length, the default shape that will be created is a square. The border-radius attribute defines the radius of the sun's corners, and setting this attribute to 50% will create a perfect circle. Then, in the background attribute, we can determine the color of our sun by using the radial-gradient function, which creates a gradual transition of colors — the first declared color (light mellow yellow) will be the color at the center of the sun, and the second color (brighter warm yellow) will be the color along the edge of the sun.
Then, we will determine the location of the sun by adding the following attributes:
...
#sun {
    ...
    position: absolute;
    left: 350px;
    bottom: 75px;
}
...
Similar to the other elements in our Mini City, we will declaring the absolute value to the sun's position attribute, which allows the element to move along with the webpage's document body. The left attribute affects the element's horizontal position by pushing the sun more to the side, and bottom attribute affects the element's vertical position by lifting the sun upwards.
This is what our sun should look like in our Mini City:
In preparation for our day-to-night change, we can also create our moon element by using the same code template we have for our sun element:
...
#sun {
    ...
}

#moon {
    position: absolute;
    left: 350px;
    bottom: 75px;
    width: 115px;
    height: 115px;
    border-radius: 50%;
    background: radial-gradient(#D3D3D3, #555AA6);
}
...
For our moon, we will use a new selector labelled #moon and change the colors in the radial-gradient function — the color at the center of our moon will be a light cool gray, and the color at the edges will be a dark grayish violet.
At this point, we will not be able to view our moon element because we have not declared a <div> element for it in our HTML code. We do not need to declare this because will only be switching back and forth between these two selectors, which we will code in JavaScript later on.
This is what our completed #sun and #moon elements should look like:
...
#sun {
    position: absolute;
    left: 350px;
    bottom: 75px;
    background: radial-gradient(#FFF89E, #FFDE45);
    width: 115px;
    height: 115px;
    border-radius: 50%;
}

#moon {
    position: absolute;
    left: 350px;
    bottom: 75px;
    width: 115px;
    height: 115px;
    border-radius: 50%;
    background: radial-gradient(#D3D3D3, #555AA6);
}
...
CSS Code: Day and Night Buttons
To start stylizing our buttons' properties, we will be adding a button selector into our code:
...
<style TYPE="text/css">
    ...
    button {

    }
</style>
...
This selector accesses all <button> elements declared in the HTML code, which are our day and night buttons.
First, we will adjust the color and position of our buttons with the following attributes:
...
button {
    position: relative;
    top: -40px;
    right: -360px;
    background-color: #FFFFFF;
}
...
By setting the position attribute to relative, this will allow us to adjust the location of the buttons from their "normal" position, which is the center of the webpage, using the top and right attributes — the values that we inputted will move buttons to the area below our sun. We will also set the buttons' color to white using the background-color attribute.
Then, we will add a border to our buttons by adding the following attributes:
...
button {
    ...
    border-style: solid;
    border-width: 2px;
    border-color: #FF8080;
    border-radius: 10px;
}
...
For all the border properties to show up, the border-style attribute first must be set. Above, we set our buttons' borders to solid that will result in a solid colored border. Feel free to experiment with different kinds of borders from this CSS Border Styles list. As for the additional border attributes, border-width andborder-color adjust the border's thickness and color, respectively, and border-radius adjusts the roundness of the corners of the border — this particular property allows up to four values, each value accessing each corner of the element.
Finally, we will change the font of the text of our buttons with the last two following attributes:
...
button {
    ...
    font-size: 15px;
    font-family: "Consolas";
}
...
The font-size attribute will adjust the size of the buttons' font. Also, feel free to customize your buttons' font by testing out fonts from this CSS font list and setting it to your font-family attribute. You can also add additional attributes, such as font-style and font-weight, to stylize your buttons even more.
This is what our completed button element should look like:
...
button {
    position: relative;
    top: -40px;
    right: -360px;
    background-color: #FFFFFF;

    border-style: solid;
    border-width: 2px;
    border-color: #FF8080;
    border-radius: 10px;

    font-size: 15px;
    font-family: "Consolas";
}
...
This is what our Mini City should like so far:
Adding Interactivity with JavaScript
JavaScript Code
In order to be able to code in JavaScript in our HTML file, we will insert a set of <script></script> tags into the body element of our HTML code, underneath the code we added above:
...
<!--HTML-->
  <body>
      <button>day</button>
      <button>night</button>

      <div id = "sun"></div>
      <body id = "body"></body>

      <script>
      </script>
...
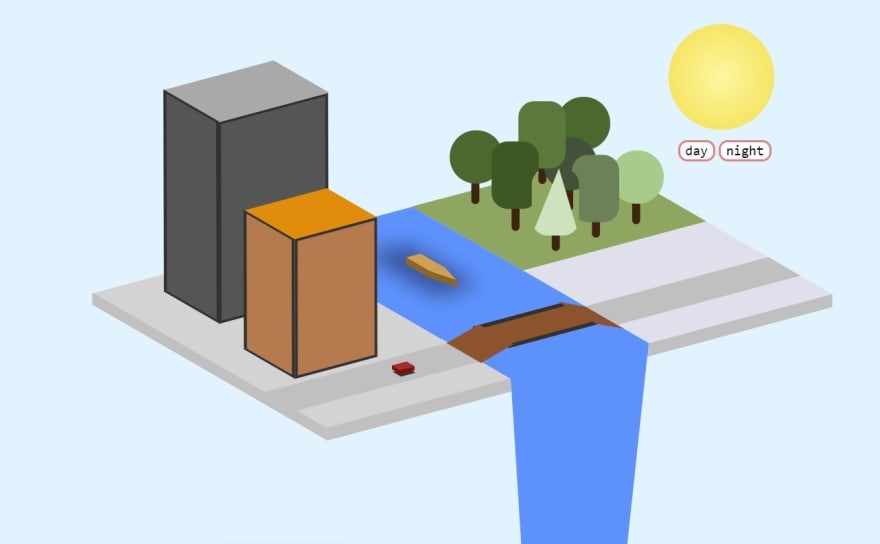
If we want to manipulate the colors of the sun/moon element and the background, we must retrieve our sun and body elements, respectively, by calling on their id.
To do this, we will declare a var or variable — circle for the sun element and sky for the body element — and then access each element by using the document method getElementById():
...
<script>
    var circle = document.getElementById("sun");
    var sky = document.getElementById("body");
</script>
...
Since we already established the moon element for our planned color palette change, we should also choose the color we want our night sky to be.
To do this, we will create an array named colors that will contain the color of our daytime sky and nighttime sky:
...
<script>
    var circle = document.getElementById("sun");
    var sky = document.getElementById("body");
    var colors = ["#D5F3FE","#343F8A"];
</script>
...
The first color in the array is our default daytime color, which is the light blue that we currently set, and the second color is for our nighttime color palette, which is a dark cool blue.
Now, to set up our day and night color palettes, we will set up two functions labelled day and night:
...
<script>
    ...
    function day() {

      }
    function night() {

      }
</script>
...
For each function, we will need to establish two changes: one for our sun-to-moon switch, and another for our day-to-night color change.
To display our sun during the day and our moon at night, we will retrieve information from our #sun and #moon elements by using the setAttribute() method on our circle variable. For the two required parameters, we will set the id of this variable to the sun and moon elements for the day and night color palettes, respectively:
...
function day() {
    circle.setAttribute("id", "sun");
}
function night() {
    circle.setAttribute("id", "moon");
}
...
To set our sky colors for the daytime and nighttime, we will accessing the backgroundColor attribute of the body element through our sky variable by appending .style.backgroundColor to retrieve and manipulate the CSS properties of this variable. Then, we will set this equal to its respective color of the day and night color palettes in our colors array (the index of an array always starts from the number 0, so colors[0] is referring to the daytime color while colors[1] is referring to the nighttime color):
...
function day() {
    circle.setAttribute("id", "sun");
    sky.style.backgroundColor = colors[0];
}
function night() {
    circle.setAttribute("id", "moon");
    sky.style.backgroundColor = colors[1];
}
...
This is what your completed JavaScript code should look like:
...
<script>
    var circle = document.getElementById("sun");
    var sky = document.getElementById("body");
    var colors = ["#D5F3FE","#343F8A"];

    function day() {
        circle.setAttribute("id", "sun");
        sky.style.backgroundColor = colors[0];
      }
      function night() {
        circle.setAttribute("id", "moon");
        sky.style.backgroundColor = colors[1];
      }
</script>
...
To tie everything together, we need move back to our HTML code to link our day() and night() functions to our day and night buttons, respectively, by adding the onclick event to each button:
...
<!--HTML-->
  <body>
    <button onclick = "day()">day</button>
    <button onclick = "night()">night</button>
...
Now, you can interact with your Mini City by changing the time of day through the click of a button:

Conclusion
Congrats on adding an interactive color component to your Mini City!
Throughout this tutorial, we designed buttons in JavaScript and learned how to stylize and link these elements in HTML and CSS.
Feel free to add more decorative features to your buttons or implement more actions under the day and night functions to create a more distinct switch between the changing times of the day. Though this blog series may only serve as a very simple introduction to these programming tools, hopefully, this project has sparked your interest and/or built your confidence in web development and design.

Latest comments (1)
Great post, btw I'm currently learning how to manipulate the DOM.
This post was really helpful.