
This is my 6th article on Telegram, the IM platform of my preference. In this article I’m going to introduce about how I wrote the integration tests for my EFB Telegram Master channel — a Telegram interface for EFB, using a userbot-like strategy.
To get started, you need to have a bot ready to be tested, and a Telegram client app key that is registered with your account. While alternative tools are available, we will be using Telethon and PyTest in this article.
What you need
- A Telegram Bot (preferably written in Python) ready to be tested
- A Telegram account (you need that to make a bot anyway)
- Programming skill (you need that too to make a bot anyway)
Steps
Compile a list of features to test
First of all you need to be clear with the design details of your tests:
- What features of your bot you are going to test,
- What actions are involved (send messages, press buttons, etc.), and
- How do you know if the response is as expected.
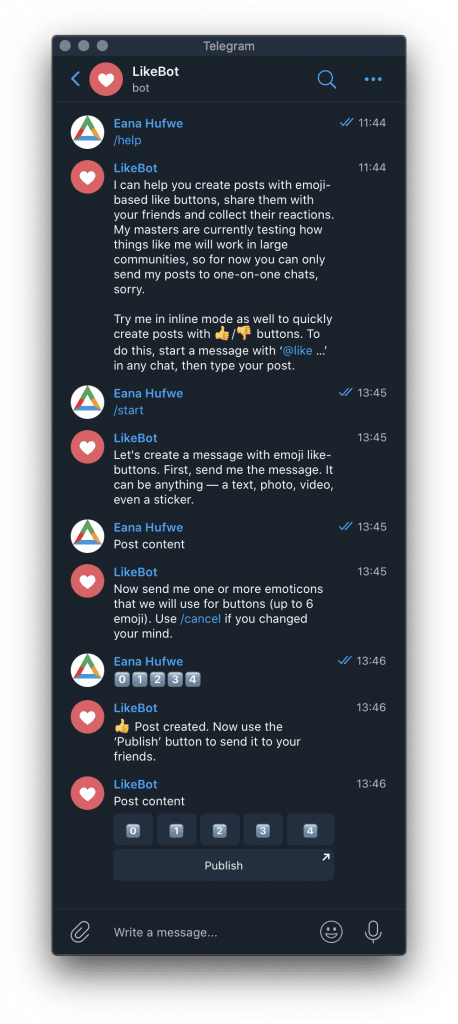
This is simply up to the design of each bot, and it can be drastically different based on the purpose of your design. I’ll use the behavior of the official @like bot as an example here, assuming that we have written a bot identical to it in Python.
Get an API ID
In order to use the MTProto of Telegram as a user, you need firstly register your application with Telegram.
- Sign in your Telegram account with your phone number here. Then choose “API development tools”.
- If it is your first time doing so, it will ask you for an app name and a short name, you can change both of them later if you need to. Submit the form when you have completed it.
- You will then see the
api_idandapi_hashfor your app. These are unique to your app, and not revocable.
Keep your API ID and hash which will be used later to access Telegram through MTProto.
Log in with your account
To use a user account to test a bot, you need to log it in first.
Telethon has provided several different methods to store a login session, with the default being using an SQLite database. It is totally fine if you will only test on your local machine, but if you are going to setup your test on a CI (or any similar automated environments), it could be difficult to store an entire database secretly online, especially for those open source projects. In this case, you can switch to the StringSession option of Telethon to format your session data into a not-so-long string that can be easily fit into an environment variable.
The following code demonstrates how to log in with Telethon and get the string for your login session. While running this code, you will be prompted to enter your phone number, verification code and password (if set).
from telethon.sync import TelegramClient
from telethon.sessions import StringSession

# Your API ID and hash here
api_id = "12345"
api_hash = "0123456789abcdef0123456789abcdef"

with TelegramClient(StringSession(), api_id, api_hash) as client:
    print("Your session string is:", client.session.save())

# Source code taken from https://docs.telethon.dev/en/latest/concepts/sessions.html#string-sessions
Attention
Treat the session file/string, your API ID and hash as your password. Anyone got on hold of these 3 will be able to gain full access to your Telegram account until you revoke it.
Sidenote: do it on a test DC
As we all might have already know, there are a lot of stuff in Telegram, especially those client-related, are not well documented. You might have noticed that when you get the ID and hash for your app, there are 2 IP addresses, one for production server, the other for test server.
Yes, you’re right. There is a separate test environment for Telegram and everyone can use it. If you only have one phone number, and don’t want to risk hitting rate limit on your main account, use a test DC is a good choice.
As the entire server structure is separated, you need to sign up for accounts and create your bots over again. To switch to test DCs, you can use any Telegram Desktop versions, beta versions for Android, iOS and macOS.
- Telegram Desktop: type
testmodeinto the program when no chat is opened. - Android (beta): tap the version number at the bottom of setting screen multiple times
- iOS and macOS (beta): tap the setting icon at the bottom multiple times
Once you are in the test mode, sign in/up with your phone number, then go to @botfather
and create a bot as usual. To access the HTTP bot API, just add /test to the end of your bot token, for example: https://api.telegram.org/bot123456:ABC-DEF1234ghIkl-zyx57W2v1u123ew11/test/getMe. For PTB users, you can just add /test to the end of your token string, and it will work as expected.
If you don’t even want to reveal your test DC session to your CI, there are test phone numbers that everyone can use. Read more about how to use these numbers here. However, these numbers cannot create bots with @botfather , and their data is cleared in a irregular basis. You might need extra effort if your bot involves actions using groups or channels.
Setup PyTest
As Telethon mainly operates in async mode, and PyTest doesn’t support async natively, we need to install pytest-asyncio plugin to add asyncio support to PyTest.
pip3 install pytest-asyncio
Everything else would be rather straightforward, create a fixture and use the session we just got in the previous step.
import pytest
import os
from telethon import TelegramClient
from telethon.sessions import StringSession

# Your API ID, hash and session string here
api_id = int(os.environ["TELEGRAM_APP_ID"])
api_hash = os.environ["TELEGRAM_APP_HASH"]
session_str = os.environ["TELETHON_SESSION"]

@pytest.fixture(scope="session")
def client():
    return TelegramClient(
        StringSession(session_str), api_id, api_hash,
        sequential_updates=True
    )
In order to let the client created to send and receive messages properly, we need to do so some setup and teardown works to it. This can be achieved by turning the fixture function into a generator, yielding a single value, setup before it and teardown after it.
@pytest.fixture(scope="session")
async def client() -> TelegramClient:
    # Connect to the server
    await self.client.connect()
    # Issue a high level command to start receiving message
    await self.client.get_me()
    # Fill the entity cache
    await self.client.get_dialogs()

    yield TelegramClient(
        StringSession(session_str), api_id, api_hash,
        sequential_updates=True
    )

    await self.client.disconnect()
    await self.client.disconnected
Note that this fixture now should be async, as the setup and teardown actions need so.
Test the bot
Now we can start to write tests for the bot. Writing test can be really easy if your bot is expected to work in only one chat at a time. Telethon has provided a Conversation helper class to send and handle updates in a specific chat.
Also, since all operations in Telethon are to be done in async, it is important to mark your test cases as async for it to run properly.
To test a simple command:
from pytest import mark
from telethon import TelegramClient
from telethon.tl.custom.message import Message

@mark.asyncio
async def test_help(client: TelegramClient):
    # Create a conversation
    with client.conversation("@myReplicaLikeBot", timeout=5) as conv:
        # Send a command
        await conv.send_message("/help")
        # Get response
        resp: Message = await conv.get_response()
        # Make assertions
        assert "@myReplicaLikeBot" in resp.raw_text
        assert "👍" in resp.raw_text
        assert "👎" in resp.raw_text
The timeout argument indicates number of seconds each operation should not take longer than, if you want to set an overall timeout for the conversation, use total_timeout. More options are explained in the docs.
To test a continuous command like /start in the example:
from pytest import mark
from secrets import token_urlsafe
from telethon import TelegramClient
from telethon.tl.custom.message import Message
from telethon.tl.message import BotCallbackAnswer

@mark.asyncio
async def test_start(client: TelegramClient):
    # Create a conversation
    with client.conversation("@myReplicaLikeBot", timeout=5) as conv:
        # User > /start
        await conv.send_message("/start")
        # Bot < Let's create a message with emoji like-buttons. First, send
        # me the message. It can be anything — a text, photo, video, even a
        # sticker.

        # Get response
        resp: Message = await conv.get_response()
        # Make assertions
        assert "create a message" in resp.raw_text

        # User > Message body L9b_vp7IV6hVAR5ADsYxYL9w7YPQw-HLlqHopcwf20I
        message = f"Message body {token_urlsafe(32)}"
        # Bot < Now send me one or more emoticons that we will use for buttons
        # (up to 6 emoji). Use /cancel if you changed your mind.
        await conv.send_message(message)
        resp = await conv.get_response()
        assert "emoticon" in resp.raw_text
        assert "6" in resp.raw_text
        assert "/cancel" in resp.raw_text

        # User > 🆗🆒❤🤣
        emojis = ["🆗", "🆒", "❤", "🤣"]
        await conv.send_message(emojis.join(""))

        # Bot < 👍 Post created. Now use the ‘Publish’ button to send it to
        # your friends.
        resp = await conv.get_response()
        assert "👍" in resp.raw_text
        assert "Publish" in resp.raw_text

        # Bot < Message body L9b_vp7IV6hVAR5ADsYxYL9w7YPQw-HLlqHopcwf20I
        # [🆗][🆒][❤][🤣]
        # [Publish]
        resp = await conv.get_response()
        assert resp.raw_text == message
        assert resp.button_count == len(emojis) + 1
        assert [i.text for i in resp.buttons[0]] == emojis
        assert resp.buttons[1][0].text == "Publish"

        # Test reaction
        # Click on button [🆗]
        answer: BotCallbackAnswer = await resp.click(text=emojis[0])
        # Bot gives response > You 🆗 this.
        assert emojis[0] in answer.message
        # Bot (edited) < Message body L9b_vp7IV6hVAR5ADsYxYL9w7YPQw-HLlqHopcwf20I
        # [🆗1][🆒][❤][🤣]
        # [Publish]
        resp = conv.get_edit(message=resp)
        assert "1" in resp.buttons[0][0].text
If your bot does things more complicated than just sending and receiving text messages in a single chat, it would be better to have a helper class to make your life easier. ETM is bundled with a helper class that can handle incoming messages from multiple chats, filtering by various criteria and supports proxies. Test cases in the repo should be sufficient examples on how to use this helper class.
The post How to Write Integration Tests for a Telegram Bot appeared first on 1A23 Blog.

Top comments (2)
I can follow this up until trying to get Telethon/PyTest to use my test bot instead of my live bot. I made a test both that runs on the same code as my live bot, splitting it up by having different .env files on local versus prod and having different Bot tokens in each file. But when I try to log in to the TelegramClient with my test bot token it tells me it's not valid and only accepts my live bot token.
telethon.TelegramClientis for the user account that you use to test against the bot. If you have 2 separate bots on the Production DC (data center), there is nothing to change on the Telethon side. If your test bot is on the Test DC, you need to sign in again with some Test DC-specific arguments. More details on that can be found on Telethon docs.