
RxJS is a framework for reactive programming that makes use of observables, which makes it really easy to write asynchronous code.
According to the official documentation, this project is a kind of reactive extension to JavaScript with “better performance, better modularity, better debuggable call stacks, while staying mostly backwards compatible, with some breaking changes that reduce the API surface.”
It is the official library used by Angular to handle reactivity, converting pull operations for callbacks into observables.
Prerequisites
To be able to follow this article’s demonstration, you should have:
- Node version 11.0 installed on your machine
- Node Package Manager version 6.7 (usually ships with Node installation)
- Angular CLI version 7.0
- The latest version of Angular (version 7)
Confirm that you are using version 7 using the command below, and update to 7 if you are not.
// run the command in a terminal
ng version
Download this tutorial’s starter project here to follow through the demonstrations. Unzip the project and initialize the Node modules in your terminal with this command:
npm install
What are RxJS subjects?
RxJS subjects are observables that also act as observers and provide a platform for data values to be multicasted to more than one observer. An observable can be defined simply as a function that returns a stream of data values to one observer over time.
A subject is a kind of advanced observable that returns values to more than one observer, which allows it to act as a kind of event emitter.

Why are RxJS subjects important?
First of all, it is an observable, so all the methods available for use with observables automatically work with subjects. The additional fact that you can multicast, which means that more than one observer can be set for a subject, is really awesome.
Observables act purely as producers, but subjects can be both producers and consumers, shifting the reach of observables from unicast to multicast. Subjects should be used in place of observables when your subscriptions have to receive different data values. With multicasting, it matches each subscription to its respective observer.
RxJS subject syntax
Inside an Angular project, the syntax for defining an RxJS subject looks like this:
import { Subject } from "rxjs";
ngOnInit(){
const subject = new Subject();
}
Demo
To illustrate RxJS subjects, let us see a few examples of multicasting. If you started reading this post from the start, you will have the starter project open in your VS Code application. Open your app.component.ts file and copy the code below into it:
import { Component, OnInit } from '@angular/core';
import { Subject } from "rxjs";
@Component({
  selector: 'app-root',
  templateUrl: './app.component.html',
  styleUrls: ['./app.component.css']
})
export class AppComponent implements OnInit{
  ngOnInit(){
   const subject = new Subject();

   subject.subscribe({
    next: (data) => console.log('First observer prints '+ data)
   });

   subject.next(1);
   subject.next(2);
   }
}
You’ll see that unlike the observable, which requires a kind of helper module passed to create it, the subject just needs a new subject construct, and with that, you can go ahead and use it just as you would any observable. If you run the app in development with the dev command:
ng serve
You will see that it logs data values just as we’d expect, emulating a fully functional observable. This means that both the error and the complete values can be passed to the observer.
Working with more than one observer
Remember that one of subjects’ main features is their ability to have more than one observer set that can make reference to it. You will see that in action with the same logic as we have above. Copy the code block below into the app.component.ts file:
import { Component, OnInit } from '@angular/core';
import { Subject } from "rxjs";
@Component({
  selector: 'app-root',
  templateUrl: './app.component.html',
  styleUrls: ['./app.component.css']
})
export class AppComponent implements OnInit{
  ngOnInit(){
   const subject = new Subject();
   subject.subscribe({
    next: (data) => console.log('First observer prints '+ data)
   });
   subject.next(1);
   subject.subscribe({
    next: (data) => console.log('Second observer prints '+ data)
   });
   subject.next(2);
   subject.next(3);
   }
}
If you save the file and it recompiles, you will notice that although there are two observers for the subject, the various observers still return data values as expected.
If you notice, the second observer did not receive the very first next value because the subject simultaneously holds and efficiently distributes the values according to scope and definition. This is the beauty of using subjects in RxJS.
Subject variants
There are officially three variants of RxJS subjects. They are:
- Behavior subject
- Replay subject
- Async subject
Behavior subject
The behavior subject is a very special type of subject that temporarily stores the current data value of any observer declared before it. Here is a clear illustration — copy the code below into your app component file:
import { Component, OnInit } from '@angular/core';
import { BehaviorSubject } from "rxjs";
@Component({
  selector: 'app-root',
  templateUrl: './app.component.html',
  styleUrls: ['./app.component.css']
})
export class AppComponent implements OnInit{
  ngOnInit(){
   const subject = new BehaviorSubject(0);
   subject.subscribe({
    next: (data) => console.log('First observer prints '+ data)
   });
   subject.next(1);
   subject.next(2);
   subject.subscribe({
    next: (data) => console.log('Second observer prints '+ data)
   });
   subject.next(3);
   }
}
Here you see that the behavior subject is imported from RxJS, and the new construct must take in an initial value (which was zero in our case). Also, unlike the prior illustration, you see that the very last data value before the new observer was called (the current value 2) was stored and then reported by the new observer even though it was defined after the reference to it.
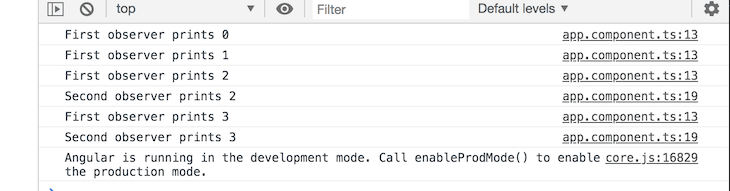
This is exactly what the behavior subject achieves: storing and then passing on the current data value to the new observer.
Replay subject
After viewing the possibilities that comes with the behavior subject variant, any curious person might ask why they can’t store more than the current value. Well, the good news is that with the replay subject, you can. So the replay subject is basically the behavior subject with the option to choose how many values you want to emit from the last observer. Here is a quick example:
import { Component, OnInit } from '@angular/core';
import { ReplaySubject } from "rxjs";
@Component({
  selector: 'app-root',
  templateUrl: './app.component.html',
  styleUrls: ['./app.component.css']
})
export class AppComponent implements OnInit{
  ngOnInit(){
   const subject = new ReplaySubject(2);
   subject.subscribe({
    next: (data) => console.log('First observer prints '+ data)
   });
subject.next(1);
   subject.next(2);
   subject.subscribe({
    next: (data) => console.log('Second observer prints '+ data)
   });
subject.next(3);
   }
}
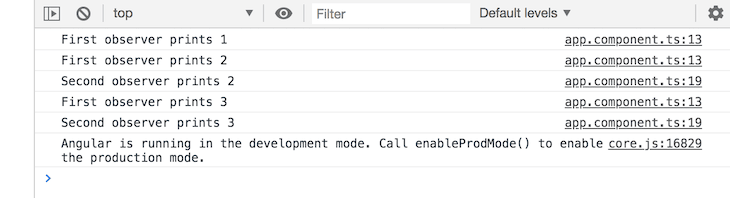
Here it is specified that only one last value be emitted from the last observer, so the output in your browser console should be exactly the same save for the initial log line.
Additionally, this replay subject can take an optional second argument called window time, recorded in milliseconds. It just allows you to time the return.
Async subject
This is the very last variation. It acts exactly the same as the behavior subject but can only execute after a complete method is called. Remember there are three methods that an observable can call: next, error, and complete. So this particular variation emits the very current value only when it sees the complete method call.
import { Component, OnInit } from '@angular/core';
import { AsyncSubject } from "rxjs";
@Component({
  selector: 'app-root',
  templateUrl: './app.component.html',
  styleUrls: ['./app.component.css']
})
export class AppComponent implements OnInit{
  ngOnInit(){
   const subject = new AsyncSubject();
   subject.subscribe({
    next: (data) => console.log('First observer prints '+ data)
   });
subject.next(1);
   subject.next(2);
   subject.subscribe({
    next: (data) => console.log('Second observer prints '+ data)
   });
subject.next(3);
   subject.complete();
   }
}
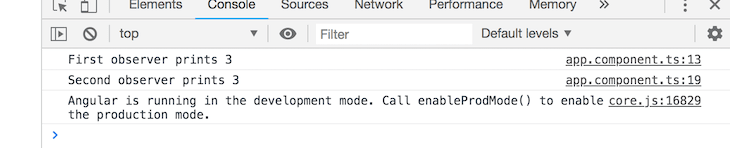
If you run this in your development server, your browser console will look like this:
Conclusion
This is an introductory overview of subjects in RxJS and how important they are in your workflow. There were also illustrations and even explanations of the three variations that subjects come in. Now you can start to use them in your Angular projects — happy hacking!
Plug: LogRocket, a DVR for web apps

LogRocket is a frontend logging tool that lets you replay problems as if they happened in your own browser. Instead of guessing why errors happen, or asking users for screenshots and log dumps, LogRocket lets you replay the session to quickly understand what went wrong. It works perfectly with any app, regardless of framework, and has plugins to log additional context from Redux, Vuex, and @ngrx/store.
In addition to logging Redux actions and state, LogRocket records console logs, JavaScript errors, stacktraces, network requests/responses with headers + bodies, browser metadata, and custom logs. It also instruments the DOM to record the HTML and CSS on the page, recreating pixel-perfect videos of even the most complex single-page apps.
Try it for free.
The post How to use subjects to multicast observers in RxJS appeared first on LogRocket Blog.

Top comments (0)