
Written by Ebenezer Don✏️
React works really well. Its ability to create single-page applications (SPAs) is really groundbreaking, plus the flexibility it provides developers with its open-minded library — unlike opinionated frontend frameworks like Angular — is just phenomenal.
However, with that much flexibility comes a lot of responsibility for frontend developers, which can lead to many bad habits as well as reduced productivity and increased development time for software engineers. Hence the need for an enterprise-class React framework like UmiJS.
Umi provides out-of-the-box tools and plugins to aid rapid development of scalable applications. Coupled with its server-side implementation of routing and content delivery, Umi makes for a really attractive tool for frontend development.

What are server-side rendered (SSR) apps?
SSR apps, unlike SPAs, give browsers the leverage of receiving and displaying HTML content from the server rather than doing all the work of rendering and transforming content from JavaScript files. Alex Grigoryan gives a good breakdown of the benefits of server-side rendering over client-side rendering here.
UmiJS introduction
UmiJS is a scalable, enterprise-class frontend application framework that supports both configuration and conventional routing while maintaining functional completeness, such as dynamic routing, nested routing, and permission routing.
From source code to build products, its complete plugin system supports various function extensions and business requirements. This makes Umi a highly extensible solution for enterprise-class applications.
Umi’s tech stack
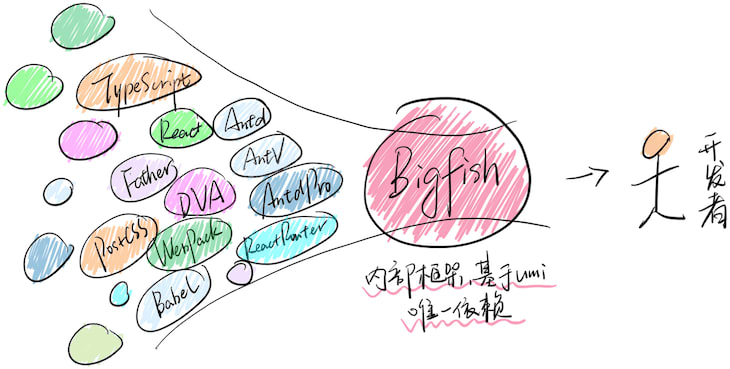
This image from Umi’s documentation is for its internal frame, Bigfish. It’s comprised of technologies and tools that are commonly used for frontend development. These tools, converged, make up Umi.
Constraints
Here are some of Umi’s constraints, which you ought to consider before using it:
- Umi does not support IE 8 or lower
- Umi supports only React 16.8 and above
- Umi supports only Node 10.0.0 and above
- The framework is highly opinionated (although we consider this an advantage for the purposes of this article)
Getting started
Let’s get started by building a simple, two-page Umi app. First, we’ll run the following command on our terminal to ensure we have Node installed:
node --version
If it returns an error message or a version of Node lower than 10, you should head over to Node’s official website to see its installation instructions. Umi recommends that you use Yarn to manage npm dependencies. With Node installed, let’s run this command on our terminal to add Yarn globally:
npm i -g yarn
Next, we’ll confirm that we have Yarn installed by running yarn -v on our terminal.
Scaffolding our project
Let’s create an empty directory for our app by running the following command on our terminal:
mkdir umi-app && cd umi-app
In our new directory and on our terminal, we’ll run the next command to scaffold our Umi app:
yarn create umi
You should get a response similar to this:

You can safely ignore the fsevents warning. As shown in the above image, Umi provides us with five boilerplate types:
- ant-design-pro: This uses ant design’s layout-only boilerplate to scaffold an Umi app
- app: This option will create a simple boilerplate with Umi’s basic functionalities
- block: The block option creates an Umi block
- library: This will scaffold a library boilerplate with Umi
- plugin: For creating an Umi plugin
For the purposes of this guide, we’ll go with the app option by navigating to it and hitting the enter key.
After that is done, you should see a window similar to this:

If you would like to use TypeScript in your Umi app, type y when asked if you want to use it; otherwise, type N. We’ll do without TypeScript for now.
The next set of options presents us with functionalities that Umi provides out of the box:
- Ant Design: An enterprise-class UI design language and React UI library
- DVA: A lightweight frontend framework based on Redux, redux-saga, and react-router
- Code splitting: For chunking our code into bundles to enable dynamic and parallel loading
- DLL: A dynamic link library for bundle splitting to improve build-time performance
- Internationalization: This enables an easy localization of our app for our target audience, depending on their language

We’ll use the arrow keys to navigate through the options and space bar to select. We’ll go with all options for the purpose of this guide. When done, hit the enter key. You should see something similar to this:

Next, we’ll run yarn install on our terminal to install the initial dependencies, and then yarn start to start our Umi app. If that was successful, you should be able to access your application when you navigate to http://localhost:8000 on your browser. Your Umi app should look like this:

Umi’s directory structure
Now that we’ve successfully created our Umi app, let’s open the app directory in our preferred text editor/IDE and examine our folder structure:
.
├── package.json
├── .umirc.js
├── .prettierrc
├── .eslintrc
├── .env
├── webpack.config.js
├── dist
└── src
    ├── assets
    ├── layouts
        ├── index.css
        └── index.js
    ├── locales
    ├── models
    ├── pages
        ├── index.less
        └── index.tsx
    └── app.js
-
package.json– houses the default dependencies that support our Umi app -
.umirc.ts– our app’s configuration file -
.prettierrc– config file for Prettier, an opinionated code formatter -
.eslintrc– config file for ESLint, a JavaScript linter and code analysis tool -
.env– houses our app’s environment variables -
webpack.config.js– config file for webpack, our app’s module bundler -
dist– default location for our build files -
assets– our app’s assets, like images -
layouts– houses our app’s layout module for conventional routing pattern -
locales– config for our app’s internationalization -
models– houses our app’s model files -
pages– all our pages and router entries live here -
app.js– exports our DVA config for dataflow
Components and routing
Our index page can be found in ./src/pages/index.js:
import styles from './index.css';
import { formatMessage } from 'umi-plugin-locale';
export default function() {
  return (
    <div className={styles.normal}>
      <div className={styles.welcome} />
      <ul className={styles.list}>
        <li>To get started, edit src/pages/index.js and save to reload.</li> <li> <a href="https://umijs.org/guide/getting-started.html"> {formatMessage({ id: 'index.start' })} </a> </li> </ul> </div> ); }
You handle components in Umi the same way you would any React component. The formatMessage function imported on line 2 and used on line 11 is Umi’s way of handling internationalization. You’ll find the value for index.start when you navigate to ./src/locales/en-US.js:
export default {
  'index.start': 'Getting Started',
}
Creating pages in Umi
Umi makes creating new pages relatively easy and provides out-of-the box routing for each page it creates. Let’s create a new page named about by running the following command on our terminal:
npx umi g page about
You should get a success message similar to this:

Now, when we open http://localhost:8000/about on our web browser, we should see something similar to this:
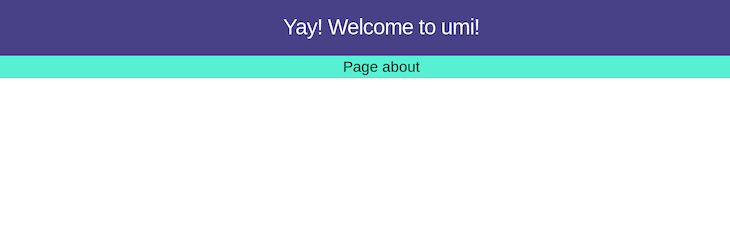
To view and edit our new component, we’ll navigate to /src/pages/about.js:
import styles from './about.css';
export default function() {
  return (
    <div className={styles.normal}>
      <h1>Page about</h1>
    </div>
  );
}
As you may have observed, the new about page still has the message Yay! Welcome to umi! in the navigation bar. This is because it is part of our application’s layout. Let’s explore the layout by adding navigation links for the home and about pages.
First, we’ll navigate to /src/layouts/index.js. Your layout file should contain something similar to this:
import styles from './index.css';

function BasicLayout(props) {
  return (
    <div className={styles.normal}>
      <h1 className={styles.title}>Yay! Welcome to umi!</h1>
      {props.children}
    </div>
  );
}
export default BasicLayout;
The changes we’ll make here will reflect in all our app’s pages. Let’s start by importing the Link component for page navigation. In regular React, we would normally import this component from the react-router-dom. However, we’ll be using umi/link, which comes with Umi by default for managing component navigation:
import Link from 'umi/link';
import styles from './index.css';
...
Next, we’ll use it in our BasicLayout component. Let’s add the following code block under the title:
<Link to="/">Home </Link> |
<Link to="/about"> About</Link>
Finally, we should have this in our BasicLayout component:
import Link from 'umi/link';
import styles from './index.css';

function BasicLayout(props) {
  return (
    <div className={styles.normal}>
      <h1 className={styles.title}>Yay! Welcome to umi!</h1>
      <Link to="/">Home </Link> |
      <Link to="/about"> About</Link>
      {props.children}
    </div>
  );
}
export default BasicLayout;
Once we save our new changes, Umi will automatically recompile our application with the new changes and reload the app in our browser. Now, when we go back to our open app in our browser, we should see something that looks similar to this:

Now we can navigate between the different components by clicking on either the Home or About buttons.
Conclusion
In this article, we’ve covered the basics of UmiJS by building a simple two-page app. Umi’s approach to building frontend React applications is relatively easy when compared to the default method of using create-react-app. With its highly scalable and complete plugin system that eases the development of enterprise-class applications, it is a really good choice for frontend development.
Full visibility into production React apps
Debugging React applications can be difficult, especially when users experience issues that are difficult to reproduce. If you’re interested in monitoring and tracking Redux state, automatically surfacing JavaScript errors, and tracking slow network requests and component load time, try LogRocket.

LogRocket is like a DVR for web apps, recording literally everything that happens on your React app. Instead of guessing why problems happen, you can aggregate and report on what state your application was in when an issue occurred. LogRocket also monitors your app's performance, reporting with metrics like client CPU load, client memory usage, and more.
The LogRocket Redux middleware package adds an extra layer of visibility into your user sessions. LogRocket logs all actions and state from your Redux stores.
Modernize how you debug your React apps — start monitoring for free.
The post Rapid, enterprise-class development with UmiJS appeared first on LogRocket Blog.

Top comments (0)