
I'm hosting an event for our Rainbow Stack ERG (employee resource group for LGBTQIA+ members and allies), and I wanted to make it feel like a real conference. The event is several members who have agreed to give talks about things that are meaningful to them that the rest of the group would find interesting!
I'm super excited about the event and wanted to make the speakers feel special, and also use my developer skills to make it better. So, I created a single page app with multiple tabs showing information about the event, and thanks to EUI (Elastic UI), it turned out AMAZINGLY and wasn't hard to build at all!

Want to check it out in action? Here's the live version.
I wanted to share how it works, how I built it, and how you can use it too if you're hosting an event or conference!
Ps - If you prefer to watch, scroll the bottom and you can watch me go through this in my YouTube video!
Features
So, yes. It renders data. Nothing too terribly fancy on that front. But I did work in a few cool things that I'm particularly proud of and hope provide utility for others.
Convert time to local timezone
Use the button on the talks page to change the timezone.

It was actually much easier to make than I thought it would be, thanks to Moment.
Here's how to implement something like this:
const moment = require("moment-timezone");
// Get the users local timezone
const getLocalTimezone = () => {
return Intl.DateTimeFormat().resolvedOptions().timeZone;
};
export const showTime = (timestamp, checkTime) => {
let localTime = moment.tz(timestamp, getLocalTimezone());
let estTime = moment.tz(timestamp, "America/New_York");
// return the correctly formatted time zone by passing the state
return checkTime ? estTime.format("h:mm a z") : localTime.format("h:mm a z");
};
```
### Create rainbow letters
This takes a string and array of colors and creates one big span with individual spans of colorful letters!

Here's how to implement this.
```
export const makeRainbowText = () => {
const colors = [
"#FF1616",
"#F7B012",
"#FFDE59",
"#7ED957",
"#38B6FF",
"#CB6CE6",
"#8C52FF",
"",
"#FF1616",
"#F7B012",
"#FFDE59",
"#7ED957",
"#38B6FF",
];
const letters = "RAINBOW STACK".split("");
const rainbowedLetters = letters.map((letter, index) => {
return (
<span style={{ color: `${colors[index]}`, fontFamily: "Inter" }}>
{letter}
</span>
);
});
return (
<span>
<strong>{rainbowedLetters} SUMMIT</strong>
</span>
);
};
```
### Inject `Speaker` object details into a field in the `Talks` Array
I wanted to be able to show the speaker details, such as name and avatar, as a field on talk object, so I created a function to grab the whole speaker object by looking up the name of a speaker.
While I could have simply added the `speakerName` and `speakerAvatar` fields to each talk, that felt like way too much duplication and then if those things changed, I'd have to change in both places. This was more fun :)
```
const findSpeaker = (name) => {
return speakers[speakers.findIndex((speaker) => speaker.name === name)];
};
```
And then I just use that function in my `speaker` field for each talk, which returns the whole speaker object to get what I need from it in the render.
```
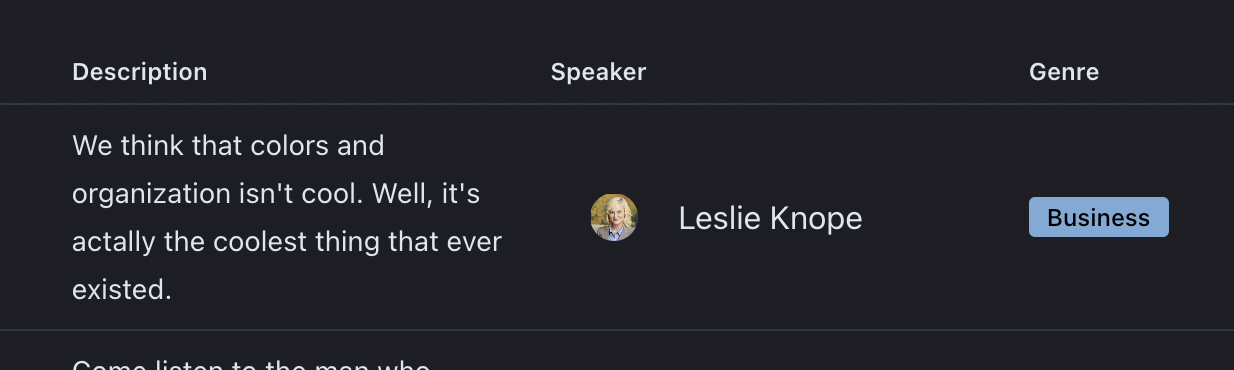
{
sessionDate: "Sept 8th",
sessionTime: "2022-09-08T20:00:00.000Z",
title: "Making Color Coding Cooler",
description:
"We think that colors and organization isn't cool. Well, it's actually the coolest thing that ever existed.",
genre: "Business",
speaker: findSpeaker("Leslie Knope"),
},
```
Here's how I reference it in the render for that field/column.
```
{
field: "speaker",
name: "Speaker",
render: (speaker) => (
<>
<EuiAvatar
imageUrl={speaker.avatar}
size="s"
name={speaker.name}
className="xMargin"
/>
<EuiText>{speaker.name}</EuiText>
</>
),
},
```
So those are the exciting features and how it works, but here's a little more about under the hood how this site is put together.
## How It Works
I spun up a quick site with `create-react-app`, and then [added Eui](https://elastic.github.io/eui/#/guidelines/getting-started) to it so that I can quickly access components, rather than needing to build a bunch of things out of the box. This is probably my favorite thing about Eui - there's so much built out of the box that lets me get up and running quickly, but you can easily customize so many things about it.
### Main Page
This is my layout component:
```
<EuiPage paddingSize="none">
<EuiFlexGroup className="eui-fullHeight">
<EuiPageBody panelled>
<Navbar tabs={tabs} />
<EuiPageContent
hasBorder={false}
hasShadow={false}
paddingSize="none"
color="transparent"
borderRadius="none"
verticalPosition="center"
horizontalPosition="center"
>
<EuiPageContentBody>{showSelectedContent()}</EuiPageContentBody>
<EuiSpacer size="l" />
</EuiPageContent>
<BottomBar />
</EuiPageBody>
</EuiFlexGroup>
</EuiPage>
```
Eui has a page component that I can add children to. I added a NavBar, made the body a panel with tabs (and details about those tabs, like content to show, ids, and `onClick` actions, which I used to set the state which then renders the correct tab content.)
### NavBar
Simple `EuiPageHeader` component that I just plug in an icon, title, and any elements I want, like buttons.
```
<EuiPageHeader
restrictWidth
iconType={rainbowCluster}
pageTitle={makeRainbowText()}
rightSideItems={[
addCalButtons(sessionTwo.dateAndTime, sessionTwo.calendarLink),
addCalButtons(sessionOne.dateAndTime, sessionOne.calendarLink),
]}
tabs={props.tabs}
/>
```
I actually created my own functional component that returns a `EuiButton` when I pass a link and date. Not a very complicated function, and you could maybe argue it wasn't necessarily but since I referenced these buttons in a couple places, it felt right.
```
export const addCalButtons = (date, calendarLink) => {
return (
<EuiFlexItem component="span">
<EuiButton
color="accent"
fill
iconType="calendar"
href={calendarLink}
target="_blank"
>
Save the {date} session
</EuiButton>
</EuiFlexItem>
);
};
```
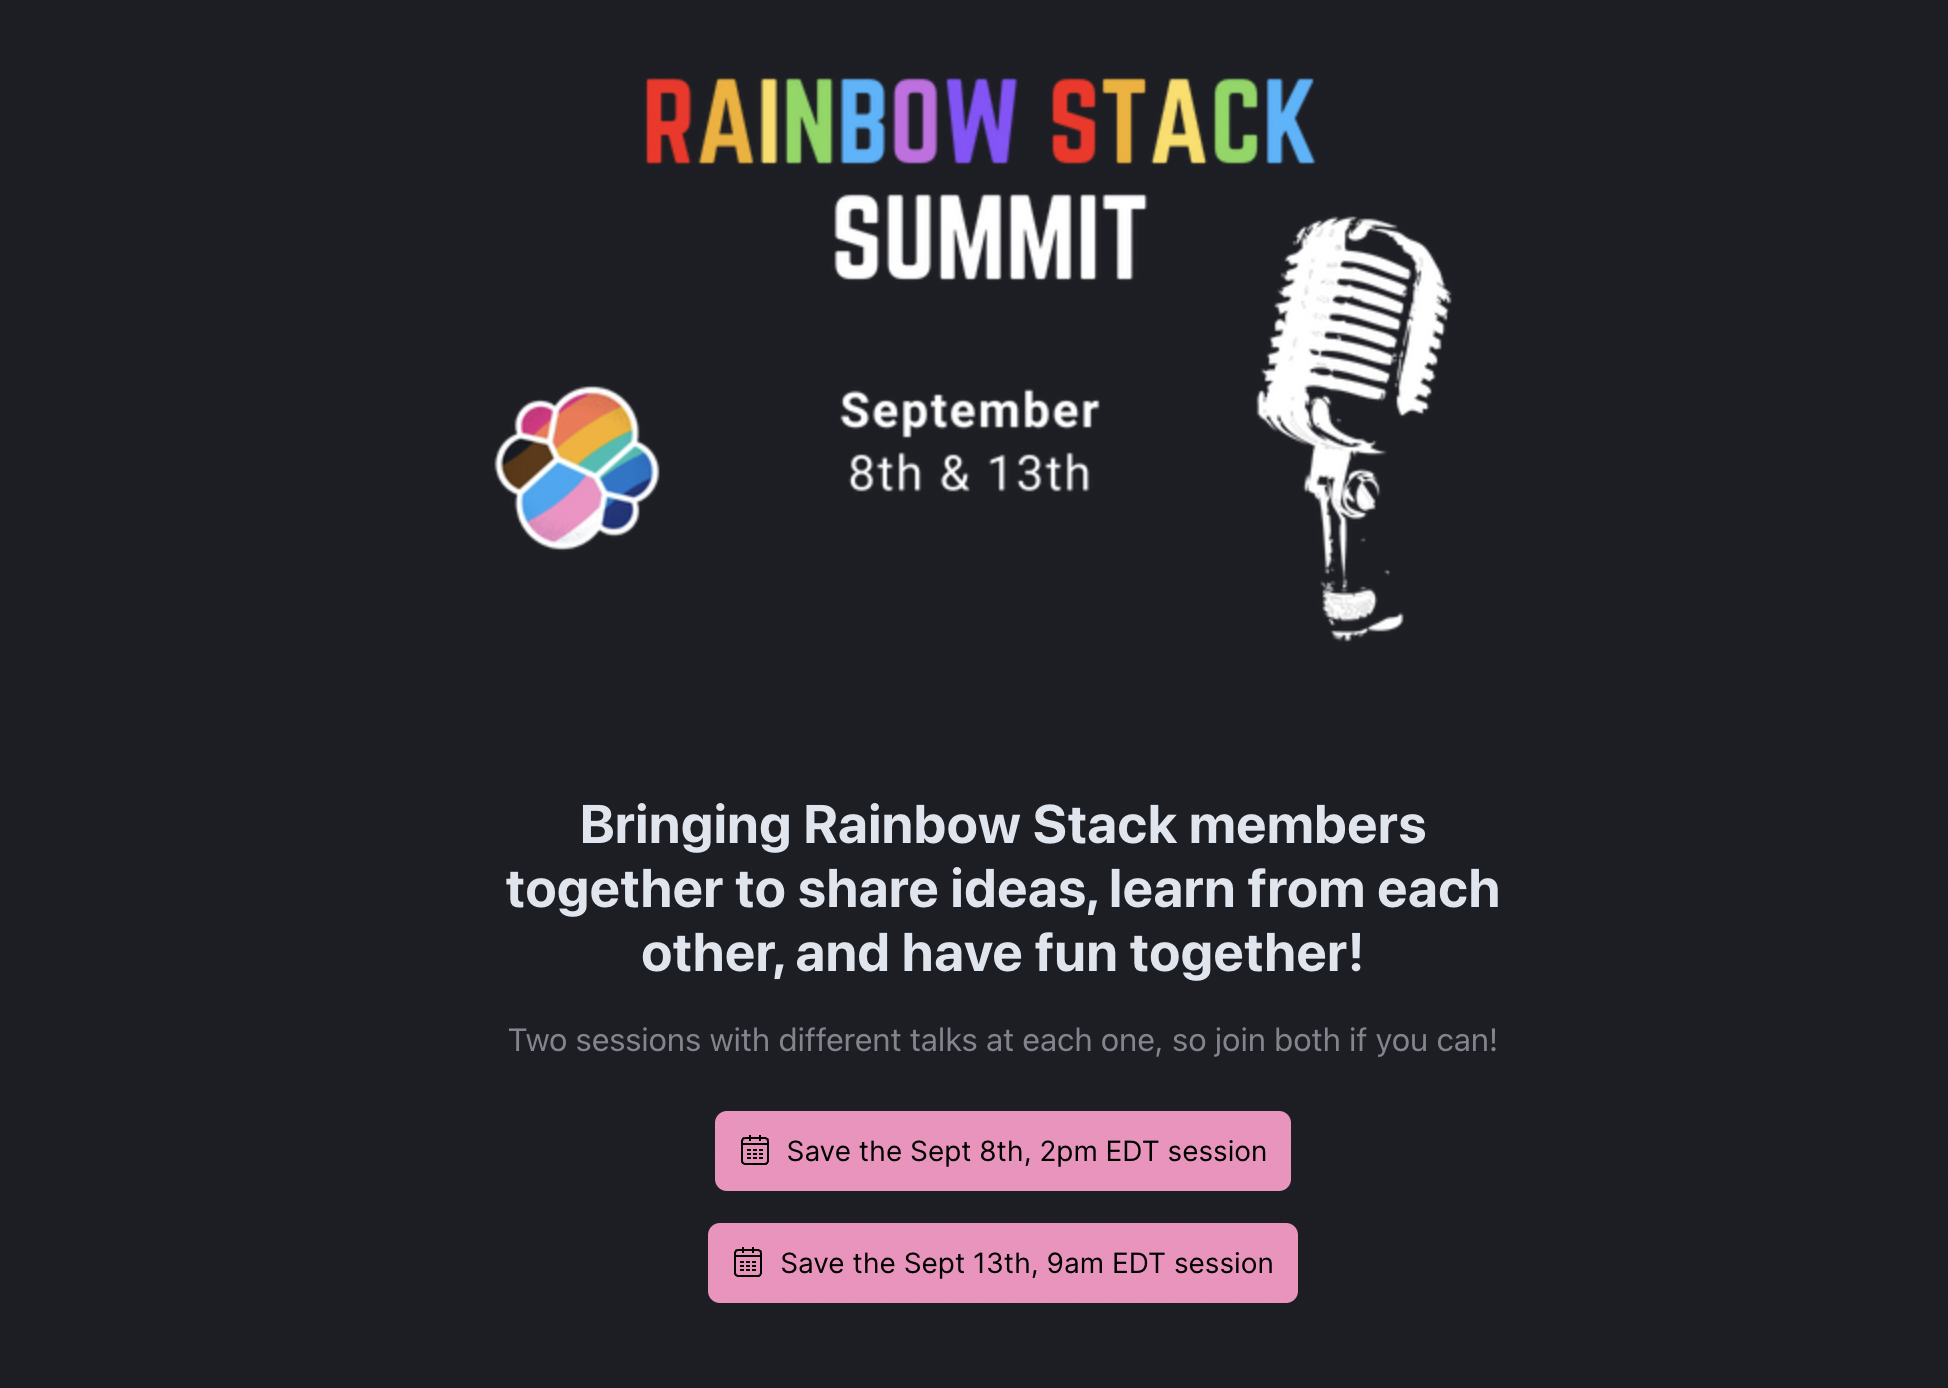
Final product looks like this:

### Panels - Event Details
This one was really straightforward! Just rendered an image as a hero, and then a `EuiEmptyPrompt`, which accepted title, description, and actions, so it was actually just what I was looking for!
```
renderMoreDetails = () => {
return (
<EuiEmptyPrompt
title={
<span>
Bringing Rainbow Stack members together to share ideas, learn from
each other, and have fun together!
</span>
}
body={
<EuiText>
Two sessions with different talks at each one, so join both if you
can!
</EuiText>
}
actions={[
addCalButtons(sessionOne.dateAndTime, sessionOne.calendarLink),
addCalButtons(sessionTwo.dateAndTime, sessionTwo.calendarLink),
]}
/>
);
};
```
Then I stacked that together in a FlexGroup with the image, and viola!
### Panels - Speaker Details
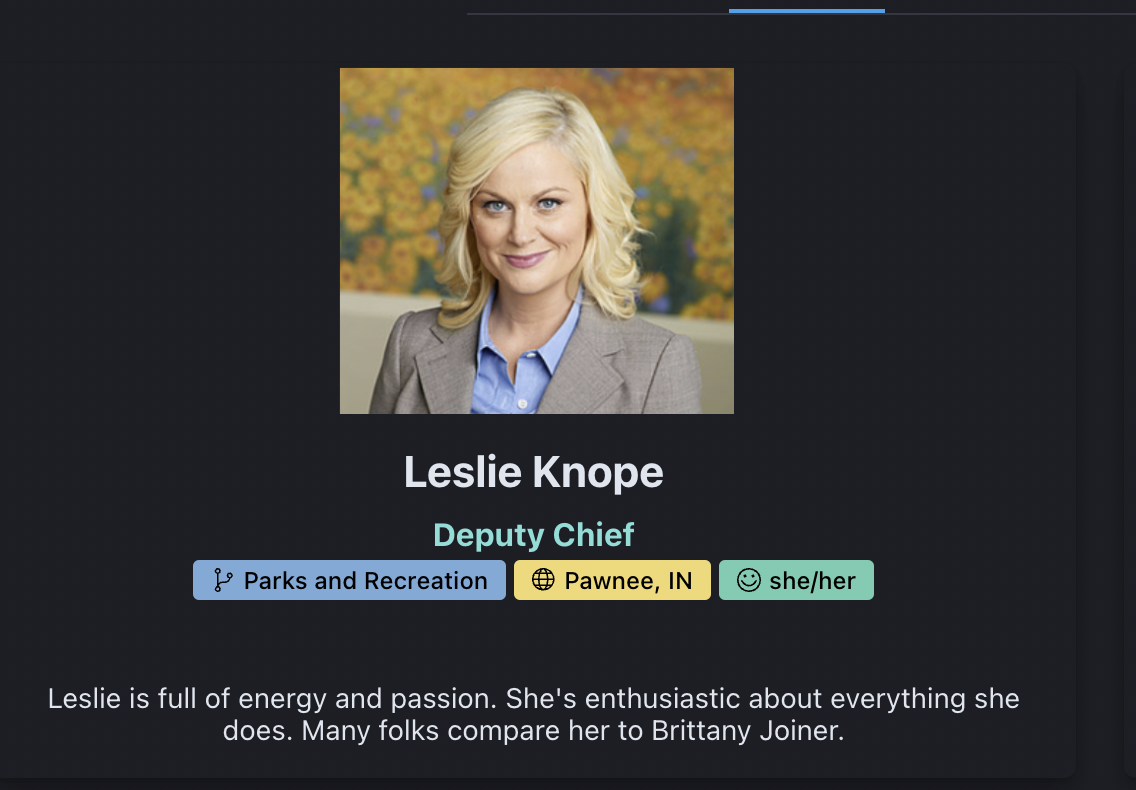
I used the `EuiCard` component to map through my array of speakers and return a styled version of each speaker.
```
renderAllSpeakers() {
return (
<>
{speakers.map((speaker) => {
return (
<EuiFlexItem>
<EuiCard
aria-label={speaker.name}
image={<EuiImage size="m" src={speaker.avatar}></EuiImage>}
footer={speaker.shortBio}
description={
<>
<EuiText color="success">
<strong>{speaker.title}</strong>
</EuiText>
<EuiBadge color="primary" iconType="branch">
{speaker.team}
</EuiBadge>
<EuiBadge color="warning" iconType="globe">
{speaker.basedIn}
</EuiBadge>
<EuiBadge color="success" iconType="faceHappy">
{speaker.pronouns}
</EuiBadge>
</>
}
title={speaker.name}
/>
</EuiFlexItem>
);
})}
</>
);
}
```
I'm REALLY happy with how this turned out!
### Panels - Talk Details
I used the `EuiBasicTable` component to grab an array of Talks and display a row for each object in the array.
Check out [the source code for this file](https://github.com/brittanyjoiner15/eui-event/blob/main/src/components/panels/TalksPanel.jsx) if you want to specific components I used to style specific items, as there are quite a few.
I also added a button so you could change the timezone.

### Bottom Bar
Lastly, I used to `EuiBottomBar` component to create a bar across the bottom that had some custom text and two different buttons.
```
<EuiBottomBar position="static">
<EuiFlexGroup direction="row" alignItems="center">
<EuiFlexItem>
<EuiText>
<h4>Hosted by Elastic's Rainbow Stack ERG </h4>
</EuiText>
<EuiText>Group for LGBTQIA+ members and allies</EuiText>
</EuiFlexItem>
<EuiFlexItem grow={false}>
<EuiButton color="success" fill href="#" target={"_blank"}>
Sign up for updates
</EuiButton>
</EuiFlexItem>
<EuiFlexItem grow={false}>
<EuiButton color="primary" fill href="#" target={"_blank"}>
Join the slack group
</EuiButton>
</EuiFlexItem>
</EuiFlexGroup>
</EuiBottomBar>
```
Nothing too fancy here, but shows the details I need with ideal "CTA"s (Calls to Action). You could use them for joining an email list or subscribing to event updates.

### Deploying
Once I built it and pushed it to GitHub, all I needed to do was go to [Vercel](https://vercel.com/) and hook up the repo to a project and 🎉! She's live!
## How To Use It
Now that you know how it works, time to jump into it! Whether you want to use it, add features, or learn more about it, here's everything you need.
- **Check out the source code**. I copied some of the code, but it's likely to change and be improved, and there's plenty of parts I left out! If you're trying to learn more about how this works or how to build a simple app, read through it all and clone the repo to get it running locally on your computer! You can view the repo at [brittanyjoiner15/eui-event](https://github.com/brittanyjoiner15/eui-event).
- **Fork and make it your own!** Want to create something like this for an event you're hosting? Just for it and customize the information to be specific to your event, speakers, and talks!
- **Contribute if you have ideas or improvements!** Have ideas on how this could be better? I do too! Please [add an issue](https://github.com/brittanyjoiner15/eui-event/issues) or if you'd like, fork the repo, then open a pull request with your changes! (Let me know if you need any help with it if you've never done that before, I know it can be intimidating at first, but I'm happy to help show you how to do that and make simple changes!)

Top comments (0)