
When I last left off I had just finished the main OS install. Now it's time for the "A" in LAMP, Apache. The "A" represents the "Apache HTTP Server" in the LAMP software stack. Apache will receive requests, process the requests, and then serves up associated web assets via the HTTP (HyperText Transfer Protocol) so that a website is accessible to anyone in the public domain via a simple URL.
[⭕]Linux
[❌]Apache
[❌]MySQL
[❌]PHP
In recent years the LAMP software stack has started to utilize Nginx, or other web servers, in place of Apache. "In June 2013, Netcraft estimated that Apache served 54.2% of all active websites and 53.3% of the top servers across all domains... In June 2014, Apache was estimated to serve 52.27% of all active websites, followed by Nginx with 14.36%." 1
NOTE:: From here on I will be showing commands with my applications name, etcpasswdapp. Be sure to change them to your applications name. By using my applications name this will allow for consistency between the steps and clearer representation of what commands you should be running.
Table Of Contents
Step 1: Install Apache
Step 2: Configuring Apache
Step 2.1: Configuring Name-based Virtual Hosts
Step 2.2: Configuring IP-based Virtual Hosts
Step 2.3: Configuring Port Virtual Hosts
Step 1: Install Apache
To install Apache on a Ubuntu Server OS is super easy.
- Run
sudo apt install apache2to install the Apache HTTP server and a very basic website in the/var/www/htmlfolder. - Run
ifconfigon the server computer to find the IP address of the server and then type it into my browser to confirm the Apache2 landing page is live.
- Mine was something like
192.168.2.43.
- Mine was something like

Now that you have Apache installed it needs to be configured so you can host your own application/website.
{Back to the Table Of Contents}
Step 2: Configuring Apache
To configure Apache you need to set up a "Virtual Host" and there are 3 types of Virtual Hosts available. (If you skipped over it you can refer to my previous definitions post on this.):
- IP-based: meaning that you have a different IP address for every web site, 172.20.30.40 or 172.20.30.50
- Name-based: meaning that you have multiple names running on each IP address, blog1.example.com or blog2.example.com
- Port: meaning that you have multiple ports on one IP address for every web site, 172.20.30.40:8081 or 172.20.30.40:8080
No matter what type of VirtualHost you chose you will need to at least do these steps:
- Make a folder for your site to live in with
sudo mkdir /var/www/etcpasswdapp.- Remember to name the directory the same name as the website that you want to create aby replacing "etcpasswdapp" with your website's name.
- Navigate into the folder with
cd /var/www/etcpasswdapp. -
Add a basic index.html page for testing with
nano index.html.- Mine just says "HiiIiIIiI" so I can see it's working.
<html>
<body>
<p>HiiIiIIiI</p>
</body>
</html>
- Mine just says "HiiIiIIiI" so I can see it's working.
Now navigate into the "sites-available" folder with
cd /etc/apache2/sites-available/.-
Here you will create a copy of the default configuration file "000-default.conf" with
sudo cp 000-default.conf etcpasswdapp.conf.- Don't forget to replace "etcpasswdapp" with your website's name. :)
Now it's time to configure the Virtual Host for your set up. The following 3 sections will show a few different configuration options so take a minute to read over them and choose the best one for your situation.
{Back to the Table Of Contents}
Step 2.1: Configuring Name-based Virtual Hosts
There are two ways to configure the Name-Based Virtual Host depending on if you have a registered domain name, such as "www.example.com", or not.
With a registered domain
If you have a registered domain this tutorial "should" work for you. I say this because I am not able to test this part 100% as I don't have any registered domains.
- Navigate into the sites-available folder with
cd /etc/apache2/sites-available/. - Run
sudo nano etcpasswdapp.confand follow the Ubuntu tutorial for specifics that you will need to change add for your configuration.- If you are setting up a separate frontend and backend, like my set up, I recommend changing the "ServerAlias" to be like
*.etcpasswdapp.comso that it can account for an api address likeapi.etcpasswdaoo.comthat I will be using later for the backend configuration.
- If you are setting up a separate frontend and backend, like my set up, I recommend changing the "ServerAlias" to be like
- Run
sudo a2ensite etcpasswdapp.confto add your site configuration to the enabled sites list. - Run
sudo a2dissite 000-default.confto disable the default configuration site. - Run
sudo systemctl restart apache2to restart the apache service and you should now be able to connect to your registered domain in a browser on your client computer.
Without a registered domain
If your client is a MAC, Linux, or Windows PC, all the above steps will be needed, in addition to the steps below, to allow you to connect to a non-registered domain name to your client computer through its "local hosts". For each client type below you will run the commands above here and then the commands below specific to your client computer type.
▶️For a MAC or Linux client:
- Run
nano /etc/hoststo edit the "hosts" file. - Add a comment of
#VirtualHoststo the bottom of the file so you know which information you added. - Below your comment add
192.168.2.43 etcpasswdapp.comfor each of the web sites your are hosting.- Be sure that you use the IP Address of YOUR server computer and the name of the domain that you want to access from your client computer.
- Save and exit the "nano" editor and your site should be accessible in your client browser with the domain name your chose.
▶️For a Windows client:
This is the process that I used as an Admin on my client computer.
- Open a "File Explorer" and navigate to the "hosts" file located at
C:\Windows\System32\drivers\etc\. - Open the "hosts" file in NotePad.
- Add a comment of
#Virtual Hoststo the bottom of the file. - Add
192.168.2.43 etcpasswdapp.comfor each of the web sites your are hosting.- Be sure that you use the IP Address of YOUR server computer and the domain that you want to access locally.
- Before you can save the "hosts" file go back into the "File Explorer", right-click on the "hosts" file, and view its "Properties".
- If you are not an Admin on your client computer you might need to contact them for this.
- Go into the "Security" Tab.
- Select your User group and "Edit" their permissions for this file.
- Add the ability to "Modify" and "Write" the file and apply the changes.
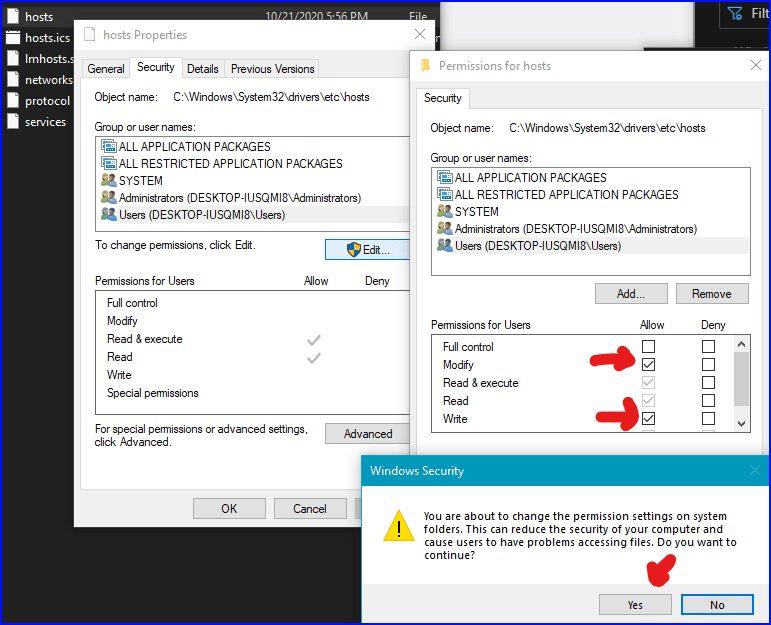
- It will give you a warning here but click "Yes".
- Also, be sure to change your permissions back as you shouldn't need to edit this again and don't want to let anything happen to this file by accident.
- Now you can save the "hosts" file that you edited in NotePad.
If you still have issues accessing your site(s) you might run sudo systemctl restart apache2 on the server computer to restart the apache service again or you might need to restart your client computer. Whichever client computer you have this should change your new landing page to your sample "index.html" page. 
{Back to the Table Of Contents}
Step 2.2: Configuring IP-based Virtual Hosts
This configuration will work to set up temporary "IP aliasing" for testing multiple IP addresses on a servers single NIC and will automatically be deleted once the system reboots.
For this configuration to work permanently you need to either have multiple NICs (Network Interface Cards) or be able to configure virtual NICs on the server computer. Both of which are beyond the scope of this blog, but the basics of how to configure a IP-based VirtualHosts, assuming you have one of the mentioned set ups, you will be doing some of the steps as the Name-based VirtualHosts setup as well as adding an IP address into your configuration (See Step 4 below as it's second part is this configuration step) so the NICs knows where to direct traffic.
- Run
ifconfigon the server to check what your ethernet connections name is and what IP address it is using.- On my server I currently have a local IP of "192.168.2.43/24" and I named it "EtherNetBond0" when I installed the Ubuntu Server OS.
- Run
sudo ip addr add 192.168.2.44/24 dev EtherNetBond0to create a new IP alias for this Network Interface.- Note: that you can really choose any number for the 4th octet on the IP address as long as it is not being used by another device on you network.
- Navigate into the "sites-available" folder with
cd /etc/apache2/sites-available/. - Run
sudo nano etcpasswdapp.confand follow the Ubuntu tutorial for specifics that you will need to change add for your configuration. - While still editing the conf file for the application that you want to access through a different ip address be sure to change its
<VirtualHost *:80>to<VirtualHost 192.168.2.60:80>.- The
*represents what IP addresses will be used to connect the site on the server. Changing*:80to192.168.2.60:80will enable the separation of IP address connections of incoming traffic on port 80 and allow for more VirtualHost connections through different IP addresses on the server.
- The
- Run
sudo a2ensite etcpasswdapp.confto add your site configuration to the enabled sites list. - Run
sudo a2dissite 000-default.confto disable the default configuration site. - Run
sudo systemctl restart apache2to restart the apache service. - You should now be able to connect to your website in a browser on your client computer with the IP address you chose.
{Back to the Table Of Contents}
Step 2.3: Configuring Port Virtual Hosts
The configuration of Port Based VirtualHosts is similar to configuring Name-based VirtualHosts but with a port specification and configuration of the UFW (Uncomplicated Firewall).
- Navigate into the "sites-available" folder with
cd /etc/apache2/sites-available/. - Run
sudo nano etcpasswdapp.confand follow the Ubuntu tutorial for specifics that you will need to change add for your configuration. - Now change its
<VirtualHost *:80>to<VirtualHost *:8080>or whatever port your choose.- Becareful not to use a port that is in use or could be in use by choosing a high number or look up what numbers are commonly in use to avoid them.
- Save the file and exit the editor.
- Run
sudo a2ensite etcpasswdapp.confto add your site configuration to the enabled sites list. - Run
sudo a2dissite 000-default.confto disable the default configuration site. - Run
sudo systemctl restart apache2to restart the apache service and set the changes.
Now that the basics are set up you now need to configure the UFW (Uncomplicated Firewall), which should be pre-installed on the Ubuntu server, to allow web traffic to that specific port.
-
Run
sudo ufw app listto look at your UFW application list. It should show 4 available applications: Apache, Apache Full, Apache Secure, and OpenSSH.
Available applications:
    - Apache
    - Apache Full
    - Apache Secure
    - OpenSSH
Run
sudo ufw statusto view your current Apache Full profile status and what pots are open. It should show that it enables traffic to ports 80 and 443.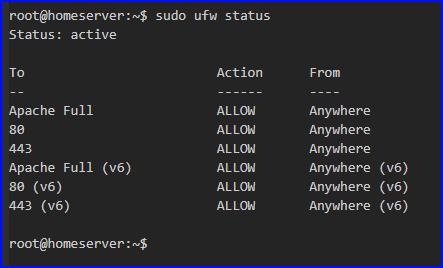
Run
sudo ufw allow in "Apache Full"to allow for incoming traffic for the "Apache Full" profile.-
Now run
sudo ufw allow 8080/tcp(or whatever port you chose to host your application on)- If you run the
sudo ufw statusagain it should now show the port your added.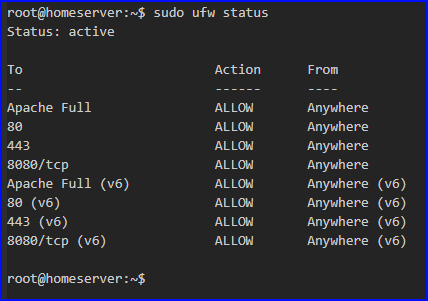
- If you run the
Run
sudo systemctl restart apache2to restart the apache service and you should be able to connect to your registered domain in a browser now.
Couple notes here:
- You might need to add your server IP address to the "hosts" file for this configuration to work, like I did with the Name-Based configuration.
- You cannot add an IP address with a specific port to the "hosts" file and it's not designed for this. If you desire to access your website through a specific port you will need to add the IP address to your "hosts" file and bookmark the specific port in a browser.
- If you want to see the configuration this sets navigate to the "user.rules" and "user6.rules" files with the
cd /etc/ufwand look at the user files with theless user.rulesandless user6.rulescommands.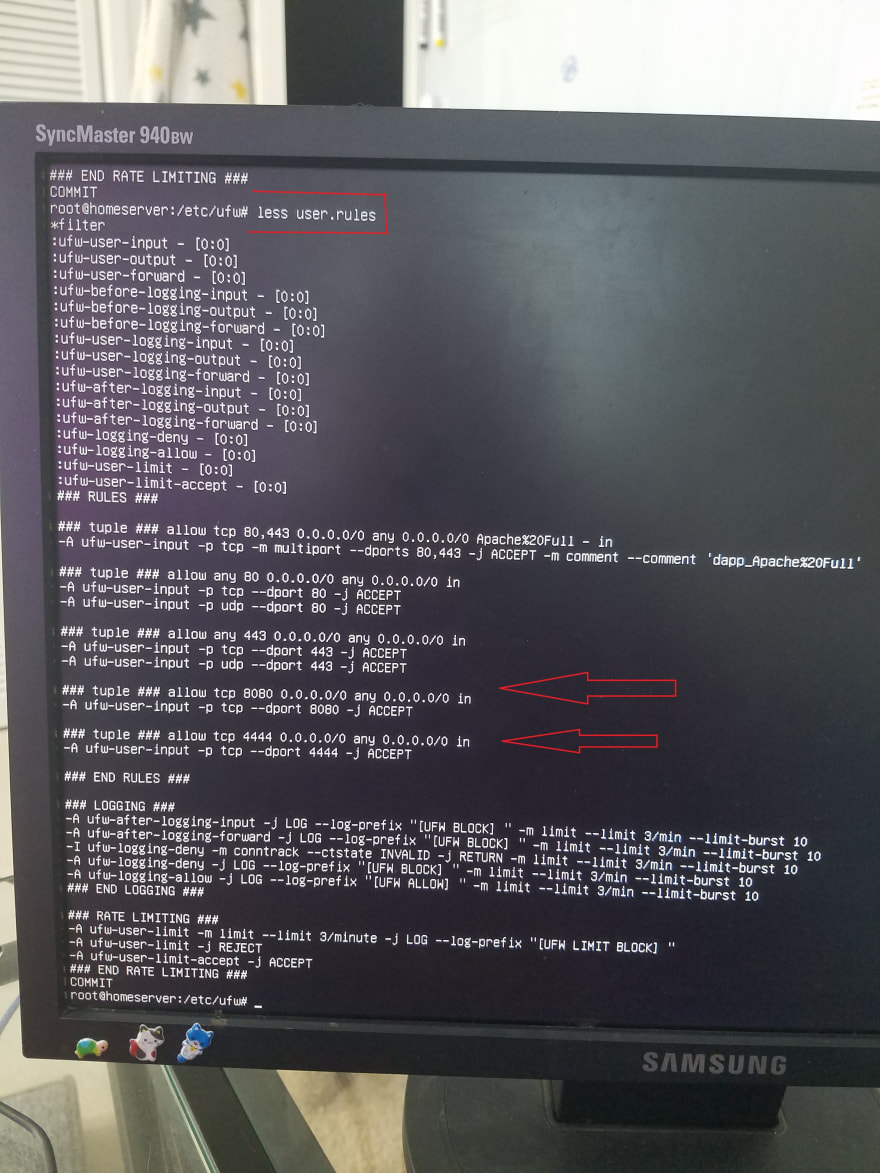

-
lessandcatcommands both read the file butlesswill allow you to scroll through the file if it is too big to fit on the screen.
-
{Back to the Table Of Contents}
Success! Hopefully that worked for you because it's now that Linux and the Apache HTTP server are installed and configured it's time to move onto the database,
[⭕]Linux
[⭕]Apache
[❌]MySQL
[❌]PHP
Happy Hacking

Resources:
1. https://news.netcraft.com/archives/2014/06/06/june-2014-web-server-survey.html
2. https://news.netcraft.com/archives/2013/06/06/june-2013-web-server-survey-3.html
3. https://en.wikipedia.org/wiki/Virtual_hosting
4. http://httpd.apache.org/docs/current/vhosts/
5. https://httpd.apache.org/docs/2.4/vhosts/examples.html
6. https://www.digitalocean.com/community/tutorials/how-to-set-up-apache-virtual-hosts-on-ubuntu-16-04
7. https://wiki.ubuntu.com/UncomplicatedFirewall?action=show&redirect=UbuntuFirewall
8. https://wiki.ubuntu.com/UbuntuFirewallSpec
9. https://stackoverflow.com/questions/8652948/using-port-number-in-windows-host-file

Top comments (0)