Get Started
First we need to create the react application that we want to host on AWS S3. For the simplicity of this tutorial I'll be using the default template from create-react-app
To do this, I'll be using following command.
npx create-react-app s3-hosting-demo
It will create a simple react application with following folder structure that we can use to deploy
For the simplicity of this tutorial I will edit the App.js file a bit. I'll change the default text in the start page.
import logo from './logo.svg';
import './App.css';

function App() {
  return (
    <div className="App">
      <header className="App-header">
      <h1>Hello World</h1>
      <h2>Hosted in s3</h2>
      </header>
    </div>
  );
}

export default App;
This will show following output in the localhost
Now Lets See, How we can host this application on S3 bucket
First login to AWS console . If you don't have an AWS account, you can register as a free tier user
After login, navigate to Amazon S3 service. Your dashboard should looks like this.
Create a new S3 bucket
Click on "Create bucket" button top right corner

Then Give a name to your s3 bucket. In this case I'll name my bucket as blog-demo-react-app. Check on AWS recommended s3 bucket naming rules
Then you need to allow public access to your s3 bucket. To do this, you need to uncheck the checkbox under Block Public Access settings for this bucket.
Then you need to acknowledge the setting by checking the following box.
Finally click on Create Bucket button under the form and your s3 bucket is created.
Add bucket policy
Once the bucket is created we need to add a bucket policy so that content inside our bucket is publicly accessible. To do this we need to navigate to the new s3 bucket just created and click on
Permissions tab.
When scrolled down a bit, we can see the place to edit the bucket policy.
Click on edit button and paste the following policy. Replace <<YOUR_BUCKET_NAME>> with the name of the bucket that you've created. Then click on "Save Changes" button on the bottom to save the policy.
{
    "Version": "2012-10-17",
    "Statement": [
        {
            "Sid": "Stmt1380877761162",
            "Effect": "Allow",
            "Principal": {
                "AWS": "*"
            },
            "Action": "s3:GetObject",
            "Resource": "arn:aws:s3:::<<YOUR_BUCKET_NAME>>/*"
        }
    ]
}
Bonus
You can use AWS policy generator to generate policies to your AWS services
Enable Static site hosting
Then you need to enable Static website hosting for your s3 bucket. To do this, navigate to the Properties tab in your s3 bucket.
Then scroll to the bottom. you can see the settings for Static website hosting. Click on Edit button.
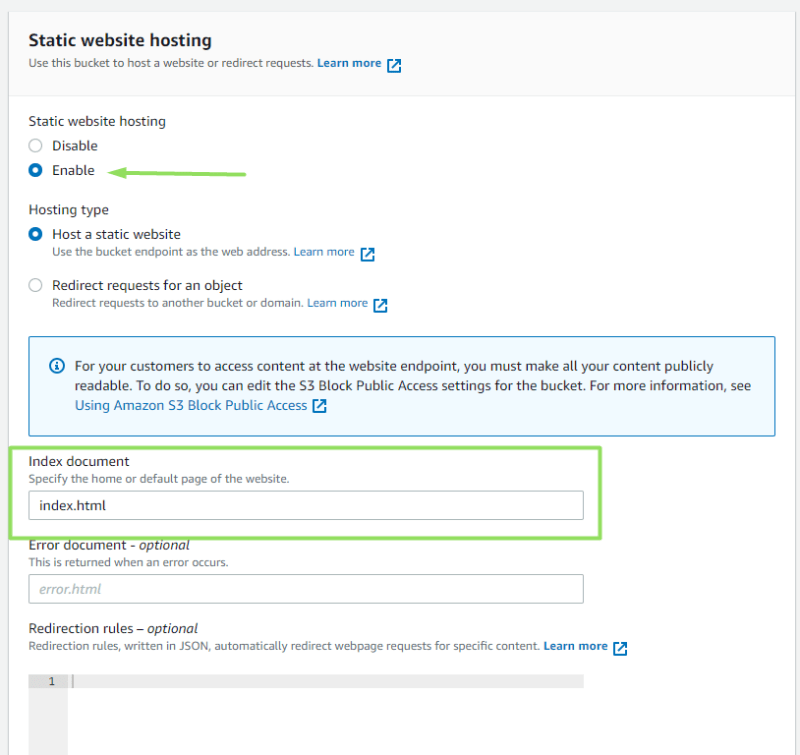
In the next screen you need to click on Enable and new set of settings will appear.
Now let's keep this for a while and move back to the react app that we've created. We'll create a production build using the following command.
npm run build
This will create a new build folder in the project root.
index.html will be the entry file for this project. Now let's move back to S3 console and add the necessary configurations.
You can also add an error document if you need. Once all the configurations are made, click on the Save Changes button on the bottom to save the changes.
Once everything is configured properly, you should be able to see the website endpoint under Static website hosting
Then navigate to the Objects tab in your S3 bucket and drag and drop the content inside ./build folder to your bucket and upload. Once the content is uploaded it should looks like this.
Then navigate to website endpoint in you web browser. You should be able to see your react application live.
Hope you have enjoyed.
Please comment if you face any problems. I'm happy to help. Also follow me on twitter


Top comments (0)