So far, we have managed to receive and send data between nodejs server and unity client. But it was limited to display only on console. This part, I'd like to build some GUI stuff to make it more pleasing to look at! Unity ninjas love to make some GUI stuff after all 😎.
I love Scriptable Objects in Unity. If you missed or dodged it, check out my completed series about MVC with Scriptable Objects in Unity.
For this part, I'll make a list view that contains enemies and a form-like GUI to push a new item to the server.
- ScrollView
- EnemyView
- EnemyFormView
I love Kenney's art and his free assets. For the images, I'll use this free package.
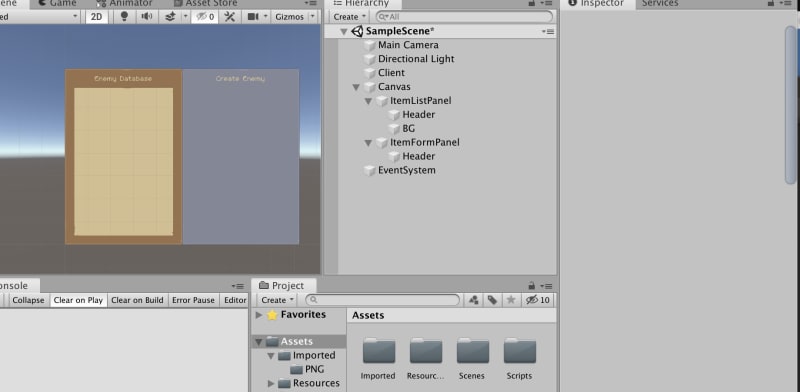
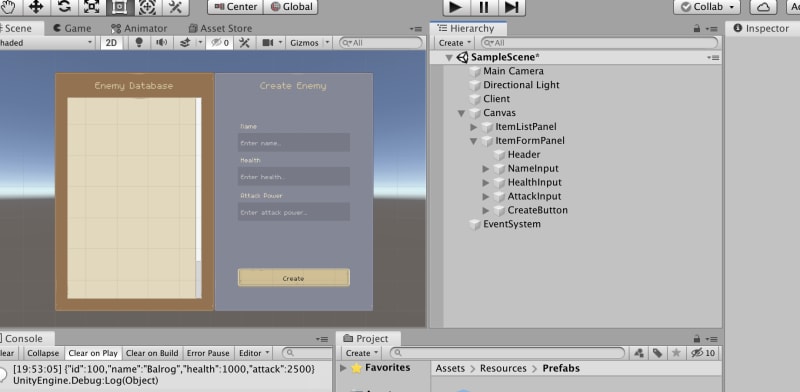
First, split the screen. Put some labels to identify each panel. I'll use this free font.
Build ScrollView
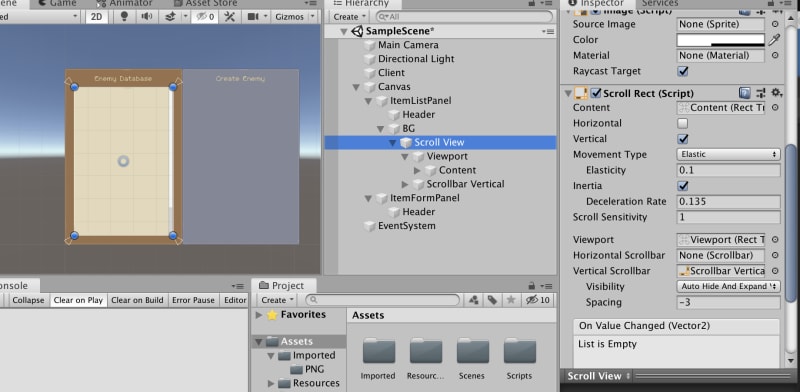
We have built-in ScrollView component in unity, this one is easy-peasy-lemon squeezy 🤡.
I've deleted the Scrollbar Horizontal object from Scroll View and disabled horizontal scrolling since we don't need it.
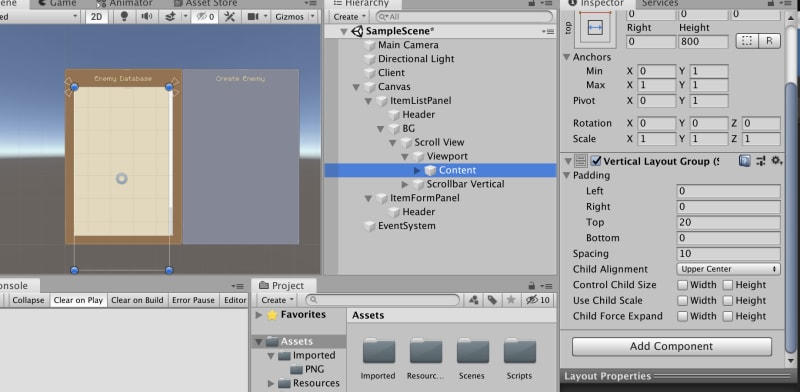
Next, I need to make a view for enemies. ScrollView has a Content object, as its name suggests, it contains and makes scrollable visualisation automatically. But there is a component that handles view constraints, Vertical Layout Group.
The content object will have EnemyViews as child objects and they'll show up and behave scrollable according to Vertical Layout constraints(like spacing, padding and size).
Build EnemyView
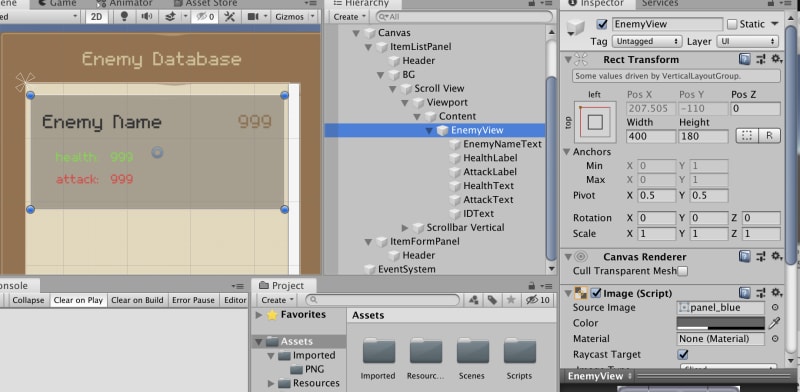
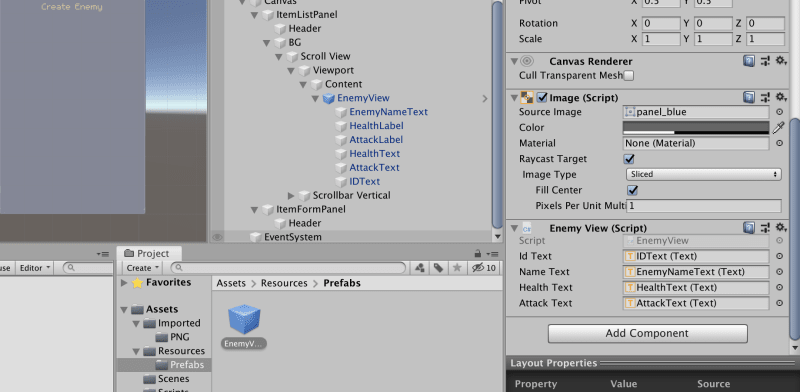
To make it I'll create an Image(I'll name it as EnemyView) object in content and I'll place necessary UI objects for enemy attributes as children.
Here I have the EnemyView. Since it's not complicated, I'll skip the detailed UI creation parts.
Next, create a script that holds references to this view, EnemyView.
using System.Collections;
using System.Collections.Generic;
using UnityEngine;
using UnityEngine.UI;

public class EnemyView : MonoBehaviour
{
    public Text idText;
    public Text nameText;
    public Text healthText;
    public Text attackText;

    public void InitView(Enemy enemy)
    {
        idText.text = enemy.id.ToString();
        nameText.text = enemy.name;
        healthText.text = enemy.health.ToString();
        attackText.text = enemy.attack.ToString();
    }
}
Now attach the EnemyView script to EnemyView GameObject in the hierarchy, assign elements and save it as prefab. After that, it's okay to delete it from the scene.
Build EnemyFormView
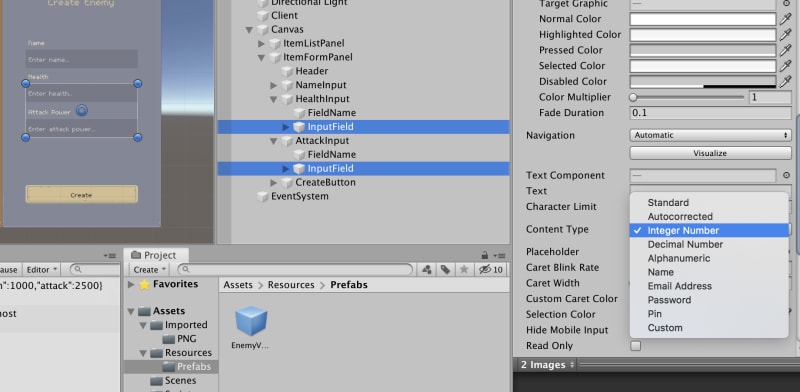
I'll use InputField UI objects for this.
Don't forget to set Content Type for health and attack input fields to integer.
Next, create EnemyFormViev.
using UnityEngine;
using UnityEngine.UI;

public class EnemyFormView : MonoBehaviour
{
    public InputField nameField;
    public InputField healthField;
    public InputField attackField;
    public Button createButton;

    public void InitFormView(System.Action<EnemyRequestData> callback)
    {
        createButton.onClick.AddListener(()=>{
                OnCreateClicked(callback);
            }
        );
    }

    public void OnCreateClicked(System.Action<EnemyRequestData> callback)
    {
    }

}
EnemyRequestData is a data holder class to contain info before we make a post request. I'll define this class in Enemy.cs.
[System.Serializable]
public class Enemy
{
    public int id;
    public string name;
    public int health;
    public int attack;
}

public class EnemyRequestData
{
    public string name;
    public int health;
    public int attack;

    public EnemyRequestData(string name, int health, int attack)
    {
        this.name = name;
        this.health = health;
        this.attack = attack;
    }
}
If the user provides valid info we'll make an EnemyRequestData and responsible class will handle the rest of the work.
using UnityEngine;
using UnityEngine.UI;

public class EnemyFormView : MonoBehaviour
{
    public InputField nameField;
    public InputField healthField;
    public InputField attackField;
    public Button createButton;

    public void InitFormView(System.Action<EnemyRequestData> callback)
    {
        createButton.onClick.AddListener(()=>{
                OnCreateClicked(callback);
            }
        );
    }

    public void OnCreateClicked(System.Action<EnemyRequestData> callback)
    {
        if (InputsAreValid())
        {
            var enemy = new EnemyRequestData(

                nameField.text,
                int.Parse(healthField.text),
                int.Parse(attackField.text)
            );

            callback(enemy);
        }
        else
        {
            Debug.LogWarning("Invalid Input");
        }
    }

    private bool InputsAreValid()
    {
        return (string.IsNullOrEmpty(nameField.text) ||
            string.IsNullOrEmpty(healthField.text) ||
            string.IsNullOrEmpty(healthField.text) );
    }
}
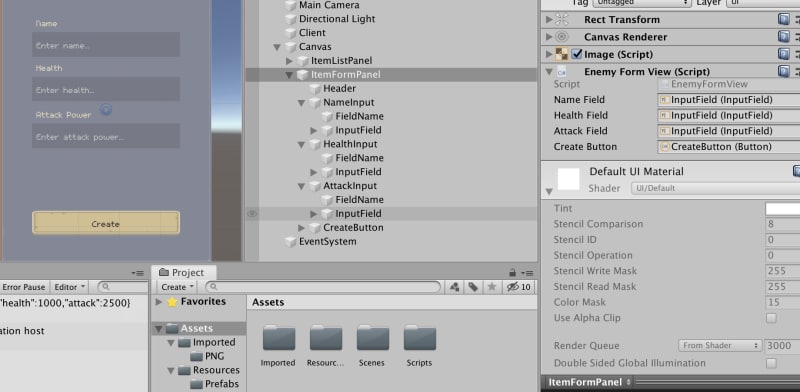
Attach this component to EnemyFormView object in the scene and assign objects.
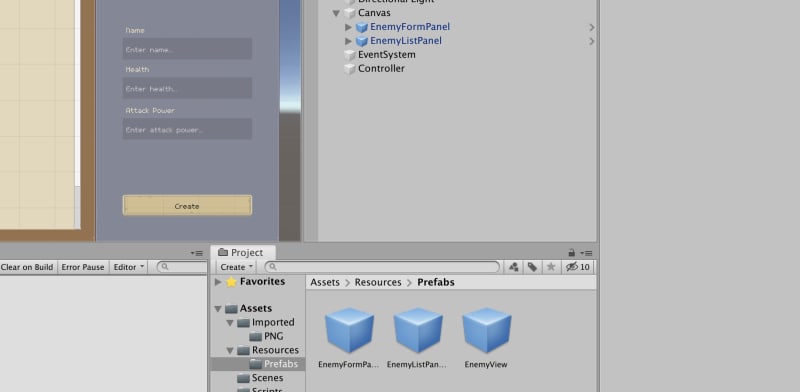
Time to create a prefab for each view
GUI stuff is ready! I need to wire up with some logic. More to do:
- A Database for enemies
- A controller for view and data
Enemy Database
EnemyDatabase will use Scriptable Object magic. Thus, it'll allow us to create data assets, so data can be persisted. That would be a life savior in a lot of circumstances in unity, for example, using the data in different scenes effortlessly, assigning from editor easily or ability to work with the inspector.
Create a script named EnemyDatabase.
using UnityEngine;
using System.Collections.Generic;

[CreateAssetMenu]
public class EnemyDatabase : ScriptableObject
{
    [SerializeField]
    private List<Enemy> database = new List<Enemy>();

    public List<Enemy> GetEnemies() => database;

    public void Add(Enemy enemy)
    {
        database.Add(enemy);
    }

    public void ClearInventory()
    {
        database.Clear();
    }
}
SerializeField attribute allows it to serialize unity with private variables from editor. I want to inspect from the editor and restrict access to all.
Controller
Before moving further, I have to refine and change some parts of our project I have done earlier.
In ClienApi.cs I have two methods Get and Post that responsible for making http requests. They are using Coroutines that part of UnityEngine and they don't have a proper return type. A workaround to use it just passing an Action<T> as a parameter.
So I'll modify these methods to return a json string and the controller will process the json parsing and creating Enemy information to display in Views.
Let's modify the get method in ClientApi.cs
    public void GetRequest(string url, System.Action<string> callback)
    {
        StartCoroutine(Get(url,callback));
    }

    private IEnumerator Get(string url, System.Action<string> callback)
    {
        using(UnityWebRequest www = UnityWebRequest.Get(url))
        {
            yield return www.SendWebRequest();

            if (www.isNetworkError)
            {
                Debug.Log(www.error);
            }
            else
            {
                if (www.isDone)
                {
                    //handle result
                    var result = System.Text.Encoding.UTF8.GetString(www.downloadHandler.data);
                    //format json to be able to work with JsonUtil
                    result = "{\"result\":" + result + "}";

                    callback(result);
                }
                else
                {
                    //handle the problem
                    Debug.Log("Error! data couldn't get.");
                }
            }
        }
    }
I could grab the result with this trick now. Same for the post method.
    public void PostRequest(string url, EnemyRequestData data, System.Action<string> callback)
    {
        StartCoroutine(Post(url,data,callback));
    }

    private IEnumerator Post(string url, EnemyRequestData data, System.Action<string> callback)
    {
        var jsonData = JsonUtility.ToJson(data);
        Debug.Log(jsonData);
        using(UnityWebRequest www = UnityWebRequest.Post(url, jsonData))
        {
            www.SetRequestHeader("content-type", "application/json");
            www.uploadHandler.contentType = "application/json";
            www.uploadHandler = new UploadHandlerRaw(System.Text.Encoding.UTF8.GetBytes(jsonData));
            yield return www.SendWebRequest();

            if (www.isNetworkError)
            {
                Debug.Log(www.error);
            }
            else
            {
                if (www.isDone)
                {
                    // handle the result
                    var result = System.Text.Encoding.UTF8.GetString(www.downloadHandler.data);
                    result = "{\"result\":" + result + "}";

                    callback(result);
                }
                else
                {
                    //handle the problem
                    Debug.Log("Error! data couldn't get.");
                }
            }
        }
    }
Now I'll modify the app.js on the server side. I'll add a small package for id generation called shortid. Let's navigate to folder and npm install shortid. This way, the server will generate the id.
const express = require('express');
const id = require('shortid');
const app = express();
app.use(express.json());

app.get('/', (req, res) => {
    res.send('Hello Unity Developers!');
});

let enemies = [
    {
        "id": id.generate(),
        "name": "orc",
        "health": 100,
        "attack": 25
    },
    {
        "id": id.generate(),
        "name": "wolf",
        "health": 110,
        "attack": 25
    }
];

app.get('/enemy', (req, res) => {
    res.send(enemies);
});

app.post('/enemy/create', (req, res) => {
    let newEnemy = {
        "id": id.generate(),
        "name": req.body.name,
        "health": req.body.health,
        "attack": req.body.attack
    };

    enemies.push(newEnemy);
    console.log(enemies);
    res.send(enemies);
});

app.listen(3000, () => console.log('started and listening on localhost:3000.'));

console.log(enemies);
So far so good.
Before the test, I need to complete Controller. Controller will create GUI, initialize views, and responsible for requests.
public class Controller : MonoBehaviour
{
    public Transform canvasParent;
    public ClientApi client;

    private Transform contentParent;
    private EnemyFormView formView;

    private void Start()
    {
        CreateListView();
        CreateFormView();
    }

    private void CreateFormView()
    {
        var formPanelPrefab = Resources.Load("Prefabs/EnemyFormPanel");
        var formPanelGO = Instantiate(formPanelPrefab, canvasParent) as GameObject;
        formView = formPanelGO.GetComponent<EnemyFormView>();
        formView.InitFormView(SendCreateRequest);
    }

    private void CreateListView()
    {
        var listPanelPrefab = Resources.Load("Prefabs/EnemyListPanel");
        var listPanelGO = Instantiate(listPanelPrefab, canvasParent) as GameObject;
        contentParent = listPanelGO.GetComponentInChildren<ScrollRect>().content;
    }

    private void SendCreateRequest(EnemyRequestData data)
    {
        client.PostRequest(client.postUrl, data, result => {
            Debug.Log(result);
            });
    }
}
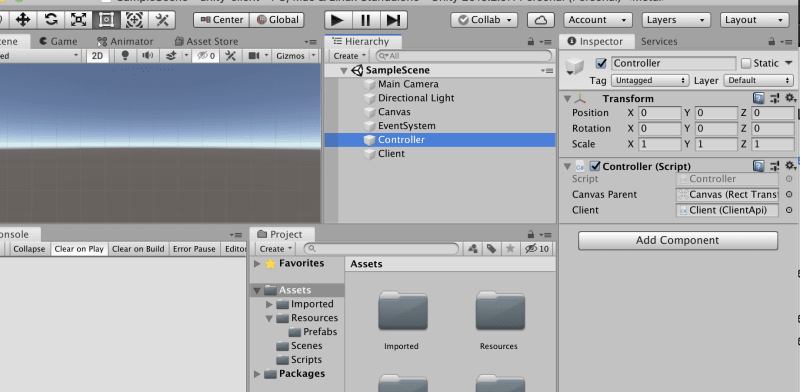
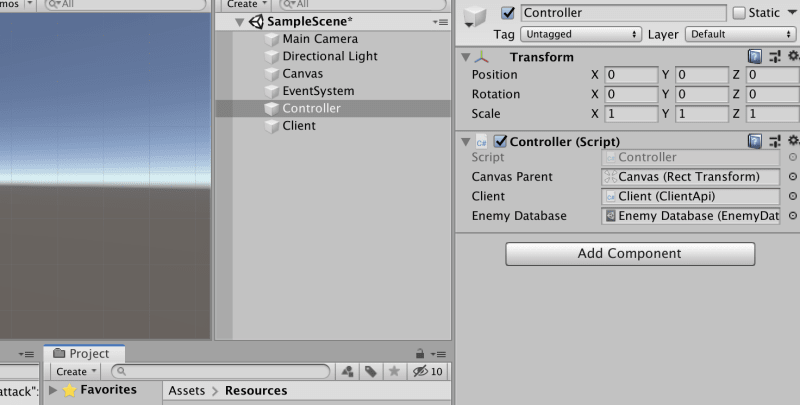
The first step for creating GUI. on Start we create both panels, initialize EnemyFormView and passing SendCreateRequest as a callback when Create button clicked. Last, to do to complete the first step of controller, assign client and Canvas parent in the scene.
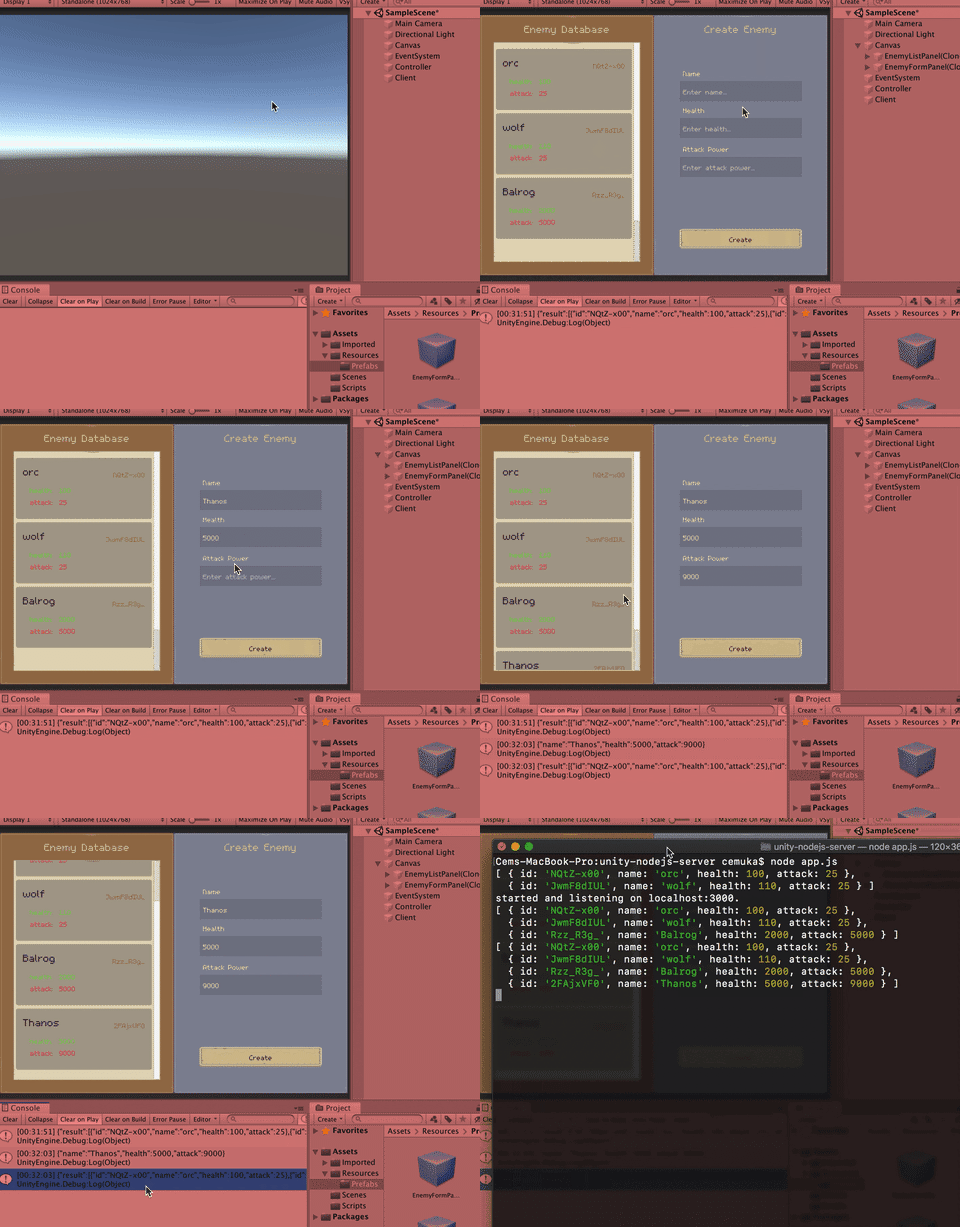
Before second step, let's test it out.
node app.js to start the server.
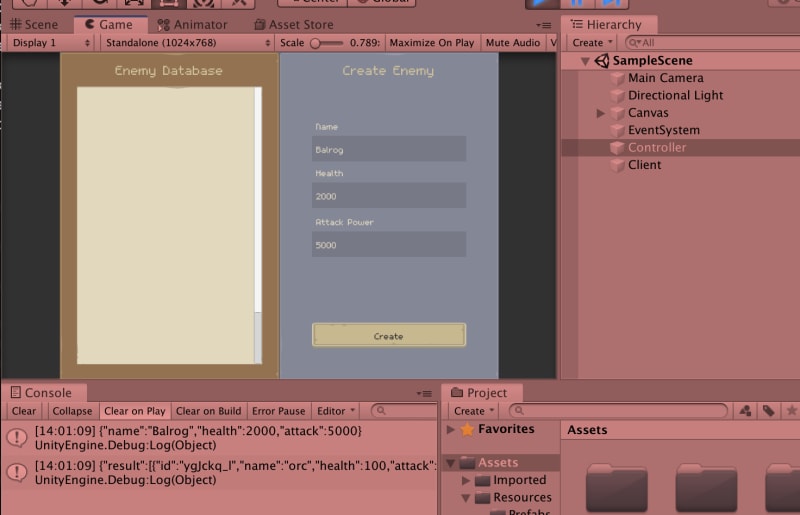
Hit play on unity, afterward. I'll try form with a true nemesis, Balrog 👾
Seems ninja enough to me 😎
Second part of the controller is getting data to the client's own database and injecting to view.
using System.Collections;
using System.Collections.Generic;
using UnityEngine;
using UnityEngine.UI;

public class Controller : MonoBehaviour
{
    public Transform canvasParent;
    public ClientApi client;
    public EnemyDatabase enemyDatabase;

    private Transform contentParent;
    private GameObject enemyViewPrefab;
    private EnemyFormView formView;

    private void Start()
    {
        CreateListView();
        CreateFormView();
        enemyViewPrefab = Resources.Load<GameObject>("Prefabs/EnemyView");

        RequestEnemies();
    }

    private void CreateFormView()
    {
        var formPanelPrefab = Resources.Load("Prefabs/EnemyFormPanel");
        var formPanelGO = Instantiate(formPanelPrefab, canvasParent) as GameObject;
        formView = formPanelGO.GetComponent<EnemyFormView>();
        formView.InitFormView(SendCreateRequest);
    }

    private void CreateListView()
    {
        var listPanelPrefab = Resources.Load("Prefabs/EnemyListPanel");
        var listPanelGO = Instantiate(listPanelPrefab, canvasParent) as GameObject;
        contentParent = listPanelGO.GetComponentInChildren<ScrollRect>().content;
    }

    private void SendCreateRequest(EnemyRequestData data)
    {
        client.PostRequest(client.postUrl, data, result => {
            Debug.Log(result);
            });
    }

    private void RequestEnemies()
    {
        client.GetRequest(client.getUrl, result => {
            Debug.Log(result);
            OnDataRecieved(result);
        });
    }

    private void OnDataRecieved(string json)
    {
        var recievedEnemies = JsonHelper.FromJson<Enemy>(json);
        enemyDatabase.ClearInventory();

        foreach (var enemy in recievedEnemies)
        {
            enemyDatabase.Add(enemy);
        }
    }
}
Here, I've defined a method named OnDataRecieved and it takes a string parameter. This method works like an event that will fire up when a response received from the server and it will populate the database with received data.
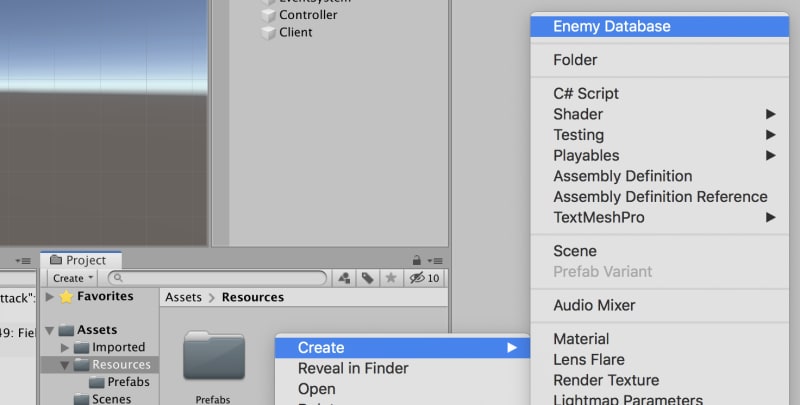
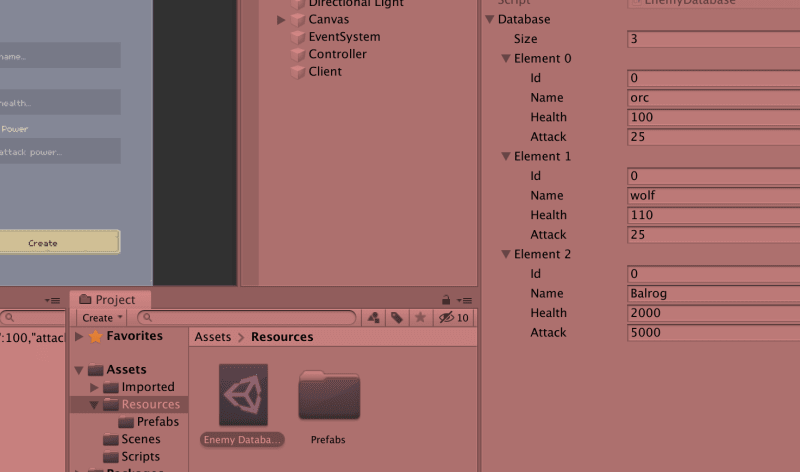
Now create a new database file in the assets folder and assign it to Controller.
Let's try this new database in the editor.
If you select the asset, you'll see the enemies received from the server. So, If I Instantiate EnemyViews after database populated, it should work.
using System.Collections;
using System.Collections.Generic;
using UnityEngine;
using UnityEngine.UI;

public class Controller : MonoBehaviour
{
    public Transform canvasParent;
    public ClientApi client;
    public EnemyDatabase enemyDatabase;

    private Transform contentParent;
    private GameObject enemyViewPrefab;
    private EnemyFormView formView;

    private List<EnemyView> enemyViews = new List<EnemyView>();

    private void Start()
    {
        CreateListView();
        CreateFormView();
        enemyViewPrefab = Resources.Load<GameObject>("Prefabs/EnemyView");

        RequestEnemies();
    }

    private void CreateFormView()
    {
        var formPanelPrefab = Resources.Load("Prefabs/EnemyFormPanel");
        var formPanelGO = Instantiate(formPanelPrefab, canvasParent) as GameObject;
        formView = formPanelGO.GetComponent<EnemyFormView>();
        formView.InitFormView(SendCreateRequest);
    }

    private void CreateListView()
    {
        var listPanelPrefab = Resources.Load("Prefabs/EnemyListPanel");
        var listPanelGO = Instantiate(listPanelPrefab, canvasParent) as GameObject;
        contentParent = listPanelGO.GetComponentInChildren<ScrollRect>().content;
    }

    private void SendCreateRequest(EnemyRequestData data)
    {
        client.PostRequest(client.postUrl, data, result => {
            Debug.Log(result);
            OnDataRecieved(result);
            });
    }

    private void RequestEnemies()
    {
        client.GetRequest(client.getUrl, result => {
            Debug.Log(result);
            OnDataRecieved(result);
        });
    }

    private void OnDataRecieved(string json)
    {
        var recievedEnemies = JsonHelper.FromJson<Enemy>(json);
        enemyDatabase.ClearInventory();

        foreach (var enemy in recievedEnemies)
        {
            enemyDatabase.Add(enemy);
        }

        CreateEnemyViews();
    }

    private void CreateEnemyViews()
    {
        var currentEnemies = enemyDatabase.GetEnemies();

        //destroy old views
        if (enemyViews.Count > 0)
        {
            foreach (var enemy in enemyViews)
            {
                Destroy(enemy.gameObject);
            }
        }

        //create new enemy views
        foreach (var enemy in currentEnemies)
        {
            var enemyViewGO = Instantiate(enemyViewPrefab, contentParent) as GameObject;
            var enemyView = enemyViewGO.GetComponent<EnemyView>();
            enemyView.InitView(enemy);
            enemyViews.Add(enemyView);
        }
    }
}
I've defined a new list to keep track of EnemyViews on GUI. Lastly, I've defined a new method CreateEnemyViews to get data from the database, destroy old enemy views and create current ones. With these changes, the last part of Controller has completed.
Time to final test.
I've never seen anything cool like this. We made it! I can't believe ninjas, it works charmlessly!
Well, maybe it's not the best without error checks, security considerations, no auth, no remove option and many more. But I hope that I've demonstrated a bit of how it could be implemented with unity as a client.
It could be more easy to make it on video but I think this part is the last chapter of this blog series, sadly.
Project on Github.
Cheers!




Top comments (2)
Great work, thanks alots
I'm glad you liked it, thanks!