Learning from those who have gone before
When learning a new subject, whether it be Web Development or basket weaving, it makes sense that new learners start at an atomic level. In the case of Web Development, learning begins with page definition tools such as HTML and CSS before to transitioning to learning languages such as Javascript or Python.
Initial steps such as these follow a bottom-up approach to the learning. This is a natural starting point since it is only logical that fundamental knowledge must be learned before it will be possible to progress to more complicated topics. For example, knowing Javascript is a prerequisite for learning React.
Most, if not all, new Web Developers find the leap from understanding how individual tools and technologies work, like CSS and HTML, to being able to integrate their use to be a difficult leap. Luckily, cloning existing websites is a learning technique that bridges the atomic understanding of individual parts and pieces into a holistic understanding.
Cloning introduces the developer to the processes used to construct real world applications. This effort forces the developer, in some cases for the first time, to think about the application as a set of cooperating components (aka an architecture), rather than as a single monolithic entity.
Creating a Blueprint

Photo by Daniel McCullough on Unsplash
Initiation and closure always seem to be the hardest parts of any project. This difficulty can be especially true for a cloning project since its often a new Web Developers first attempt at building a “real” website. However, creating a blueprint to define what activities are needed, the order they should be performed it, and at what level of detail makes getting started easier.
Step 1 — What’s to be Achieved?
Determining what the clone of an existing website is to achieve is a more than stating a high-level goal. The very premise of this effort is the desire to put your skills to use to solidify what you already know and to gain practical experience.
But, what is the broader goal and what value will it bring? Do you want to learn the steps other WebDevs follow when building a website to fill out your portfolio? Or, do you want to put a new use cloning as a means of identifying the pitfalls in a new package or framework you are researching?
At first glance, this might seem trivial, but it’s an essential step in
determining how much effort you should devote to this project, where it should be focused, and being able to measure your success at the end.
Step 2 — Select a website to clone
A difficult decision in a cloning project is coming up with the site to
replicate since there is a tendency to place undue concern on complexity.
Complexity is a critical concern but is one that will be covered at in a later step. The more significant concern is finding a website whose features provide the best means of achieving the goals and values you desire from the cloning effort.
If your goal is to gain experience in basic application construction, then you might want to start with a site that has fewer page elements. If the objective is to gain experience in complex page layout then cloning a website like Unsplash might be in order. And if your goal is to put what you’ve learned about responsive web design into practice, then a site that runs on mobile and desktops would be a wise choice.
Step 3 — Decompose the original websites parts & pieces
I grew up on a farm, and anyone with a similar background will relate to the fact that on a farm you have to keep machinery operating to be able to plant, harvest, and make a profit. When a piece of machinery breaks down, you don’t always have the time or money to be able to call a mechanic to get it repaired. You have to do it yourself.
For the same reason, the opportunity to attend a class on the brand and model of each piece of equipment isn’t usually an option. So, you have to teach yourself by taking it apart, examining what each part does, how elements work in conjunction, and how they are assembled to form a working unit.
The same is true for websites which is the primary objective of cloning. You take an application apart to learn how it works and then you put it back together.
The process of decomposing, or taking apart a website, consists of:
3.1 Examine each page and identify the high-level components on each one.
Decomposition is best done by marking up and annotating each page to show the various components and their elements.
A component is a grouping of elements which together supply a specific piece of functionality to a user. For example, the Right Nav component (surrounded by the blue dashed line) contains supplemental information. It also includes additional components, like the one labeled as #8, which supplies the user with current and forecasted weather conditions.
The result of annotating and examining major page components is a map of how they are organized to form the application.
3.2 Identifying the elements that make up each component.
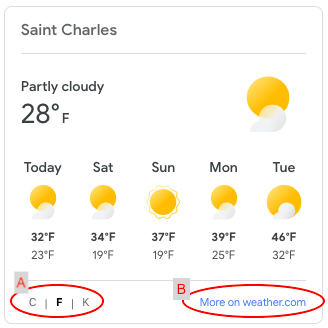
The weather component within the right navigation component displays weather conditions at the user’s locale. In addition to static text, there are also buttons to allow the user to change the temperature scale (see A) and a link to open a new window to provide more weather data (see B).
3.3 Determine what actions are available to the user and what their results are.
A record of the action to be performed and the expected result should be created for each user action. This inventory of buttons, links, hover actions, input fields, etc. will be used implement the website’s functionality, but it also acts as a type of check and balance to help ensure that the clone faithfully replicates the original website.
For example, this can be as simple as noting that clicking on the ‘More on weather.com’ link to open a new tab. Conversely, this might be more complicated as is the case if the weather.com tab is to be tailored to the user’s locale, which would require a more detailed URL and client-side code.
Both paper notes and spreadsheets are simple and uncomplicated means of
maintaining the inventory of actions and results.
3.4 Scrutinize how data flows between components and determine what variables may be needed and where they will be used.
Application state is the persistent data the application uses to implement the functionality it was designed to provide. State data can span the application or it can be used only across a few components and, depending on the scope of the application, there could be many state variables or none.
Properties, or ‘props,’ are transient data used at a point in time by a
component, which are not retained. A pattern that emerges in web applications is one where data maintained as a state by a parent component is passed as a prop to its children.
For example, for the user’s avatar to be displayed across the application, it must be made available as a property to each page. Understanding what and where data is required is necessary for understanding data flow and mapping state and props to different parts of the app. For example,
Step 4 — Identify the Scope
The features you include in the clone will be constrained by the amount of time available to you for development and the goal you established at the start of the project.
It’s important to keep in mind that you shouldn’t feel compelled to implement every capability of the website you are cloning. Unlike a commercial or public facing website, since you are the primary user the only person you need to please is yourself.
It’s also advisable to start small and then iterate over successive projects to add new features. This allows more focus and lets you build in small successes. It’s also the pattern many professional developers follow.
Step 5 — Define the Technical Stack
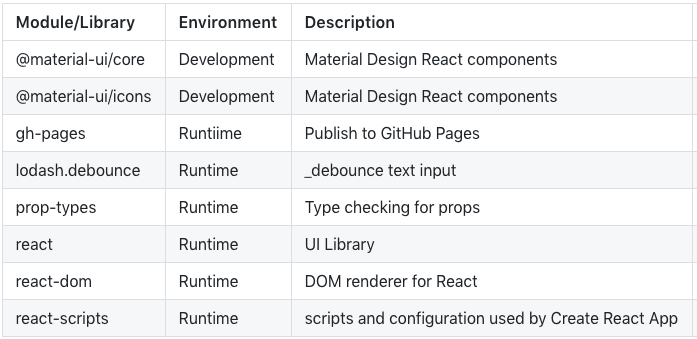
The technical stack is consists of the packages and libraries needed to build and run the website. For example,

Library Dependencies for the Meteorite Explorer application
Having goals also helps with the selection of the technical stack used to create and run the site. A new WebDev is initially focused on specific packages to be learned, while an experienced WebDev focuses on various features, functionality, interactions, and algorithms. New WebDev’s are also building from scratch to enhance their portfolio while experience WebDev’s rely on existing applications and templates.
Project scope is also an important factor to consider when choosing a technical stack. It’s recommended that the number of packages unfamiliar to the team is limited to control the ensuing frustration, confusion, and problems that arise from using too much “new” at the same time.
Step 6 — Clone the website
In a project of this type duplicating the functionality found on the site you’ve selected is where you’ll spend the majority of your time. How you perform this step and the actual length of time required depends on what you’ve chosen to clone, project scope, the technical stack you’ll be using, and the knowledge and experience you start with.
The focus of this discussion is to present the process for making your cloning effort successful, not on the mechanics of how to set up an application clone. The fact that you have to build websites to be a WebDev is reminiscent of the comedian Steve Martin’s routine from a 1978 episode of
Saturday Night Live.
“You can be a millionaire.. and never pay taxes! You say.. “Steve.. how can I be a millionaire.. and never pay taxes?” First.. get a million dollars.”
Implementing the application is left up to you, and there are many resources available to help guide you through the process of creating an application using the technical stack you’ve selected.
Step 7 — Reflect on what you’ve learned
Before moving on to another project, it’s always instructive to consider what went right, what went wrong, what would you do differently, and what were the most valuable lessons learned.
As important as they are this isn’t just about the technical aspects of the website you’ve built. It’s also about the planning, documentation, UI/UX, and the team processes you followed to get from the inception to a completed project.
Reflection is the technique that transforms an individual by broadening the foundation from the knowledge gained and lessons learned from each project.
Wrapping It Up
The first step in learning the craft of Web Development is to understand the details of the tools and technologies used to create websites. The second step involves making the transition from knowing about individual tools to understanding how to efficiently combine them to produce something of value.
The focus of learning the features and capabilities of the web development toolset is primarily one of gathering information. Learning how to use tools in concert with one another transforms information into knowledge. Learning exercises like website cloning can help ease this transformation, while also making it more enjoyable and productive.
Now get to it and build something!!!


Top comments (0)