
The article was originally posted on my personal blog.
Working with forms in React is notoriously difficult, particularly when there are dynamic fields involved. There exist a number of libraries that make the whole process easier. One of such libraries is React Hook Form. Instead of having a bunch of form components, React Hook Form, as the name suggests, exposes various hooks that help in controlling the form's behavior, leaving the individual component implementation details to the user. This approach presents a few advantages, mainly that users aren't tied to any particular UI framework or predefined form components.
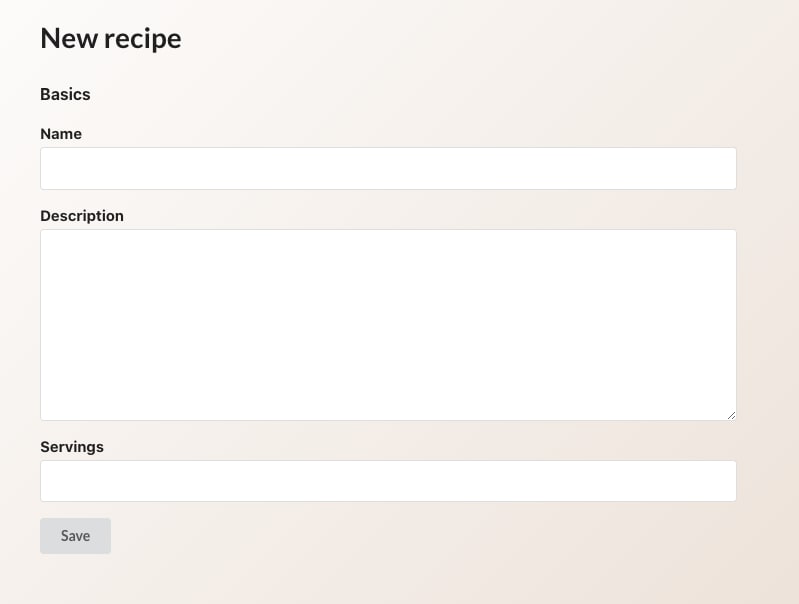
In this post we're gonna build a simple recipe form, which allows entering the basic details along with a dynamic list of ingredients. The final result will look like this:

UI-wise it doesn't look too fancy, since the main focus is on using React Hook Form. Apart from it, we'll be using Semantic UI React, a library of UI components and Emotion/styled, to be able to adjust the styles of those components.
As the first step, let's install all the required dependencies:
npm i @emotion/core @emotion/styled semantic-ui-react semantic-ui-css react-hook-form
Now we can setup our form component in a new file, called Form.js.
import React from "react";
import styled from "@emotion/styled";
import { useForm } from "react-hook-form";

export const Recipe = () => {
  return (
    <Container>
      <h1>New recipe</Title>
    </Container>
  );
};

const Container = styled.div`
  display: flex;
  flex-direction: column;
`;
Additionally, remember to add import "semantic-ui-css/semantic.min.css"; in the index.js, above the custom index.css styles.
Form Base
With all this setup out of the way, we can finally start working on the form itself. We'll begin with the Basics section, which will have the general information about the recipe. To help with grouping form fields into sections, let's add a custom component, called FieldSet, which is a small abstraction on top of the native HTML fieldset.
// FieldSet.js

export const FieldSet = ({ label, children }) => {
  return (
    <Container>
      {label && <Legend>{label}</Legend>}
      <Wrapper>{children}</Wrapper>
    </Container>
  );
};

const Container = styled.fieldset`
  margin: 16px 0;
  padding: 0;
  border: none;
`;

const Wrapper = styled.div`
  display: flex;
  justify-content: space-between;
  flex-direction: column;
  align-items: self-start;
`;

const Legend = styled.legend`
  font-size: 16px;
  font-weight: bold;
  margin-bottom: 20px;
`;
For the form itself, we'll use the Form component from Semantic UI React, which also comes with a few handy subcomponents, such as Form.Field. For this simple recipe form we'll only have a few basic fields, such as recipe name, description, and number of servings. Let's add them to the form.
import React from "react";
import styled from "@emotion/styled";
import { Button, Form } from "semantic-ui-react";
import { FieldSet } from "./FieldSet";

const fieldWidth = 8;

export const Recipe = () => {
  return (
    <Container>
      <h1>New recipe</h1>
      <Form size="large">
        <FieldSet label="Basics">
          <Form.Field width={fieldWidth}>
            <label htmlFor="name">Name</label>
            <input type="text" name="name" id="name" />
          </Form.Field>
          <Form.Field width={fieldWidth}>
            <label htmlFor="description">Description</label>
            <textarea name="description" id="description" />
          </Form.Field>
          <Form.Field width={fieldWidth}>
            <label htmlFor="amount">Servings</label>
            <input type="number" name="amount" id="amount" />
          </Form.Field>
        </FieldSet>

        <Form.Field>
          <Button>Save</Button>
        </Form.Field>
      </Form>
    </Container>
  );
};

const Container = styled.div`
  display: flex;
  flex-direction: column;
  padding: 25px 50px;
`;
Here we add the recipe fields with their labels, which results in a simple form below. Note the use of name attributes on the form elements, as they will become handy in a bit. Also we use a combination of htmlFor and id attributes to improve fields' accessibility.
Now it's time to use React Hook Form for managing our form's state. One of the selling points of the library is that it makes state managing easier, without the need to add a bunch of setState hooks. All we need to do is use a combination of name and ref attributes to register fields on the form's state.
import React from "react";
import styled from "@emotion/styled";
import { Button, Form } from "semantic-ui-react";
import { FieldSet } from "./FieldSet";
import { useForm } from "react-hook-form";

const fieldWidth = 8;

export const Recipe = () => {
  const { register, handleSubmit } = useForm();

  const submitForm = formData => {
    console.log(formData);
  };

  return (
    <Container>
      <h1>New recipe</h1>
      <Form size="large" onSubmit={handleSubmit(submitForm)}>
        <FieldSet label="Basics">
          <Form.Field width={fieldWidth}>
            <label htmlFor="name">Name</label>
            <input type="text" name="name" id="name" ref={register} />
          </Form.Field>
          <Form.Field width={fieldWidth}>
            <label htmlFor="description">Description</label>
            <textarea name="description" id="description" ref={register} />
          </Form.Field>
          <Form.Field width={fieldWidth}>
            <label htmlFor="amount">Servings</label>
            <input type="number" name="amount" id="amount" ref={register} />
          </Form.Field>
        </FieldSet>

        <Form.Field>
          <Button>Save</Button>
        </Form.Field>
      </Form>
    </Container>
  );
};
We start with importing and calling useForm hook, which returns several useful helpers. In this case we use register to assign a form field via its name to the corresponding property on the state. This is why adding names to the fields is important here. We also need to wrap our submit function in handleSubmit callback. Now if we enter a recipe details in the form fields and press Save, we should see a following object in the console:
    {
      name: "Pancakes",
      description: "Super delicious pancake recipe",
      amount: "10"
    }
That's all the setup needed to start using React Hook Form. However, its functionality doesn't end here and next we'll see a few enhancements we can add to our form.
Form validation and error handling
The register value we get from useForm is actually a function that accepts validation params as an object. There are several validation rules available:
- required
- min
- max
- minLength
- maxLength
- pattern
- validate
In order to make the recipe name a required field, all we need to do is call register with a required prop:
<input type="text" name="name" id="name" ref={register({required: true})} />
Additionally, useForm returns errors object, which maps all the raised errors to the field names. So in case with missing recipe name the errors would have a name object with type required. It's also worth noting that instead of specifying validation rule with a boolean value, we can also pass it a string, which will be used as the error message:
ref={register({required: 'This field is required'})}
Alternatively message property can be used for this. The error message can be later accessed via errors.name.message. We also pass the field errors as boolean values to Form.Field to toggle the error state.
Now we can combine form validation and errors to display helpful messages for the users.
export const Recipe = () => {
  const { register, handleSubmit, errors } = useForm();

  const submitForm = formData => {
    console.log(formData);
  };

  return (
    <Container>
      <h1>New recipe</h1>
      <Form size="large" onSubmit={handleSubmit(submitForm)}>
        <FieldSet label="Basics">
          <Form.Field width={fieldWidth} error={!!errors.name}>
            <label htmlFor="name">Name</label>
            <input
              type="text"
              name="name"
              id="name"
              ref={register({ required: "Recipe name is required." })}
            />
            {errors.name && <ErrorMessage>{errors.name.message}</ErrorMessage>}
          </Form.Field>
          <Form.Field width={fieldWidth} error={!!errors.description}>
            <label htmlFor="description">Description</label>
            <textarea
              name="description"
              id="description"
              ref={register({ maxLength: 100 })}
            />
            {errors.description && (
              <ErrorMessage>
                Description cannot be longer than 100 characters.
              </ErrorMessage>
            )}
          </Form.Field>
          <Form.Field width={fieldWidth} error={!!errors.amount}>
            <label htmlFor="amount">Servings</label>
            <input
              type="number"
              name="amount"
              id="amount"
              ref={register({ max: 10 })}
            />
            {errors.amount && (
              <ErrorMessage>Maximum number of servings is 10.</ErrorMessage>
            )}
          </Form.Field>
        </FieldSet>

        <Form.Field>
          <Button>Save</Button>
        </Form.Field>
      </Form>
    </Container>
  );
};

const Container = styled.div`
  display: flex;
  flex-direction: column;
  padding: 25px 50px;
`;

const ErrorMessage = styled.span`
  font-size: 12px;
  color: red;
`;

ErrorMessage.defaultProps = { role: "alert" };
If we try to submit the form with invalid data, we get handy validation messages for the fields.

It's also possible to apply custom validation rules to the fields via validate rule. It can be a function or an object of functions with different validation rules. For example, we can validate if the field value is equal like so:
ref={register({validate: value => value % 2 === 0})
Handling Number Inputs
In the current form we're using number input field for the servings. However due to how HTML input elements work, when the form is submitted, this value will be a string in the form data. In some cases this might not be what we want, for ex. if the data is expected to be a number on backend. One easy fix here would be to convert the amount to number on submit, however it is not optimal, especially in cases where we have many such fields. A better solution would be to abstract number input into a separate component with the type conversion logic. That way, when the form is submitted, the data has the types we need. In order to connect this component to the form, React Hook Form provides Controller - a wrapper for working with controlled external components.
First, let's create such component, named NumberInput.
// NumberInput.js

import React from "react";

export const NumberInput = ({ value, onChange, ...rest }) => {
  const handleChange = e => {
    onChange(Number(e.target.value));
  };

  return (
    <input
      type="number"
      min={0}
      onChange={handleChange}
      value={value}
      {...rest}
    />
  );
};
After that we can replace the current amount field with this new component.
import { useForm, Controller } from "react-hook-form";

//...

const { register, handleSubmit, errors, control } = useForm();

//...

<Form.Field width={fieldWidth} error={!!errors.amount}>
  <label htmlFor="amount">Servings</label>
  <Controller
    control={control}
    name="amount"
    defaultValue={0}
    rules={{max: 10}}
    render={props => <NumberInput id="amount" {...props} />}
  />
  {errors.amount && (
    <ErrorMessage>Maximum number of servings is 10.</ErrorMessage>
  )}
</Form.Field>
Instead of register, we use control object that we get from useForm, for validation we use rules prop. We still need to add name attribute to the Controller to register it. Then we pass the input component via render prop. Now the data for the recipe servings will be saved to the form as before, while using an external component.
Dynamic fields
No recipe is complete without its ingredients. However, we can't add fixed ingredient fields to our form, since their number varies depending on the recipe. Normally we'd need to roll own custom logic for handling dynamic fields, however React Hook Form comes with a custom hook for working with dynamic inputs - useFieldArray. It takes form's control object and name for the field, returning several utilities for working with dynamic inputs. Let's see it in action by adding the ingredients fields to our recipe form.
import React from "react";
import styled from "@emotion/styled";
import { useForm, Controller, useFieldArray } from "react-hook-form";
import { Button, Form } from "semantic-ui-react";
import { FieldSet } from "./FieldSet";
import { NumberInput } from "./NumberInput";
const fieldWidth = 8;
export const Recipe = () => {
const { register, handleSubmit, errors, control } = useForm();
const { fields, append, remove } = useFieldArray({
name: "ingredients",
control
});
const submitForm = formData => {
console.log(formData);
};
return (
<Container>
<h1>New recipe</h1>
<Form size="large" onSubmit={handleSubmit(submitForm)}>
<FieldSet label="Basics">
<Form.Field width={fieldWidth} error={!!errors.name}>
<label htmlFor="name">Name</label>
<input
type="text"
name="name"
id="name"
ref={register({ required: "Recipe name is required." })}
/>
{errors.name && <ErrorMessage>{errors.name.message}</ErrorMessage>}
</Form.Field>
<Form.Field width={fieldWidth} error={!!errors.description}>
<label htmlFor="description">Description</label>
<textarea
name="description"
id="description"
ref={register({ maxLength: 100 })}
/>
{errors.description && (
<ErrorMessage>
Description cannot be longer than 100 characters.
</ErrorMessage>
)}
</Form.Field>
<Form.Field width={fieldWidth} error={!!errors.amount}>
<label htmlFor="amount">Servings</label>
<Controller
control={control}
name="amount"
defaultValue={0}
rules={{max: 10}}
render={props => <NumberInput id="amount" {...props} />}
/>
{errors.amount && (
<ErrorMessage>Maximum number of servings is 10.</ErrorMessage>
)}
</Form.Field>
</FieldSet>
<FieldSet label="Ingredients">
{fields.map((field, index) => {
return (
<Row key={field.id}>
<Form.Field width={8}>
<label htmlFor={`ingredients[${index}].name`}>Name</label>
<input
type="text"
ref={register()}
name={`ingredients[${index}].name`}
id={`ingredients[${index}].name`}
/>
</Form.Field>
<Form.Field width={6}>
<label htmlFor={`ingredients[${index}].amount`}>Amount</label>
<input
type="text"
ref={register()}
defaultValue={field.amount}
name={`ingredients[${index}].amount`}
id={`ingredients[${index}].amount`}
/>
</Form.Field>
<Button type="button" onClick={() => remove(index)}>
−
</Button>
</Row>
);
})}
<Button
type="button"
onClick={() => append({ name: "", amount: "" })}
>
Add ingredient
</Button>
</FieldSet>
<Form.Field>
<Button>Save</Button>
</Form.Field>
</Form>
</Container>
);
};
const Container = styled.div`
display: flex;
flex-direction: column;
padding: 25px 50px;
`;
const ErrorMessage = styled.span`
font-size: 12px;
color: red;
`;
const Row = styled.div`
display: flex;
align-items: center;
& > * {
margin-right: 20px !important;
}
.ui.button {
margin: 10px 0 0 8px;
}
`;
ErrorMessage.defaultProps = { role: "alert" };
The first step is to import useFieldArray and call it with the control we get from the form hook, as well as to pass it the field's name. useFieldArray returns several utilities for managing dynamic fields, from which we'll use append, remove and the array of the fields themselves. The complete list of utility functions is available at the library's documentation site. Since we do not have default values for ingredients, the field is initially empty. We can start populating it by using append function and providing it default values for empty fields. Note that rendering of the fields is done by their index in array, so it's important to have field names in format fieldArrayName[fieldIndex][fieldName]. We can also delete fields by passing the index of the field to the delete function. Now after adding a few ingredient fields and filling their values in, when we submit the form, all those values will be saved on the ingredients field in the form.
That's basically all it takes to build a fully functional and easily manageable form with React Hook Form. The library has plenty more features, not covered in this post, so make sure to check the documentation for more examples.

Top comments (0)