
Hello everyone,
Real-time communication protocols are essential for applications that require realtime data updates. Two popular options for achieving real-time communication are Server-Sent Events (SSE) and WebSockets. In this two part series, we'll dive into SSE ie Server sent events and build SSECommander, An application that execute terminal commands sent via HTTP and delivers the command output stream real-time through Server-Sent Events (SSE) using Node.js.

With server-sent events, a server can push data to the client without the client needing to poll the server to get data once in a while. SSE has some similarities with WebSockets but also has distinct features that make it better for many use cases.
Web sockets
- Bi-directional i.e Full duplex
- support Binary and text data
- Uses WebSocket protocol
- Scaling is more complex than SSE
Server sent events
- Uni directional i.e Half duplex
- support only text data
- Uses HTTP protocol
- Simple and user friendly
WebSockets are a perfect fit for applications that require real-time collaboration, such as a collaborative drawing app, where both the client and server need to send data realtime. However, it's worth noting that implementing WebSockets can introduce a notable level of complexity to your application and infrastructure. This complexity can add extra development and maintenance efforts.
On the other hand, if your use case primarily involves the server pushing data to the client without requiring bidirectional communication, Server-Sent Events (SSE) are an excellent choice. SSE offers a simpler and more streamlined design, allowing you to focus more on your business logic instead of spending time on debugging complex WebSocket-related issues. SSE provides a straightforward approach to delivering continuous updates from the server to the client, resulting in an efficient and straightforward implementation process.
So without further ado let's get started.
Server
First, we will start with developing the server.
I assume that you have installed nodejs and have a code editor setup.
Let's create a directory and init npm
mkdir ssedemoserver
npm init -y
let's install express and cors to handle cross-origin.
npm I express cors
create app.js file
touch app.js
This will add required libraries. child_process is required to execute commands in the host machine aka our server. we can also use exec over spawn but here I will use spawn since it will stream data instead of buffering. refere nodejs official doc for more info on that.
const express = require("express");
const cors = require("cors");

// setup cors
const app = express();
app.use(cors());

// required to execute commands on host
const { spawn } = require("child_process");

const PORT = 3000;
Now let's create the route for sse events. this is a GET route and the command is sent via http query parameters.
SSE requires setting some headers to begin.
Headers
Content-Type: text/event-stream
This header specifies the content type of the response as "text/event-stream". It indicates that the server will be sending an SSE stream, which is a text-based format for sending a continuous stream of events to the client.
Cache-Control: no-cache
This header instructs the client and any intermediary caches not to cache the SSE response. SSE is designed for real-time communication, and caching the response would defeat the purpose of receiving continuous updates.
Connection: keep-alive
This header enables a persistent connection between the server and the client. By setting the "Connection" header to "keep-alive", the server informs the client to keep the connection open for further events. This allows the server to send events to the client without having to establish a new connection for each event, improving efficiency and reducing overhead.
Data format
Event Type
This line starts with event: and specifies the type of event being sent. It is optional but can be useful for client-side event handling.
Data
This line starts with data: and contains the actual data being sent in the event. Multiple lines can be used for multi-line data. Each line should start with data: and end with \n. To end message append \n\n at the end
ID
This line starts with id: and provides a unique identifier for the event.
Retry
Retry: This line starts with retry: and specifies the reconnection time in milliseconds if the connection is closed. It allows the client to automatically reconnect after a specified time defaulting to 3s.
in the below, i will not set retry since default retry is suitable for this implementation
I have used stdout,stderr, err, and exit event types to emphasize the usage of events but you can always simplify that design for better use cases.
once a command is exited we will close the connection since there will be no more data to send from the server end. after the response id close from the server client will retry to connect, to eliminate this behavior we will send an exit event so the client will close the connection.
in the event of a client connection closing, kill the process as we don't want to keep any dangling processes.
// run route handler
app.get("/run", async (request, response) => {
  console.log(`command : ${request.query.command}`);

  // set headers required for sse `"Content-Type": "text/event-stream",`is where the magic happens
  const headers = {
    "Content-Type": "text/event-stream",
    Connection: "keep-alive",
    "Cache-Control": "no-cache",
  };

  // send 200 response to client
  response.writeHead(200, headers);

  // break down command to command and arguments as requried by spaw methode
  const runCommand = spawn(
    request.query.command.split(" ")[0],
    request.query.command.split(" ").slice(1)
  );

  console.log(`pid : ${runCommand.pid}`);

  // send stdout encoding to uft8 since sse only support text
  runCommand.stdout.setEncoding("utf8");

  // add event listener to list to data on stdout
  runCommand.stdout.on("data", (chunk) => {
    console.log("stdout : " + String(chunk));

    // create it for event
    let id = new Date().getTime();
    // write id to response
    response.write(`id: ${id}\n`);
    // set event
    response.write(`event: stdout\n`);
    // write data to response
    response.write(
      `data: ${JSON.stringify({ type: "stdout", out: String(chunk) })}\n\n`
    );
  });

  // add event listener to list to data on stderr
  runCommand.stderr.on("data", (data) => {
    console.error(`stderr : ${String(data)}`);

    let id = new Date().getTime();
    // write id to response
    response.write(`id: ${id}\n`);
    // set event
    response.write(`event: stderr\n`);
    // write data to response
    response.write(
      `data: ${JSON.stringify({ type: "strerr", out: String(data) })}\n\n`
    );
  });

  // add event listener to list to errors
  runCommand.once("error", (err) => {
    console.log(`Error executing command exited : ${err}`);
    // set event
    response.write(`event: err\n`);
    // write data to response
    response.write(
      `data: ${JSON.stringify({ type: "error", out: String(err) })}\n\n`
    );
    response.emit("close");
    response.end();
  });

  // when command is exit close connection by sending
  runCommand.once("exit", (code) => {
    console.log(`command exited code : ${code}`);
    // set event
    response.write(`event: exit\n`);
    response.write(`data: exited\n\n`);
    // set event
    response.end();
  });
  // kill long running command id client connection is close
  request.on("close", () => {
    console.log(`${request.socket.remotePort} Connection closed`);
    runCommand.kill();
  });
});
setup http server listen with express
// http server listen on given port
app.listen(PORT, () => {
  console.log(`App is listening on http://localhost:${PORT}`);
});
now lets run the application using
node app.js
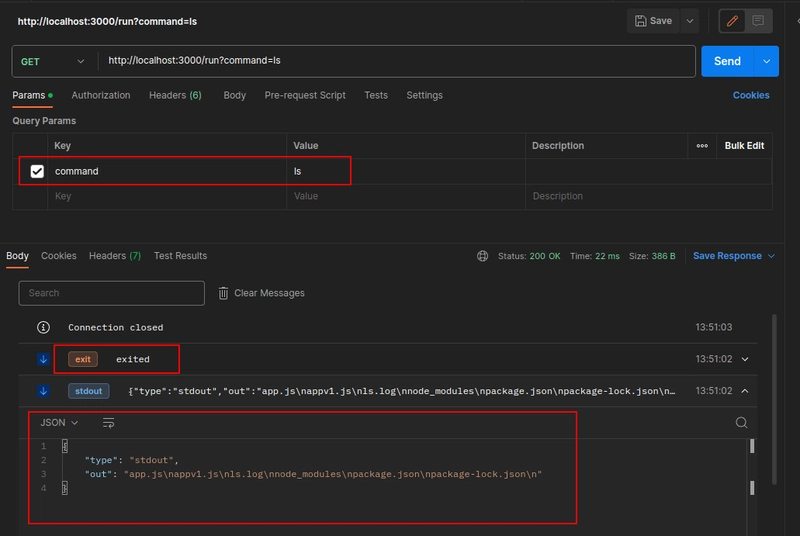
for testing, I am using Postman.
SSE support for postman was introduced on version v10.10 and above.
if everything goes well you will get below output. here we can see event data.
Important Note: It's crucial to understand that executing commands on a server without proper input sanitization can pose significant security risks.The code provided in this example is meant for educational purposes only.
Just like that, we build a server with SSE support.
Fun fact: Did you know that ChatGPT uses SSE to stream responses?
Execute Terminal Commands And Receive Live Output With Nodejs + SSE + React
Read full article on
build backend : https://codehirise.com/post/building-a-real-time-command-execution-app-with-node-js-sse
build frontend :https://codehirise.com/post/execute-terminal-commands-and-receive-live-output-with-react-sse
In the second part of this tutorial, we will build a client ui using react to create a realtime command execute application.
Aaaaaaand that's a wrap.

Top comments (0)