Step-by-step guide and feature introduction using Intro.JS
Coming up with a new product or a new feature in your Angular app?
If you answered "yes", then this tutorial is for you!
WHY USING INTRO.JS?
When new users visit your website or product, you should demonstrate your product features using a step-by-step guide. Even when you develop and/or add a new feature to your product, you should be able to show the new features to your users by creating a user-friendly solution. Intro.js was developed to allow web and mobile developers to create a step-by-step introduction easily.
First we clone the repo app from:
https://github.com/devpato/intro.js-Angular-INITIAL
-
We install the Intro.js & types NPM package.
npm install intro.js @types/intro.js --save
Open angular.json file on your project root, then add the Intro.js CSS and the JS file.
            ...
            ...
            "styles": [
              "src/styles.scss",
              "node_modules/intro.js/introjs.css"
            ],
            "scripts": [
              "node_modules/intro.js/intro.js"
            ],
            ...
            ...
-
Import Intro.js to your app.component.ts at the top of your file.
javascript import * as introJs from 'intro.js/intro.js';
-
In the same file, declare a new variable as followed:
javascript introJS = introJs();
-
Now, inside of the same file, add in the ngOnInit the following line:
this.introJS.start();
Your file should look like this:
          @Component({
             selector: 'app-root',
             templateUrl: './app.component.html',
             styleUrls: ['./app.component.scss']
          })
          export class AppComponent implements OnInit {
             introJS = introJs();
             constructor() {}

             ngOnInit() {
                this.introJS.start();
             }
          }
-
Now, go to your app.component.html file and change the following line:
<h1 id="step1">PAGE TITLE</h1>
to
<h1 id="step1" data-intro="Welcome to your new app!">PAGE TITLE</h1>
-
Time to run our angular app. Type in the terminal:
ng serve --o
You should see something like this:

Ayeeee!! Awesome right? time to do some fancy stuff!
Go back to your app.component.ts and add the following code in the constructor.
       this.introJS.setOptions({
          steps: [
          {
             element: '#step1',
             intro: 'Welcome to your new app!',
             position: 'bottom'
          },
          {
             element: '#step2',
             intro: "Ok, wasn't that fun?",
             position: 'right'
          },
          {
             element: '#step3',
             intro: "let's keep going",
             position: 'top'
          },
          {
             element: '#step4',
             intro: 'More features, more fun.',
             position: 'right'
          }
       ],
       showProgress: true
      });
-
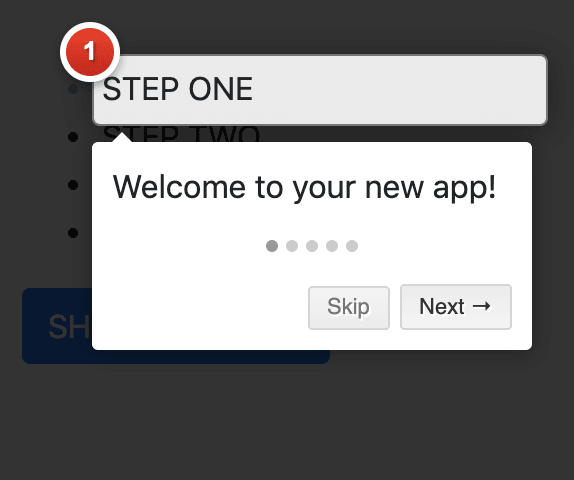
Go to your app (your server should be running already). You should see something like this:
Click on the steps for you to see how Intro.js do its magic.
Now you are wondering: how can I show the steps manually instead
page load? -
Import Intro.js to your sidebar.component.ts at the top of your file .
javascript import * as introJs from 'intro.js/intro.js';
-
Like we did before, in the sidebar.component.ts file, declare a new variable as followed:
javascript introJS = introJs();
-
In the same file, add the following steps in the function:
startSteps()
   this.introJS
      .setOptions({
       steps: [
       {
         element: '#step1-li',
         intro: 'Welcome to steps on the sidebar!',
         position: 'bottom'
       },
       {
         element: '#step2-li',
         intro: "Ok, wasn't that fun?",
         position: 'right'
       },
       {
         element: '#step3-li',
         intro: "let's keep going",
         position: 'top'
       },
       {
         element: '#step4-li',
         intro: 'More features, more fun.',
         position: 'right'
       }
     ],
     hidePrev: true,
     hideNext: false
    })
    .start();
Now, let's add a button that calls the startSteps() function.
html <button class="btn btn-primary" (click)="startSteps()">SHOW ME

  STEPS</button>
Your sidebar.component.html should look like this
   <div class="sidebar-component">
    <ul>
      <li id="step1-li">
        STEP ONE
      </li>
      <li id="step2-li">
        STEP TWO
      </li>
      <li id="step3-li">
        STEP THREE
      </li>
      <li id="step4-li">
        STEP FOUR
      </li>
    </ul>
    <button class="btn btn-primary" (click)="startSteps()">SHOW ME
    STEPS</button>
   </div>
Let's go to our app! Click on the blue button that says "SHOW ME STEPS".
You will see the following:
Finally, you may be wondering how to have steps in between different components.
In your sidebar.components.ts, where you have the array
of options, add this one more option.
          {
            // As you can see, thanks to the element ID
            // I can set a step in an element of an other component
            element: '#step1',
            intro: 'Accessed and element in another component'
          }
Go back to your app, click the blue button again, and follow the steps to see how the last step jumps to the main title that is in a different component.
This is possible thanks to the way Intro.js works to match the string of the element property of the object to the ID of the element in the DOM.
For more INFO:
https://introjs.com/
https://github.com/usablica/intro.js
https://introjs.com/docs/
FINAL CODE REPO:
https://github.com/devpato/intro.js-Angular-Final
Don't forget to show some love to the tutorial :)


Top comments (1)
Very helpful, thanks. Couldn't find a good tutorial anywhere.