
Just want the code? Find this example on github
What is DID.app
DID is an Identity Provider, that authenticates users by verifying access to either an email address or securely stored private key.
This gives users the ability to sign in with a single click without being tracked by the social login providers.
It gives developers the ability to offer a modern authentication without having to handle validating signatures, recovering accounts from lost devices or verifying user email addresses.
Requirements
The Phoenix install guide can help you install Phoenix and Elixir.
New Phoenix project
Start a new Phoenix project.
mix phx.new my_app --no-ecto --no-webpack
cd my_app
--no-ecto --no-webpack We don't need a database or JS bundle for this example
Add the openid_connect package to mix.exs. Don't forget to run mix deps.get.
defp deps do
  [
    {:openid_connect, "~> 0.2.2"}
  ]
end
Supervise the OpenID Connect worker
Add OpenIDConnect.Worker to list of children in lib/my_app/application.ex.
use Application

def start(_type, _args) do
  children = [
    {OpenIDConnect.Worker, did: did_config()},
    # ...
  ]

  opts = [strategy: :one_for_one, name: MyApp.Supervisor]
  Supervisor.start_link(children, opts)
end

defp did_config() do
  client_id = System.get_env("CLIENT_ID")
  client_secret = System.get_env("CLIENT_SECRET")

  [
    discovery_document_uri: "https://did.app/.well-known/openid-configuration",
    client_id: client_id,
    client_secret: client_secret,
    redirect_uri: "http://localhost:4000/session/callback",
    response_type: "code",
    scope: "openid"
  ]
end
These are the appropriate OpenID Connect options for a server rendered application.
The client_id and client_secret will be provided by DID when you create an application.
Create sign in actions
Signing in, or up, using the OpenID connect flow requires two endpoints.
One endpoint redirects the user to the OpenID provider (in this case DID.app) to authenticate themselves.
A second callback endpoint is where the result of authenticating is handled.
We will add both of these in a session controller.
defmodule MyAppWeb.SessionController do
  use MyAppWeb, :controller

  def authenticate(conn, _params) do
    conn
    |> redirect(external: OpenIDConnect.authorization_uri(:did))
  end

  def callback(conn, %{"code" => code}) do
    {:ok, tokens} = OpenIDConnect.fetch_tokens(:did, %{code: code})
    {:ok, claims} = OpenIDConnect.verify(:did, tokens["id_token"])
    user_id = claims["sub"]

    conn
    |> put_session(:user_id, user_id)
    |> redirect(to: "/")
  end
end
Both of these actions need to be added to the router.
scope "/", MyAppWeb do
  pipe_through :browser

  get "/session/authenticate", SessionController, :authenticate
  get "/session/callback", SessionController, :callback
end
Display status to the user
To let our guest users sign in from any page we will add a button to the app layout.
Edit the template in lib/my_notes_web/templates/layout/app.html.eex with the new code.
<%= if Plug.Conn.get_session(@conn, :user_id) do %>
  <!-- show the user something about their account -->
<% else %>
  <%= link "Sign in", to: Routes.session_path(@conn, :authenticate), class: "button" %>
<% end %>
Setup the App on DID
You will need a DID account. Sign up to create one now.
After signing up, you will be directed to set up your first app.
Because we will run on localhost we need to use test app, select test mode.
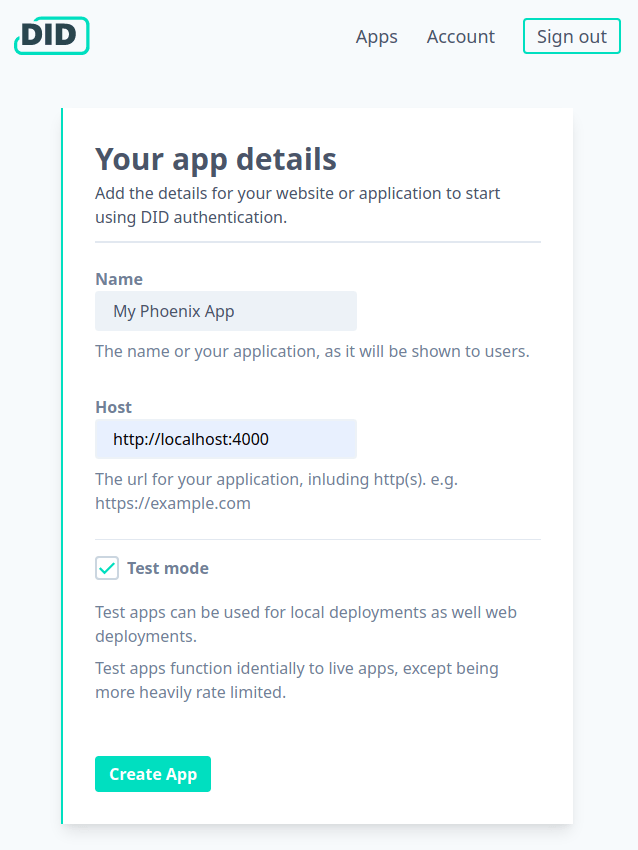
After setting the details for the app, copy the client id and secret for use in our application.
Try it out
Start Phoenix, passing in the required configuration as environment variables.
CLIENT_ID=test_abc CLIENT_SECRET=test_abcdef mix phx.server
Visit localhost:4000,
you should see your new Phoenix app with a shiny sign in button.
Any problems, see this commit for the complete set of changes.
Have a question?
If you have any further questions contact me at peter@did.app.

Top comments (0)