
So you've built a .NET core executable, it's long running (while(true)) and is ready for deploy to your server. Your initial process involves a manual network copy and some wiring on the server to ensure it runs as a service. Maybe a service wrapper? 🐱🚀 After a few refactors and bug fixes with multiple deploys, the process starts to feel a bit like smuggling sand across the Kalahari Desert.
We need a hero.

So let's get to it. The hero of choice for this adventure movie is Ansible.
Requirements:
- WSL2 (running Ubuntu)
- Visual Studio Code / Studio
- A Linux server / localhost
- SSH access via authorized key
Steps:
- What is Ansible
- Install Ansible
- Setup our configuration structure
- Define our Recipe
- Deploy 🎇
Step 1: What is Ansible?
--snip snip--
Ansible is a radically simple IT automation platform that makes your applications and systems easier to deploy and maintain. Automate everything from code deployment to network configuration to cloud management, in a language that approaches plain English, using SSH, with no agents to install on remote systems
In order words, it's our deploy tool.
Step 2: Installing Ansible
Installation on your flavor of Linux is nothing more than,
# <your package manager> install ansible
For Ubuntu the following would work:
$ sudo apt update
$ sudo apt install software-properties-common
$ sudo apt-add-repository --yes --update ppa:ansible/ansible
$ sudo apt install ansible
The installation is not a service but nothing more than a set of executables that you will use to feed a basic recipe to configure the deployment process.
Step 3: Setup our configuration structure
For those who would like to follow on without writing any code I've included a Github repository with the sample.
In my project I usually create a deploy folder as a form of separating concerns. Thereafter, I create my SystemD service file that we will setup on our remote host so we can stop and start our service. You can find a sample service file here.
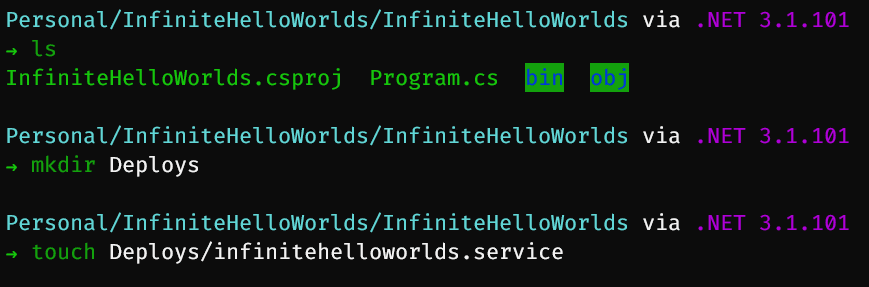
Next we will create a playbook YAML file that will be our configuration, and a hosts YAML file that will represent the host/s we want to deploy too.

Okay so now we have all we need, let's do the configuration.
Step 4: Define Our Recipe
Host configuration
Edit your hosts.yml in the Deploys folder to match the following. This basically supports a configuration of one or more hosts that we could deploy our service too.
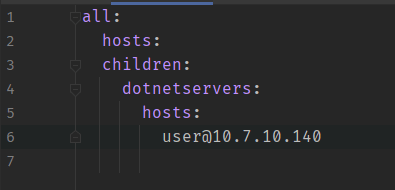
Line 4 is probably the most important as it's the key cross reference (custom name) we leverage in our play book or recipe for the deployment. For more information on configuring your inventory, check out the ansible documentation.
** Be advised you can do this cleanly with an Ansible task, but I haven't, so you will need to create the remote directory or production folder on the remote host.
Deployment playbook
Edit your playbook file and lets add the following code. Anything related to "InfiniteHelloWorlds" can be replaced with your executable name. Just remember, Linux is case sensitive.
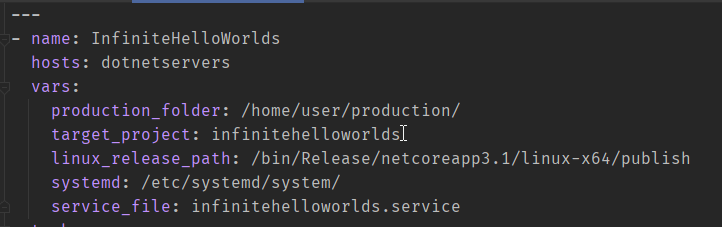
hosts - is that cross reference we mentioned earlier from the hosts.yml.
vars - represent our variables that will use within the configuration itself, the tasks. The production folder is the destination folder of the host to which you will deploy. The linux_release_path is the location of the executable after a dotnet publish as per below.
$ dotnet publish --framework netcoreapp3.1 --runtime linux-x64 -c Release
The next aspect are the actual tasks. This configuration will drive the work of deployment.

There are many kinds of tasks in ansible that apply to deploys for Windows and Linux, you can check that out here.
The tasks are broken down into the following functionality,
Task Steps by Name
- Compress directory before send: Compress published directory found in working directory of .NET Core project.
- Stop service: If the first deploy, you may want to comment this out as the service has not been setup on the host. This is there for ongoing deployments. This can also be done via an Ansible task.
- Copy release files to host: will then copy the archive/zip to the remove host to the production folder specified in the vars.
- Unarchive the code: involves un-compressing the archive onto the local disk of the host.
- Copy systemd file: will then copy from the local unarchived file contents the service file and configure the service by placing the .service file in the SystemD configuration folder.
- Restart the service: lastly, call restart on the service.
And there you have it. All configured and ready to deploy.
Step 5: Deploy
Let's deploy in the project folder (not solution).
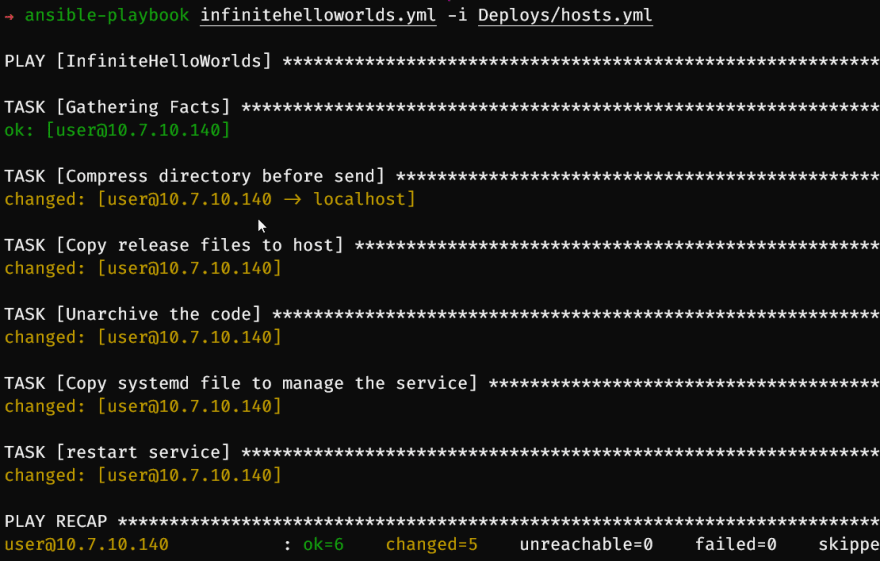
$ ansible-playbook infinitehelloworlds.yml -i Deploys/hosts.yml
That should lead to a fully deployed service, and this is what success will look like.
We have just really touched on the basics today, and this is still pretty rudimentary and not resilient enough. But it's sufficient for a good start and a foundation for more advanced deploys.
Debugging
To troubleshoot the running of your service, you can stop and start the service separately; run the deploy with verbose output, execute a specific step or even run test commands.
$ ansible-playbook --help
$ ansible-playbook InfiniteHelloWorlds/Deploys/infinitehelloworlds.yml -v
$ systemctl stop infinitehelloworlds
$ systemctl start infinitehelloworlds
$ journalctl --lines 100
$ ansible all -m ping
HTH!

Top comments (0)